Regency
®
E18 Gas Fireplace Insert
|
59
59
|
operating instructions
FINAL CHECK
Before leaving this unit with the customer, the
installer must ensure that the appliance is firing
correctly. This includes:
1.
Clocking the appliance to ensure the correct
firing rate (rate noted on label) at 15 minutes.
2.
If required, adjusting the primary air to ensure
that the flame does not carbon. First allow
the unit to burn for 15 min. to stabilize.
3.
Check for proper draft.
7.
Turn gas control knob counter clockwise to
"ON".
8.
Use the rocker switch to operate main burner.
9.
Rotate the variable flame control to adjust the
flame height higher or lower.
10.
Close the bottom louver assembly.
OPERATING
INSTRUCTIONS
Before operating this appliance, proceed through
the following check list.
1.
Read and understand these Instructions
before operating this appliance.
2.
Check to see that all wiring is correct and
enclosed to prevent possible shock.
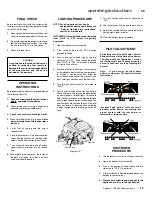
LIGHTING PROCEDURE
NOTE: For all propane units and units
equipped with electric spark boxes, see
"Copy of Lighting Plate Instructions"
section for more details.
IMPORTANT: Gas on/off knob cannot be turned
from "PILOT" to "OFF" unless it is partially
depressed.
1.
Open the bottom louver assembly
2.
If the control knob is in the "OFF" position
proceed to Step 5.
3.
Push in gas control knob slightly and turn
clockwise to "OFF". Knob cannot be turned
from "PILOT" to "OFF" unless knob is pushed
in slightly. Do not force.
4.
Wait five minutes to allow gas, that may have
accumulated in the main burner compartment,
to escape. If you do smell gas, follow the
instructions on the front of this manual. If you
don't smell gas continue on to the next step.
5.
Turn the gas control counter clockwise to
"PILOT".
6.
Push in control knob all the way and hold in.
Continually push and release the black button
on spark igniter until pilot lights. Continue to
hold the control knob in for approximately one
minute, then release the gas control knob. The
pilot flame should continue to burn. If the pilot
does not remain lit, repeat operation allowing
a longer period before releasing gas control
knob.
6.
Verify log placement. If the pilot cannot be
seen when lighting the unit - the logs or the
embers have been incorrectly positioned.
7.
The unit should never be turned off and on
again without a minimum of a 60 second
wait.
8.
When lighting the appliance, the inside of
the glass may fog up, this will burn off after
a few minutes of operation.
3.
Check to ensure there are no gas leaks.
4.
Make sure the glass door is in place.
Never
operate the appliance with the door glass
removed.
5.
Verify that all venting and the cap is
unobstructed.
Gas In
Shut Off
Hi-Low
Pilot Adjust
Gas Out
TPTH
TP
TH
CAUTION
Any alteration to the product that causes
sooting or carboning that results in
damage to the unit is not the responsibility
of the manufacturer and will not be
covered by the warranty.
Diagram 16.1
SHUTDOWN
PROCEDURE
1.
Use the rocker switch to turn off the main burner.
2.
Open the bottom louver assembly.
3.
Push in the gas control knob slightly and turn
clockwise to "OFF". Do not force.
4. Pilot must be shut off during prolonged non use
periods to conserve fuel.
4. Disconnect all electric power and gas to the
appliance if service is to be performed.
Incorrect flame pattern will have small,
probably yellow flames, not coming into
proper contact with the rear burner or
thermopile or thermocouple.
PILOT ADJUSTMENT
Periodically check the pilot flames. Correct
flame pattern has three strong blue flames:
1 flowing around the thermopile, 1 around
the thermocouple and 1 flowing across the
burner (it does not have to be touching the
burner).
Note:
If you have an incorrect flame
pattern, contact your FPI dealer for further
instructions.
Summary of Contents for E18-LP
Page 1: ......
Page 74: ...Regency E18 Gas Fireplace Insert 73 73 notes ...
Page 75: ...74 Regency E18 Gas Fireplace Insert 74 notes ...

