Regency
®
E18 Gas Fireplace Insert
|
43
43
|
installation
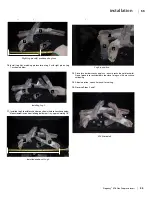
Leg Height
Existing Firebox
Vent Slide Plate
Outer Shell Legs (x2)
Fastening Screws
Outer Shell Screws (x4)
Vent Slide Plate
attachement screw
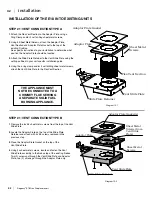
Step #2: Outer Shell Installation
The E18 was designed to be
installed in a modular fashion,
making it easier for the installer to
locate and install the various
components without having to
support the weight of the entire
appliance. The Wire Harness comes
installed from factory in order that
no connections need to be made in
the field.
1) Slide the Outer Shell rearward and
into the existing firebox being
carefull to make sure that the Vent
Slide Plate is properly engaged in the
slide provisions of the Outer Shell.
Move the Outer Shell rearward until
the left and right flanges are up
against the existing firebox.
2) Adjust the Outer Shell Legs down
to the setting noted for your specific
installation. If these settings are not
correct, the Surround Panels will not
fit correctly in your particular
installation.
3) Attach the Vent Slide Plate to the
Outer Shell with one sheet metal
screw as shown. Do not attach the
Outer Shell to the existing firebox at
this point.
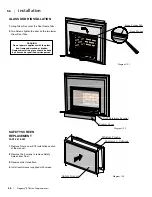
Drafthood
Bottom
Drafthood Slide
Control Box
Surround
Mounting
Bracket
Left
Wire Harness
Upper Drafthood
Baffle
Surround Mounting
Bracket Right
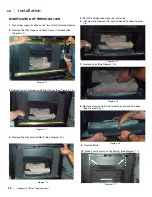
Step #3: Firebox Installation
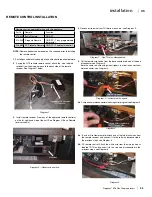
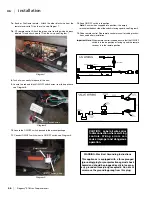
1) Install the Upper Drafthood Baffle onto the Outer Shell using 4 screws provided.
2) The Firebox installs into the Outer Shell by sliding the Drafthood Bottom onto the Drafthood
Slide until you are able to install 4 screws to secure the Firebox, 2 located in each inner lower
Firebox Sides. While you are installing the Firebox, care must be taken to avoid damaging the
Wire Harness until it can be secured in following steps.
3) The unit is installed correctly when the flanges that secure the Firebox to the Outer Shell are
touching. Making sure that the unit is centered within the existing firebox, attach the Outer
Shell to the existing firebox using 4x sheet metal screws as shown in Step #2.
4) Install 2 screws at the lower front edge corners of the Drafthood Bottom to secure the
Drafthood. These screws may need to be self drilling to screw into or through the existing
firebox.
5) Make sure that your unit is sitting at the correct height and that the Outer Shell is square
and centered in the install, fasten the Outer Shell to the existing firebox using self drilling and
tapping screws.
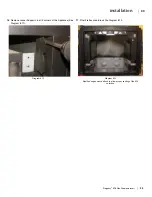
6) Locate and install the Surround Mounting Brackets Right and Left.
7) Using 2 screws provided, install the Control Box into a slot provided in the Surround
Mounting Bracket Left.
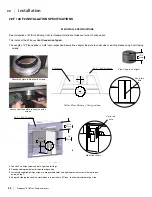
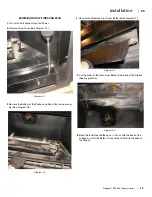
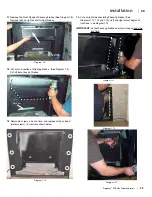
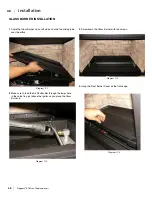
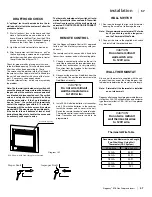
STEP #2: OUTER SHELL INSTALLATION
1
. Slide outer shell back into the existing firebox, ensure the vent slide
plate is properly engaged with the outer shell.
Move the outer shell back until the left and right flanges contact
the existing firebox.
2.
Adjust the outer shell legs to the setting noted for your specific
installation. If these settings are not adhered to, the surround will not fit
correctly.
3.
Attach the bent slide plate to the outer shell with one sheet metal
screw as shown in Figure 10.3. Refer to the applicable existing appli-
ance for correct measurements before securing outer shell in position.
4
. Ensure the unit is set at the correct height and the outer shell is square
and centered, fasten the outer shell to the existing firebox using self
tapping screws.
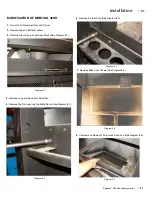
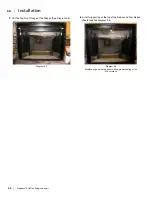
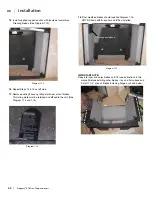
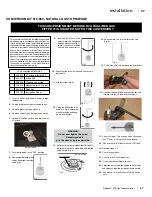
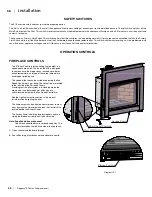
1.
Ensure thermodiscs and thermodisc brackets are in
place.
2
. Install the firebox into the outer shell by sliding the
drafthood bottom onto the drafthood slide until you are
able to install 4 screws to secure the firebox. Use care
to avoid damaging the wire harness.
Note:
2 of the screws along with panel brackets to be
installed on the lower inside of the firebox.
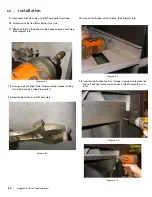
3
. Unit is installed correctly when the flanges that se-
cure the firebox to the outer shell contact. Ensure the
unit is centered within the existing firebox, attach the
outer shell to the existing firebox using 4 x sheet metal
screws.
4
. Install 2 self tapping screws at the front edge corners of
the drafthood bottom to secure the drafthood.
5
. Install 1 x Phillips screw to fasten drafthood. Install 2 x
Phillips screws to secure left and right side of thermo-
disc bracket.
STEP #3: FIREBOX INSTALLATION
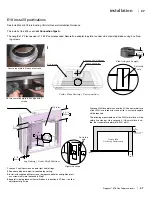
Diagram 10.3
Diagram 10.4
ZC box existing Unit
Measured from
Top of ZC box
Measured from side of
ZC box
EP28
8-7/16" (215mm)
1-7/16" (37mm)
28F - 28F2
7-3/16" (183mm)
1-1/2" (39mm)
Montigo 36SR
6-3/8" (162mm)
1-9/16" (40mm)
Firesong 220N
8-3/16" (208mm)
2-1/8" (54mm)
Summary of Contents for E18-LP
Page 1: ......
Page 74: ...Regency E18 Gas Fireplace Insert 73 73 notes ...
Page 75: ...74 Regency E18 Gas Fireplace Insert 74 notes ...


