


46
d) Switching the quadrocopter on
So that the receiver in the quadrocopter can react to the transmitter signal, the receiver and the transmitter have the
same digital coding (binding) when delivered from the factory. When it is switched on, the transmitter runs a synchro-
nisation process to test whether it is connected to the assigned receiver. For this reason it is important that you switch
on the quadrocopter exactly as described below.
Insert the charged flight battery into the quadrocopter as described above and place the quadrocopter on a flat
surface.
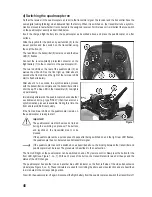
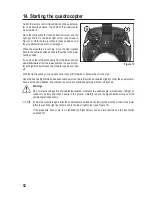
Slide the joystick for the pitch and yaw function (9) to the
lowest position and then switch on the transmitter using
the on/off button (8).
The red LED on the transmitter (6) remains on and the blue
LED (5) flashes.
Connect the reverse-polarity protected connector on the
flight battery (1) to the connector on the quadrocopter (2).
The two red LEDs on the rear of the quadrocopter (3), as
well as the white LED on the front light up. After about 2
seconds the front LED and the right of the two rear LEDs
start to flash alternately.
After about 2 to 3 seconds, the synchronisation process
with the transmitter is complete and the transmitter emits a
short beep. The blue LED in the transmitter (5) now lights
up permanently.
Immediately afterwards, the quadrocopter checks whether
a suitable monitor (e.g. type "HS001”) that it can also run a
synchronisation process is available. During this time, the
front and rear LEDs flicker quickly.
If the front and rear LEDs on the quadrocopter remain on,
the quadrocopter is ready to start.
Important!
The quadrocopter must not be moved or turned
during the switching on process! The buttons
and joystick on the transmitter must not be
pressed.
If the quadrocopter emits a quick series of beeps after being switched on and the right rear LED flashes,
the quadrocopter has not detected a valid transmitter signal.
If the quadrocopter cannot be switched on as described above, the binding between the transmitter and
quadrocopter must be reset. The procedure is described in the next section.
The front LED light on the quadrocopter can be switched on and off by remote control. Now press the button for the
front LED light (see Figure 1, no. 7). With each press of the button, the transmitter emits two short beeps and the
status of the LED changes.
The quadrocopter has another red and another blue LED indicator on the front left side of the video transmission
module (see Figure 5, no. 6). These indicators are used for controlling the photo and video function and are described
in more detail in the corresponding section.
To switch the quadrocopter off again, disconnect the flight battery from the quadrocopter and switch the transmitter off.
Figure 7