background image

Chapter 2. Installing Red Hat Enterprise Linux

11

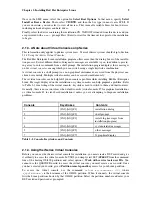
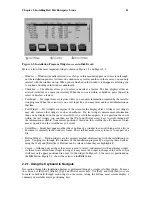
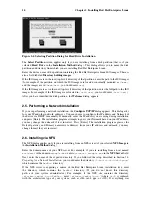
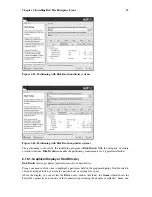
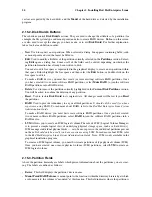
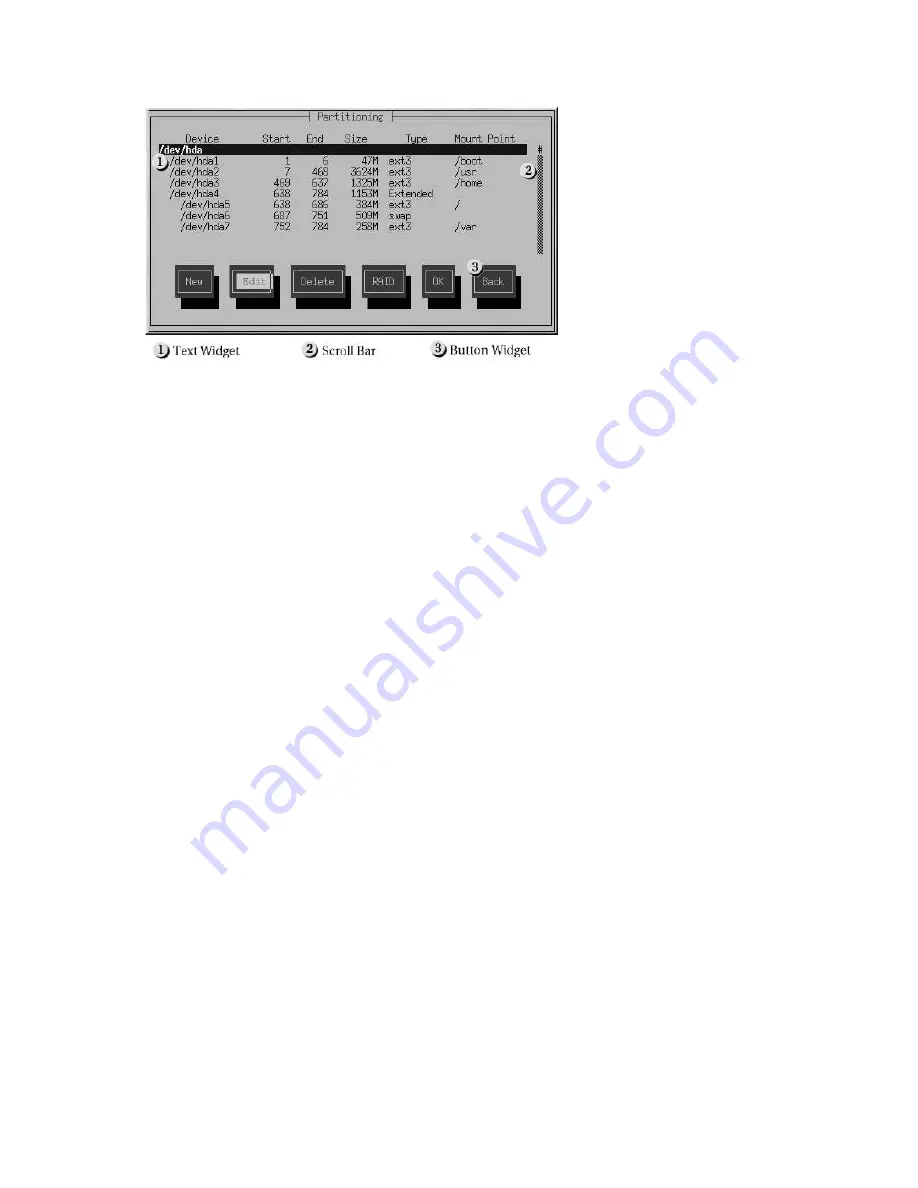
Figure 2-3. Installation Program Widgets as seen in Disk Druid

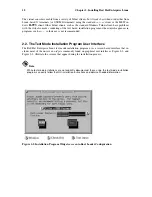
Here is a list of the most important widgets shown in Figure 2-2 and Figure 2-3:

Window — Windows (usually referred to as

dialogs

in this manual) appear on your screen through-

out the installation process. At times, one window may overlay another; in these cases, you can only

interact with the window on top. When you are finished in that window, it disappears, allowing you

to continue working in the window underneath.

Checkbox — Checkboxes allow you to select or deselect a feature. The box displays either an

asterisk (selected) or a space (unselected). When the cursor is within a checkbox, press [Space] to

select or deselect a feature.

Text Input — Text input lines are regions where you can enter information required by the installa-

tion program. When the cursor rests on a text input line, you may enter and/or edit information on

that line.

Text Widget — Text widgets are regions of the screen for the display of text. At times, text widgets

may also contain other widgets, such as checkboxes. If a text widget contains more information

than can be displayed in the space reserved for it, a scroll bar appears; if you position the cursor

within the text widget, you can then use the [Up] and [Down] arrow keys to scroll through all

the information available. Your current position is shown on the scroll bar by a

#

character, which

moves up and down the scroll bar as you scroll.

Scroll Bar — Scroll bars appear on the side or bottom of a window to control which part of a list or

document is currently in the window’s frame. The scroll bar makes it easy to move to any part of a

file.

Button Widget — Button widgets are the primary method of interacting with the installation pro-

gram. You progress through the windows of the installation program by navigating these buttons,

using the [Tab] and [Enter] keys. Buttons can be selected when they are highlighted.

Cursor — Although not a widget, the cursor is used to select (and interact) with a particular widget.

As the cursor is moved from widget to widget, it may cause the widget to change color, or the cursor

itself may only appear positioned in or next to the widget. In Figure 2-2, the cursor is positioned on

the

OK

button. Figure 2-3, shows the cursor on the

Edit

button.

2.2.1. Using the Keyboard to Navigate

Navigation through the installation dialogs is performed through a simple set of keystrokes. To move

the cursor, use the [Left], [Right], [Up], and [Down] arrow keys. Use [Tab], and [Alt]-[Tab] to cycle

forward or backward through each widget on the screen. Along the bottom, most screens display a

summary of available cursor positioning keys.

Summary of Contents for ENTERPRISE LINUX 3 - FOR IBM ESERVER ISERIES AND IBM ESERVER PSERIES

Page 1: ...Red Hat Enterprise Linux 3 Installation Guide for the IBM eServer iSeries and IBM eServer pSeries Architectures ...

Page 2: ...x is a registered trademark of Linus Torvalds Motif and UNIX are registered trademarks of The Open Group XFree86 is a trademark of The XFree86 Project Inc and is pending registration Intel and Pentium are registered trademarks of Intel Corporation Itanium and Celeron are trademarks of Intel Corporation AMD Opteron Athlon Duron and K6 are registered trademarks of Advanced Micro Devices Inc Netscape...

Page 3: ...ing the Keyboard to Navigate 11 2 3 Installing from CD ROM 12 2 3 1 What If the IDE CD ROM Was Not Found 12 2 4 Installing from a Hard Drive 13 2 5 Performing a Network Installation 14 2 6 Installing via NFS 14 2 7 Installing via FTP 15 2 8 Installing via HTTP 16 2 9 Welcome to Red Hat Enterprise Linux 16 2 10 Language Selection 17 2 11 Keyboard Configuration 17 2 12 Mouse Configuration 18 2 13 Di...

Page 4: ...3 5 Are You Seeing Python Errors 49 B 4 Problems After Installation 50 B 4 1 Unable to IPL from NWSSTG 50 B 4 2 Booting into a Graphical Environment 50 B 4 3 Problems with the X Window System GUI 51 B 4 4 Problems When You Try to Log In 52 B 4 5 Your Printer Will Not Work 52 B 4 6 Apache based httpd service Sendmail Hangs During Startup 52 C An Introduction to Disk Partitions 53 C 1 Hard Disk Basi...

Page 5: ...considered to be part of the command so the entire phrase is displayed as a command For example Use the cat testfile command to view the contents of a file named testfile in the current working directory file name File names directory names paths and RPM package names are represented this way This style should indicate that a particular file or directory exists by that name on your system Examples...

Page 6: ... text can be found on a clickable button on a GUI screen For example Click on the Back button to return to the webpage you last viewed computer output Text in this style indicates text displayed to a shell prompt such as error messages and responses to commands For example The ls command displays the contents of a directory For example Desktop about html logs paulwesterberg png Mail backupfiles ma...

Page 7: ...uration file the changes will not take effect until you restart the DHCP daemon Caution Do not perform routine tasks as root use a regular user account unless you need to use the root account for system administration tasks Warning Be careful to remove only the necessary Red Hat Enterprise Linux partitions Removing other parti tions could result in data loss or a corrupted system environment 2 How...

Page 8: ...izers have interpreting graphics Red Hat Enterprise Linux is an ideal operating system for users with visual limitations because the GUI is not required by the kernel Most modern tools including email news Web browsers calendars calcu lators and much more can run on Linux without a graphical environment The working environment can also be customized to meet the hardware or software needs of the us...

Page 9: ...ts online go to http www redhat com docs 1 2 Registering Your Product Registration enables access to the Red Hat Services you have purchased such as technical support and Red Hat Network To register your product go to http www redhat com apps activate Note You must activate your product before attempting to connect to Red Hat Network If your product has not been activated Red Hat Network rejects r...

Page 10: ...me of the Logical Partition you created in SST it should be of type Guest and Codepage 437 For a basic NWSD use None for the Resource Name and keep the defaults for all the other fields the boot fields are setup in Section 2 1 1 Booting the iSeries Installation Program Assuming you plan on using a virtual disk rather than native SCSI using the ibmsis driver create an NWSSTG virtual disk by executi...

Page 11: ...ote The directory specified in the following refers to location of disk space This means it is the directory up to but not including the RedHat distribution directory For example if you have Red Hat Enterprise Linux 3 installation files located in export redhat on the installation staging server location of disk space would be export redhat To copy the RedHat directory from the installation CD ROM...

Page 12: ...ges for NFS Installs NFS installations can use ISO or CD ROM images rather than copying an entire installation tree After placing the required ISO images the binary Red Hat Enterprise Linux CD ROMs in a directory choose to install via NFS You will then point the installation program at that directory to perform the installation Verifying that the ISO images are intact before you attempt an install...

Page 13: ...es from each installation CD ROMs For each CD ROM execute the following command on a Linux system dd if dev cdrom of tmp file name iso ISO images transfer these images to the system to be installed Verifying that ISO images are intact before you attempt an installation helps to avoid problems To verify the ISO images are intact prior to performing an installation use an md5sum program many md5sum ...

Page 14: ...6 Chapter 1 Steps to Get You Started ...

Page 15: ...am offers the full functunality of the Red Hat Enterprise Linux installation program including LVM configuration which is not available during a text mode installation Users who must use the text mode installation program can easily follow the GUI installation instruc tions and obtain all needed information iSeries system users must remember to add boot options as are listed in this manual Appendi...

Page 16: ...For more information on available boot commands refer to Appendix E Additional Boot Options Use a Telnet client to connect to the virtual console of the OS 400 partition hosting your Linux par tition using a command like telnet hosting partition 2301 Refer to Section 2 1 4 Using the iSeries Virtual Consoles for more details on using the virtual console Vary on the NWS The boot sequence begins on t...

Page 17: ...nter a problem while installing Red Hat Enterprise Linux Messages displayed on the installation or system consoles can help pinpoint a problem Refer to Table 2 1 for a listing of the virtual consoles keystrokes used to switch to them and their contents Generally there is no reason to leave the default console virtual console 7 for graphical installations or virtual console 1 for text based install...

Page 18: ...rams such as vi so their use is not recommended 2 2 The Text Mode Installation Program User Interface The Red Hat Enterprise Linux text mode installation program uses a screen based interface that in cludes most of the on screen widgets commonly found on graphical user interfaces Figure 2 2 and Figure 2 3 illustrate the screens that appear during the installation process Note While text mode insta...

Page 19: ...rsor within the text widget you can then use the Up and Down arrow keys to scroll through all the information available Your current position is shown on the scroll bar by a character which moves up and down the scroll bar as you scroll Scroll Bar Scroll bars appear on the side or bottom of a window to control which part of a list or document is currently in the window s frame The scroll bar makes...

Page 20: ... drive If found continue to the next stage of the installation process refer to Section 2 10 Language Selection Note To cancel the installation process at this time iSeries users should vary off the NWS and pSeries users should press the computer s Reset button or use the Control Alt Delete key combination to restart your machine You can safely cancel the installation at any point before the About...

Page 21: ... a directory choose to install from the hard drive You can then point the installation program at that directory to perform the installation Verifying that the ISO images are intact before you attempt an installation will help to avoid problems that are often encountered during a hard drive installation To verify the ISO images are intact prior to performing an installation use an md5sum program m...

Page 22: ...configure the IP address and Netmask of the device via DHCP or manually If manually enter the IP address you are using during installation and press Enter The installation program attempts to guess your Netmask based on your IP address you may change the netmask if it is incorrect Press Enter The installation program guesses the Default gateway and Primary nameserver addresses from your IP address...

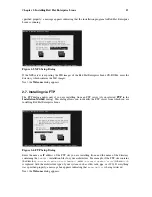
Page 23: ...d FTP in the Installation Method dialog This dialog allows you to identify the FTP server from which you are installing Red Hat Enterprise Linux Figure 2 6 FTP Setup Dialog Enter the name or IP address of the FTP site you are installing from and the name of the directory containing the RedHat installation files for your architecture For example if the FTP site contains the directory mirrors redhat...

Page 24: ...the name or IP address of the HTTP site you are installing from and the name of the directory containing the RedHat installation files for your architecture For example if the HTTP site contains the directory mirrors redhat arch RedHat enter mirrors redhat arch where arch is replaced with the architecture type of your system such as i386 ia64 ppc or s390 If everything was specified properly a mess...

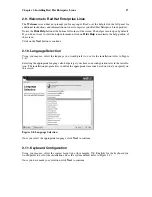
Page 25: ...button to continue 2 10 Language Selection Using your mouse select the language you would prefer to use for the installation refer to Figure 2 8 Selecting the appropriate language also helps target your time zone configuration later in the installa tion The installation program tries to define the appropriate time zone based on what you specify on this screen Figure 2 8 Language Selection Once you...

Page 26: ...ction for futher installation instructions Choose the correct mouse type for your system If you cannot find an exact match choose a mouse type that you are sure is compatible with your system refer to Figure 2 10 To determine your mouse s interface follow the mouse cable back to where it plugs into your system and use the following diagrams If your mouse is a serial mouse the port looks similar to...

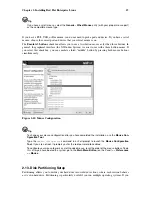
Page 27: ...dle button by pressing both mouse buttons simultaneously Figure 2 10 Mouse Configuration Tip To change your mouse configuration after you have completed the installation use the Mouse Con figuration Tool Type the redhat config mouse command in a shell prompt to launch the Mouse Configuration Tool If you are not root it prompts you for the root password to continue To configure your mouse to work a...

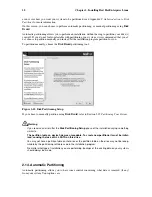
Page 28: ...ure 2 11 Disk Partitioning Setup If you chose to manually partition using Disk Druid refer to Section 2 15 Partitioning Your System Warning If you receive an error after the Disk Partitioning Setup phase of the installation saying something similar to The partition table on device hda was unreadable To create new partitions it must be initial ized causing the loss of ALL DATA on this drive You may...

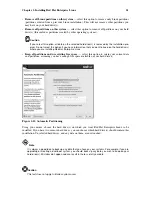
Page 29: ... are installing Red Hat Enterprise Linux Keep all partitions and use existing free space select this option to retain your current data and partitions assuming you have enough free space available on your hard drive s Figure 2 12 Automatic Partitioning Using your mouse choose the hard drive s on which you want Red Hat Enterprise Linux to be installed If you have two or more hard drives you can cho...

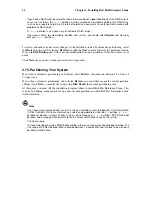
Page 30: ...ur System If you chose automatic partitioning and did not select Review skip ahead to Section 2 16 Network Configuration If you chose automatic partitioning and selected Review you can either accept the current partition settings click Next or modify the setup using Disk Druid the manual partitioning tool At this point you must tell the installation program where to install Red Hat Enterprise Linu...

Page 31: ...tioning requirements for a typical installation 2 15 1 Graphical Display of Hard Drive s Disk Druid offers a graphical representation of your hard drive s Using your mouse click once to highlight a particular field in the graphical display Double click to edit an existing partition or to create a partition out of existing free space Above the display you can review the Drive name such as dev hda t...

Page 32: ...to confirm the deletion of any partition Reset Used to restore Disk Druid to its original state All changes made will be lost if you Reset the partitions RAID Used to provide redundancy to any or all disk partitions It should only be used if you have experience using RAID To read more about RAID refer to the Red Hat Enterprise Linux System Administration Guide To make a RAID device you must first ...

Page 33: ...e RAM For more than 1 GB of RAM 2 GB of swap is recommended Creating a large swap space partition can be especially helpful if you plan to upgrade your RAM at a later time Tip If your partitioning scheme requires a swap partition that is larger than 2 GB you should create an additional swap partition For example if you have 4 GB of RAM you may want to create two 2 GB swap partitions A PPC PReP boo...

Page 34: ...Enterprise Linux are written to var spool update and require approximately 1 0 GB of disk space available when updating your system 2 15 5 Adding Partitions To add a new partition select the New button A dialog box appears refer to Figure 2 15 Note You must dedicate at least two partitions for this installation and optionally more For more informa tion refer to Appendix C An Introduction to Disk P...

Page 35: ...n ext2 file system supports standard Unix file types regular files directories symbolic links etc It provides the ability to assign long file names up to 255 characters ext3 The ext3 file system is based on the ext2 file system and has one main advantage journaling Using a journaling file system reduces time spent recovering a file system after a crash as there is no need to fsck1 the file system ...

Page 36: ...n 2 16 Network Configuration If you do not have a network device physical LAN card or virtual LAN this screen is not shown Skip ahead to Section 2 17 Firewall Configuration Figure 2 16 Network Configuration The installation program automatically detects any network devices you have and display them in the Network Devices list Once you have selected a network device click Edit From the Edit Interfa...

Page 37: ...ary Secondary and Tertiary DNS addresses Tip Even if your computer is not part of a network you can enter a hostname for your system If you do not take this opportunity to enter a name your system will be known as localhost Tip To change your network configuration after you have completed the installation use the Network Administration Tool Type the redhat config network command in a shell prompt ...

Page 38: ...f you are connecting your system to the Internet but do not plan to run a server this is the safest choice Next select which services if any should be allowed to pass through the firewall Enabling these options allow the specified services to pass through the firewall Note these services may not be installed on the system by default Make sure you choose to enable any options that you may need WWW ...

Page 39: ...specify multiple ports separate them with commas Finally select any devices should allow access to your system for all traffic from that device Selecting any of these trusted devices excludes them from the firewall rules For example if you are running a local network but are connected to the Internet via a PPP dialup you can check eth0 and any traffic coming from your local network is allowed Sele...

Page 40: ...guage configuration after you have completed the installation use the Language Configuration Tool Type the redhat config language command in a shell prompt to launch the Language Configu ration Tool If you are not root it prompts you for the root password to continue 2 19 Time Zone Configuration You can set your time zone by selecting your computer s physical location or by specifying your time zo...

Page 41: ...stallation use the Time and Date Properties Tool Type the redhat config date command in a shell prompt to launch the Time and Date Properties Tool If you are not root it prompts you for the root password to continue To run the Time and Date Properties Tool as a text based application use the command timeconfig 2 20 Set Root Password Setting up a root account and password is one of the most importa...

Page 42: ... of the installation process without entering a root password The root password must be at least six characters long the password you type is not echoed to the screen You must enter the password twice if the two passwords do not match the installation program asks you to enter them again You should make the root password something you can remember but not something that is easy for someone else to...

Page 43: ...rd Tool If you are not root it prompts you for the root password to continue 2 21 Package Group Selection After your partitions have been selected and configured for formatting you are ready to select pack ages for installation First a screen appears that details the default package set for your Red Hat Enterprise Linux installa tion This screen varies depending on the version of Red Hat Enterpris...

Page 44: ...pport and Compatibility Arch Development Support packages to install architecure specific support for their systems To select a component click on the checkbox beside it refer to Figure 2 23 Figure 2 23 Package Group Selection Select each component you wish to install Selecting Everything at the end of the component list installs all packages included with Red Hat Enterprise Linux Once a package g...

Page 45: ...stalled If you wish to abort the installation you should reboot now before any existing information on any hard drive is rewritten To cancel the installation process at this time use the following instruction methods iSeries users should vary off the NWS at the green screen pSeries users should press the computer s Reset button or use the Control Alt Delete key com bination to restart your machine...

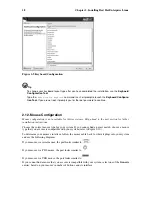
Page 46: ...ration does not apply to users of iSeries systems or users of headless pSeries systems 2 25 1 Configuring Your Monitor The installation program presents you with a list of monitors to select from From this list you can either use the monitor that is automatically detected for you or choose another monitor If your monitor does not appear on the list select the most appropriate Generic CRT or Generi...

Page 47: ...your monitor selection or the horizontal and vertical ranges are incorrect you can click the Restore original values button to return to the original suggested settings Click Next when you have finished configuring your monitor 2 25 2 Custom Configuration Choose the correct color depth and resolution for your X configuration You can also choose whether you want to boot your system into a graphical...

Page 48: ... The installation program prompts you to prepare your system for reboot iSeries Completing the Installation When the installation program completes it prompts you to press the Enter key The LPAR then reboots with the installed Red Hat Enterprise Linux OS The installation program has completed the following tasks Installed a kernel to the B slot and kernel parameters ro root LABEL Installed a kerne...

Page 49: ...sponding to the boot label Press Tab for pSeries systems at the boot prompt for a list of valid boot labels Do nothing after YABOOT s timeout period by default five seconds YABOOT automat ically boots the default boot entry Once Red Hat Enterprise Linux has booted one or more screens of messages should scroll by Eventually a login prompt or a GUI login screen if you installed the X Window System a...

Page 50: ...lection the installation program at tempts to mount the disk partitions on your system It then presents you with a shell prompt where you can make the changes you need These changes may include storing the kernel and command line into the IPL source as described in the Installation Complete section Section 2 26 Installation Complete When your changes are complete you can exit the shell using exit ...

Page 51: ...e except that the IPL source should point to the copy of boot img on your IFS from step 1 above 5 Make sure the installation disc is not in your CD ROM drive 6 IPL the Linux system 7 Follow the prompts as decribed in Section 2 27 iSeries and pSeries Rescue Mode An addi tonal prompt for the installation source appears Select NFS or FTP as appropriate and com plete the following network configuratio...

Page 52: ...44 Chapter 2 Installing Red Hat Enterprise Linux ...

Page 53: ...ration solution will assist you in moving to Red Hat Enterprise Linux First you must back up any existing data that you wish to keep for future use under Red Hat Enterprise Linux Make sure to back up any necessary configuration files as well such as the the configuration files from etc Once you have completed a backup of your data you can reinstall the system using the instructions provided in thi...

Page 54: ...46 Appendix A Red Hat Linux to Red Hat Enterprise Linux Migration Solution ...

Page 55: ...ng off the CPU cache in the firmware You could also try to swap your memory around in the motherboard slots to check if the problem is either slot or memory related You can also try running the installation with only 256 MB of memory This can be done by booting the installation program with the mem 256M boot option To try this option at the installation boot prompt type mem xxxM where xxx should b...

Page 56: ...nfiguration Figure B 1 Mouse Not Detected B 3 Trouble During the Installation B 3 1 No devices found to install Red Hat Enterprise Linux Error Message If you receive an error message stating No devices found to install Red Hat Enterprise Linux there is probably a SCSI controller that is not being recognized by the installation program Check your hardware vendor s website to determine if a driver d...

Page 57: ...n the installation program No matter what type of installation you are performing backups of the existing data on your systems should always be made B 3 4 Other Partitioning Problems for iSeries and pSeries System Users If you are using Disk Druid to create partitions but cannot move to the next screen you probably have not created all the partitions necessary for Disk Druid s dependencies to be s...

Page 58: ...cannot write information and fails If you experience such an error first try to download any available errata for anaconda Errata can be found at http www redhat com support errata The anaconda website may also be a useful reference and can be found online at http rhlinux redhat com anaconda You can also search for bug reports related to this problem To search Red Hat s bug tracking system go to h...

Page 59: ... file with gedit The file etc inittab will open Within the first screen a section of the file which looks like the following appears Default runlevel The runlevels used by RHS are 0 halt Do NOT set initdefault to this 1 Single user mode 2 Multiuser without NFS The same as 3 if you do not have networking 3 Full multiuser mode 4 unused 5 X11 6 reboot Do NOT set initdefault to this id 3 initdefault T...

Page 60: ... become root To become root type su and enter your root password when prompted Then type passwd username This allows you to enter a new password for the specified user account If the graphical login screen does not appear check your hardware for compatibility issues The Hard ware Compatibility List can be found at http hardware redhat com hcl B 4 5 Your Printer Will Not Work If you are not sure ho...

Page 61: ... systems sharing disk space with other operating systems and related topics C 1 Hard Disk Basic Concepts Hard disks perform a very simple function they store data and reliably retrieve it on command When discussing issues such as disk partitioning it is important to know a bit about the underlying hardware Unfortunately it is easy to become bogged down in details Therefore this appendix uses a sim...

Page 62: ... easy Figure C 3 Disk Drive with a Different File System Of course writing a file system to disk is only the beginning The goal of this process is to actually store and retrieve data Let us take a look at our drive after some files have been written to it Figure C 4 Disk Drive with Data Written to It As Figure C 4 shows some of the previously empty blocks are now holding data However by just looki...

Page 63: ...agrams Figure C 5 Disk Drive with Partition Table As Figure C 5 shows the partition table is divided into four sections Each section can hold the information necessary to define a single partition meaning that the partition table can define no more than four partitions Each partition table entry contains several important characteristics of the partition The points on the disk where the partition ...

Page 64: ...eric values Partition Type Value Partition Type Value Empty 00 Novell Netware 386 65 DOS 12 bit FAT 01 PIC IX 75 XENIX root 02 Old MINIX 80 XENIX usr 03 Linux MINUX 81 DOS 16 bit 32M 04 Linux swap 82 Extended 05 Linux native 83 DOS 16 bit 32 06 Linux extended 85 OS 2 HPFS 07 Amoeba 93 AIX 08 Amoeba BBT 94 AIX bootable 09 BSD 386 a5 OS 2 Boot Manager 0a OpenBSD a6 Win95 FAT32 0b NEXTSTEP a7 Win95 F...

Page 65: ...ition As this figure implies there is a difference between primary and logical partitions there can only be four primary partitions but there is no fixed limit to the number of logical partitions that can exist However due to the way in which partitions are accessed in Linux you should avoid defining more than 12 logical paritions on a single disk drive Now that we have discussed partitions in gen...

Page 66: ...pace allocated to the unused partition You first must delete the partition and then create the appropriate Linux partition s in its place You can create partitions manually during the installation process and delete the partition before creating a new one C 1 5 Partition Naming Scheme Linux refers to disk partitions using a combination of letters and numbers which may be confusing particularly if ...

Page 67: ...r to understand when you are setting up the partitions Red Hat Enterprise Linux requires C 1 6 Disk Partitions and Other Operating Systems If your Red Hat Enterprise Linux partitions are sharing a hard disk with partitions used by other oper ating systems most of the time you will have no problems However there are certain combinations of Linux and other operating systems that require extra care C...

Page 68: ...e partitions to be used by your new operating system The question of how many partitions continues to spark debate within the Linux community and without any end to the debate in sight it is safe to say that there are probably as many partition layouts as there are people debating the issue Keeping this in mind we recommend that unless you have a reason for doing otherwise you should at least crea...

Page 69: ...skette or CD ROM that a hardware vendor includes with a piece of hardware Driver media is used if you need access to a particular device to install Red Hat Enterprise Linux Drivers can be used for network NFS installations installations using a PCMCIA or block device non standard or very new CD ROM drives SCSI adapters NICs and other uncommon devices Note If an unsupported device is not needed to ...

Page 70: ...ver as a diskette CD ROM or file name when it is needed However there are some cases where you must specifically tell the Red Hat Enterprise Linux instal lation program to load that driver diskette and use it during the installation process For example to specifically load a driver diskette that you have created begin the installation process by booting from the Red Hat Enterprise Linux CD 1 or th...

Page 71: ... command allows remote display forwarding In this command IP should be replaced with the IP address of the system on which you want the display to appear On the system you want the display to appear on you must execute the command xhost remotehostname where remotehostname is the name of the host from which you are running the original display Using the command xhost remotehostname limits access to...

Page 72: ...ng an installation nousb This command disables the loading of USB support during the installation If the installation program tends to hang early in the process this command may be helpful nousbstorage This command disables the loading of the usbstorage module in the installation program s loader It may help with device ordering on SCSI systems rescue This command runs rescue mode Refer to the Red...

Page 73: ...Appendix E Additional Boot Options 65 vncpassword This command sets the password used to connect to the VNC server ...

Page 74: ...66 Appendix E Additional Boot Options ...

Page 75: ...SI 12 clock 32 configuration clock 32 network 28 time 32 time zone 32 consoles virtual 9 iSeries 9 conventions document i D DASD installation 13 deleting partitions 28 Disk Druid adding partitions 26 file system type 27 buttons 24 deleting partitions 28 editing partitions 28 partitions 22 disk partitioning 19 disk space 2 diskette media 61 documentation other manuals 1 driver media 61 produced by ...

Page 76: ...roblems IDE CD ROM related 12 program graphical user interface 7 text mode user interface 10 virtual consoles 9 registering your product 1 starting 12 installing packages 35 introduction i iSeries booting the installation program 7 iSeries hardware specific documentation 1 iSeries rescue mode 42 accessing SCSI utilities 42 iSeries virtual consoles 9 K kernel boot options 63 keyboard configuration ...

Page 77: ... iSeries hardware preparation 1 swap parition recommended partitioning 25 T TCP IP configuration 14 time zone configuration 32 traceback messages saving traceback messages without a floppy drive 48 troubleshooting 47 after the installation Apache based httpd service hangs during startup 52 after the installation 50 booting into a graphical environment 51 booting into GNOME or KDE 51 booting into t...

Page 78: ......

Page 79: ...ise Linux Introduction to Sys tem Administration Primary Writer Maintainer of the Release Notes Contributing Writer to the Red Hat Enterprise Linux Installation Guide for x86 Itanium AMD64 and Intel Extended Memory 64 Technology Intel EM64T Johnray Fuller Primary Writer Maintainer of the Red Hat Enterprise Linux Reference Guide Co writer Co maintainer of the Red Hat Enterprise Linux Security Guide...

Page 80: ...72 ...

Reviews: