29
14. Maintenance - Cont.
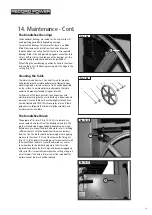
The Bandwheel Bearings
The bandwheel bearings are sealed for life units which will
need replacing periodically depending on usage.
To replace the bearings; first ensure that there is no blade
fitted. Now remove the circlip from the hub and remove
the bandwheel, you will notice that there are two separate
bearings fitted in the hub pressed up against each other. Take
a brass drift (or similar) and tap one of the bearings out, the
second bearing should now be able to be pushed out.
When fitting the new bearings; position by hand in the wheel
hub and tap in until the bearing seats against the ridge in the
casting (Fig. 14.9).
Cleaning the Table
The table is made from cast iron and if cared for properly
will provide smooth accurate performance. Obviously when
machining wood a certain amount of resin will be deposited
on the surface, to ensure optimum performance the table
needs to be properly cleaned at regular intervals.
Firstly brush off all loose particles, then wipe clean with
white spirit ensuring that any resin build up is dispersed and
removed. Once the table has been thoroughly cleaned it can
now be treated with CWA195 silicone spray or wax. If these
guidelines are followed the timber will glide smoothly and
accurately across the table.
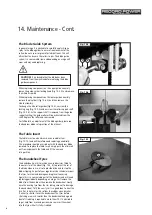
The Bandwheel Brush
The purpose of this brush (Fig. 14.10, A) is to remove any
excess sawdust and resin from the bandwheel and tyre. This
brush will need adjusting periodically depending on usage.
Before each use inspect the brush and make sure it is making
sufficient contact with the bandwheel to remove sawdust
from the tyre. The brush should be touching but not applying
pressure to the wheel. If it is not then loosen the fixing nut
(Fig. 14.11, B) and adjust accordingly so it makes contact with
the wheel. When the brush cannot be adjusted any nearer
the wheel due to the bristles being worn then it must be
replaced. Periodically the brush may also become clogged up
with resin (this is especially common when cutting a long run
of soft wood) if this occurs this resin must be scraped off as
performance of the brush will be reduced.
B
Fig. 14.8
Fig. 14.10
A
Fig. 14.11
B
Fig. 14.9
Summary of Contents for BS10
Page 32: ...32 15 Parts list and Diagrams Cont ...
Page 33: ...33 15 Parts list and Diagrams Cont ...
Page 35: ...35 ...


