2
3
Control Reference Guide
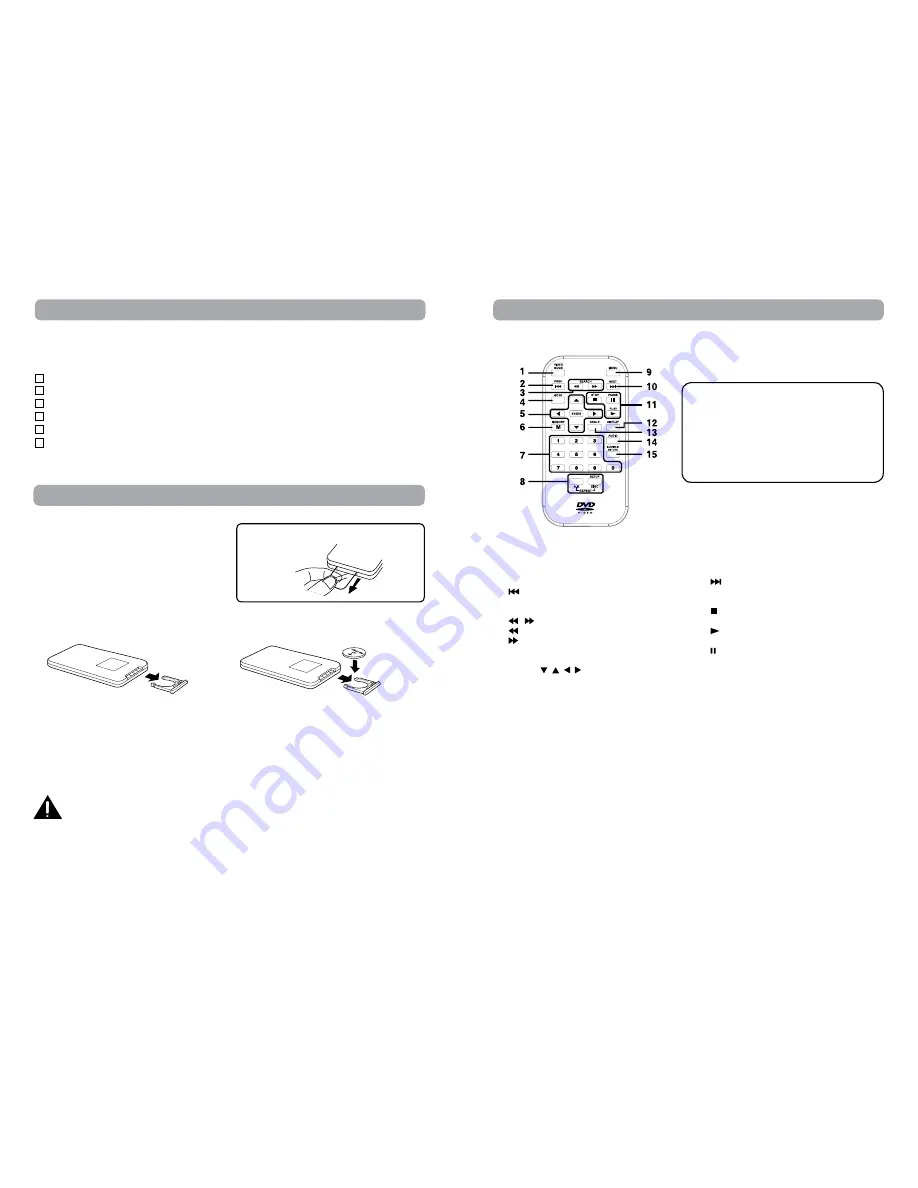
Remote Control
1) VIDEO MODE Button
Adjusts Brightness, Panel Display or Contrast of
the LCD screen.
2) PREV Button
Moves back through titles, chapters or tracks on
a disc.
3) / SEARCH Buttons
SEARCH: Fast reverse playback.
SEARCH: Fast forward playback.
4) GOTO Button
Skips directly to a location on a DVD/CD.
5) Cursor ( , , , ) Buttons
Moves between selections on a menu screen
and adjusts certain settings.
ENTER Button
Confirms selections on a menu screen.
6) MEMORY Button
Set titles/chapters in a favorite order.
7) Number (0 - 9) Buttons
Use when creating programs or locating a title/
chapter/track or specific time.
8) REPEAT A-B Button
Performs point-to-point repeat playback on a
DVD or CD.
REPEAT DISC Button
Repeats a DVD chapter or title.
Repeats a CD track or the entire disc.
SETUP Button
In STOP mode, it brings up the unit’s SETUP
menu.
9) MENU Button
Enters and exits the main DVD menu.
10) NEXT Button
Moves forward through titles, chapters or tracks
on a disc.
11) STOP Button
Stops playing a disc.
PLAY Button
Starts or resumes playback of a disc.
PAUSE Button
Pauses playback and frame advance.
12) DISPLAY Button
Shows status information on the screen.
13) ANGLE Button
Switches between multiple camera angles when
the DVD you are playing has been programmed
with multiple camera angles.
14) AUDIO Button
Selects one of the audio sound tracks on a DVD
(if more than one is available) or selects the
audio output mode on a CD.
15) SUBTITLE Button
Selects one of the subtitle languages
programmed on a DVD (if available).
RETURN Button
Returns to normal operation after using the
SETUP menu of a DVD.
Accessories
Remote Control
Using the Remote Control
• Point the remote control at the REMOTE SENSOR
located on the unit.
• When there is a strong ambient light source, the
perform ance of the infrared REMOTE SENSOR
may be degraded, causing unreliable operation.
To Change Remote Battery
1. Open the battery door.
Take out the plastic sheet before operating the
Remote Control.
2. Insert one CR2025 (3V) size battery.
Remote Control (with battery) ...............................................................................................................x 2
AC Power Adapter ..................................................................................................................................x 2
Car Power Adapter splitter .....................................................................................................................x 1
Car Power Adatper ..................................................................................................................................x 1
Audio / Video Cable ................................................................................................................................x 1
Mounting Strap .......................................................................................................................................x 2
Please check and identify the supplied accessories.
(To order replacement units, visit www.RCAav.com)
Battery Replacement
When the battery becomes weak, the operating distance of the remote control will be greatly reduced and
you will need to replace the battery.
Note:
• If the remote control is not going to be used for a long time, remove the battery to avoid damage caused
by battery leakage corrosion.
• When discarding batteries, environmental problems must be considered and local rules or laws governing
the disposal of these batteries must be strictly followed.
WARNING:
• Do not dispose of battery in fire; battery may explode or leak.
• Batteries should not be exposed to excessive heat such as sunshine, fire or the like.
CAUTION:
Danger of explosion if battery is incorrectly replaced. Replace only with the same or equivalent type.
Note:
The included remote controls have different color
keys to identity which unit they operate.
The remote control with blue keys operates Unit
A, which has the blue functional symbols on the
front of the unit.
The remote control with green keys operates
Unit B, which has the green functional symbols
on the front of the unit.


