background image

91

Specifications

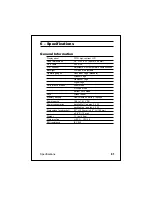
6 – Specifications

General Information

Display panel

FSTN high-contrast LCD

Panel dimensions

3.8" H x 3.8" W (96 mm x 96 mm)

No. of dots

240 x 128

LCD contrast

Adjustable, with temperature compensation

Backlight

LCD panel, adjustable

Operating pages

FishFinder Page (standard)

Window Page

Sidelooker Page

Digital Page

Performance modes

Zoom Mode

A-Scope Mode

Bottom Lock Mode

Keys

Silicon rubber

Memory backup

Non-volatile, no battery required

Power source

10.8 to 16.1 V DC

Power consumption

backlight off - approx. 2.0 W

backlight on - approx. 4.5 W

Dimensions (w/o bracket)

5.3" H (134 mm) x 6.6" W (169 mm)

x 2.8" D (72 mm)

Weight

1.1 lbs (0.5 kg)

Waterproofing

U.S.C.G., CFR 46

EMI resistance

IEC 945

Summary of Contents for L470

Page 1: ...FishFinder L470 Instruction Manual Raymarine ...

Page 2: ...er Transom Mount Installation 10 Installation Notes Thru Hull Transducer 11 Installation Notes In Hull Transducer 12 Installation Notes Trolling Motor Transducers 13 Installation Notes Transducer for Speed and Temperature Only 14 EMC Installation Guidelines 14 Mounting the Display Unit Standard Mount 16 Dismounting the Display Unit 16 Mounting the Display Unit Flush Mount 18 Installing the Transdu...

Page 3: ...ting 60 Frequency Setting 61 Resetting the Log 63 System Setup Menu 64 Simulator 65 Language 65 Fish Symbols 65 White Line 65 VRM 66 Sidelooker 66 Speed Cal 66 Temp Cal 67 Depth Digits 67 Shallow Alarm 67 Deep Alarm 68 Fish Alarm 68 Buzzer 69 Depth Units 70 Speed Units 70 Temp Units 70 Speed 70 Log 70 Temp 70 Setup Menus for Zoom Mode 71 Zoom Select Menu 71 Zoom Screen Split Full Menu Item 72 Setu...

Page 4: ...enu item 79 Combining Displays 80 Resetting the Unit to Factory Defaults 81 Default Settings 82 5 Maintenance andTroubleshooting 83 Cleaning Instructions 83 Troubleshooting Suggestions 83 Servicing a Thru Hull Transducer 87 How to Contact Raymarine 87 6 Specifications 91 General Information 91 FishFinder Functions 92 Connector Diagrams 93 Glossary of Terms 94 ...

Page 5: ...ount Installation 18 2 13 Disassembling from Bracket 19 2 14 Installing Cable on Transom 20 2 15 Cable for Sidelooker Transducer 21 2 16 Cable for Speed and Temperature Sensor 22 2 17 DC Power Connections 23 3 1 Display Panel 26 3 2 Lamp Contrast Menu 29 3 3 Operating Pages 31 3 4 FishFinder Page 32 3 5 Fish Indications 38 3 6 Bottom Conditions 40 3 7 Window Page 41 3 8 Options for Window Page 42 ...

Page 6: ...ock Range Menu Item 73 4 13 Bottom Lock Split Full Menu Item 74 4 14 Digital Setup Menu Item 75 4 15 Sidelooker Range Menu item 77 4 16 Sidelooker Sensitivity Menu Item 78 4 17 Sidelooker Chart Speed Menu Item 78 4 18 Sidelooker View Menu Item 79 4 19 Split FishFinder Page with A Scope Mode 80 4 20 Window Page with Option G Selected and Zoom Enabled 81 5 1 Sample Mailing Label 89 6 1 Connector Dia...

Page 7: ...s these echoes and presents a display The FishFinder L470 can handle many different jobs detect the presence of fish below the boat trigger an alarm when fish are found measure the depth of the water set alarms for minimum and maximum depth show the shape of the bottom determine whether the seabed is hard or soft measure the speed of the boat and the distance traveled show the water temperature We...

Page 8: ... items Description Part No FishFinder L470 display unit E61013 Quick release swivel mount bracket with mounting hardware G623996 1 DC power cable M99 146 Instruction manual G627172 3 Four 10 x 3 4 ss mounting screws Standard Transducers Depending on which model of the L470 you have purchased the box will include one of the transducers listed below Description Part No Transom mount transducer with ...

Page 9: ...ion in fiberglass hull only or mounting on trolling motor including hardware for either installation and 20 or 6m cable M78928 Angled in hull transducer for installation in fiberglass hull only where deadrise angle is 10 to 22 M78946 Plastic thru hull transducer Valox plastic with speed and temperature sensors used with depth only transducers M78922 M78928 M78946 M78937 Transom mount speed and tem...

Page 10: ...eration of the FishFinder it is vital that the transducer be mounted correctly The transducer will give the most reliable readings if it looks into water which is smooth and undisturbed If you place the transducer so bubbles or turbulence flow across the face of the unit the system may give inaccurate readings There are three important rules when mounting any type of transducer The transducer shou...

Page 11: ...inboard outboard engine s and if you re planning to use the Sidelooker option This type of transducer must be mounted ahead of or beside the propeller s Do not use this type of transducer for a boat with a straight shaft inboard engine Use a thru hull transducer if your boat has a straight shaft inboard engine This type of transducer is installed in a hole drilled through the hull Use an in hull t...

Page 12: ...the best location for the mounting bracket Here are the rules If your boat has one propeller outboard or inboard outboard mount the transducer about 18 455 mm to the side of the centerline of the boat See Fig 2 3 Choose the side that is on the downstroke of the propeller This is usually the starboard side of the boat This will reduce interference caused by air bubbles If the propeller can be turne...

Page 13: ... fittings intakes or other parts which extend from the hull These may cause turbulence or air bubbles The bracket has a quick release mechanism This may reduce dam age by allowing the transducer to flip up if it hits any debris or the bottom See Fig 2 4 Allow enough clearance above the transducer so that it can swing upward completely This is about 10 254 mm Transducer in released position 10 254 ...

Page 14: ...vets on the hull are creating bubbles Lower the transducer a bit The bow of the transducer is above the bottom of the transom creating cavitation The rear of the transducer is too high creating cavitation 2 to 5 2 to 5 2 to 5 No No No 1 2 3 Insert screws 1 and 3 1 4 from the bottom of slots and screw 2 1 4 from the top of the slot to allow room for adjustment Correct alignment If screws are insert...

Page 15: ...m of the transducer 3 Looking at the rear of the boat be sure the bracket is vertical perpendicular to the water line 4 Hold the bracket and the wedge if used against the transom and trace the positions of the screw slots 5 Remove the bracket See Fig 2 6 The screws in the outer slots should be placed about 1 4 6 mm up from the bottom of each slot The screw in the center slot should be placed 1 4 6...

Page 16: ...t This is helpful when you are looking for fish or structure near banks or under docks or piers 2 The M78930 Sidelooker transducer is attached to the same mounting bracket used with the transom mount transducer See Fig 2 7 Begin by installing the transom mount bracket as described earlier 3 Remove the two screws and the bracket covering the paddle wheels 4 Attach the Sidelooker transducer to the t...

Page 17: ...l allow you to service the unit Allow at least 6 152 mm of headroom above the transducer 3 When choosing a mounting location drill a small pilot hole 1 8 or 3 2 mm from the inside of the hull Before you drill the hole be sure you will be able to reach the large nut on the top of the unit and that there will be enough clearance for the cable If there is a strake or other feature on the hull drill f...

Page 18: ...just a few important points 1 Choose the best mounting location For outboard powerboats Install as far aft as possible For inboard outboard powerboats Install close to the engine s For inboard powerboats Install forward of the propeller s and shaft s For sailboats Install near the centerline of the hull and forward of the leading edge of the keel 2 An in hull transducer may only be installed in a ...

Page 19: ...e installations are simple but it is important to keep these points in mind 1 Keep the Sidelooker transducer fully submerged The transducer will only produce an image if it is immersed in water 2 Keep the Sidelooker transducer clear of weeds or debris 3 When the position of the trolling motor is changed the field of view of the Sidelooker also changes The Sidelooker can be aimed at interesting ech...

Page 20: ... you install the FishFinder and the wiring cables Place the display unit and the power and signal cables at least 3 ft 1m from any equipment transmitting radio signals or any cables carrying radio signals This includes VHF radios cables and anten nas In the case of SSB radios the distance should be increased to 7 ft 2m Allow a space of at least 7 ft 2m from the path of a radar beam Normally a rada...

Page 21: ...e installation do not cut the transducer cable or remove the connector Do not try to shorten or splice the cable The transducer cable includes several wires along with shielding and insulation If the cable is cut it cannot be repaired Cutting the cable will also void the warranty During installation if you need to drill any holes for the cable they must be large enough to accept the connector This...

Page 22: ... angles 2 Remove the display unit from the bracket by pressing on the large button in the center of the bracket See Fig 2 10 3 Mount the base of the bracket using the supplied screws 4 Slide the display unit back into the bracket 5 Adjust the display unit for the best viewing angle You can turn the display from side to side and tilt it up or down Dismounting the Display Unit See Fig 2 10 To releas...

Page 23: ...lation 17 Fig 2 11 Dimensions 3 29 32 99 mm 4 7 32 107 mm 6 5 8 169 mm 5 13 16 147 mm 8 1 4 210 mm Hole 3 16 5 mm 2 25 32 70 mm 2 21 32 67 mm 1 15 32 37 mm 1 3 4 45 mm 4 9 32 109 mm 1 3 4 44 mm 2 27 32 72 mm ...

Page 24: ...the mounting area Be sure there are no hidden electrical wires or other items behind the point where you plan to mount the display unit 2 A mounting template is supplied with the flush mounting kit Tape this over the selected location on the panel and trace around the edges 3 Make the cutout for the display Drill a series of 1 2 13 mm holes at the points shown around the edges of the cutout area 4...

Page 25: ...he threaded studs into the holes on the rear of the display unit 8 Set the display unit into place to be sure that it will fit correctly Thread the wing nuts onto the threaded studs to hold the display unit in place temporarily 9 Once the DC wiring is complete finish the installation Hold the gasket in place around the opening Fit the display into the cutout again From the rear screw the thumbscre...

Page 26: ...r cable runs near another electrical wire it may pick up electrical interference or noise To reduce this try to keep the transducer cable separated as far as possible from all other wires This is especially important with wiring for the boat s ignition alternator or tachometer Also try to keep the transducer cable away from the antenna and power cables for VHF or FM radios It is also helpful to ke...

Page 27: ...ransducer cables See Fig 2 15 The cable from the Sidelooker includes a Y connector and is 12 long 3 6 m 2 Plug the cable from the depth transducer into the open end of the Y connector Installing the Transducer Cable Installation with Separate Speed and Temperature Sensors 1 Optional depth only and speed and temperature only transducers are available for the FishFinder L470 In this optional configu...

Page 28: ...t can be wired to a negative ground system or both the negative and positive supply lines may be floating above ground This unit is not intended for use on boats with positive ground 2 The 6 foot power cable supplied with the display unit should reach the source of DC power On a small boat connect the power leads directly to the main battery isolation switch or breaker On a larger boat route the p...

Page 29: ...this to a good ground 6 If you need to extend the power wiring by more than 10 feet use a larger wire size This will allow the wires to deliver the correct voltage in spite of the longer wire distance For runs of 20 to 35 feet use 14 AWG If you extend the power wiring be sure all electrical connections are solid and durable Soldering is the best way to make these connec tions Insulate all connecti...

Page 30: ...d that your boat moves through the water The hull of the boat may have a shape which channels water past the transducer at a speed which is faster or slower than normal 1 To calibrate the speed sensor set up a course between two known points As markers you can use buoys range markers or landmarks Measure the length of time the boat takes to cover a known distance 2 You may also use locations indic...

Page 31: ...number for Speed Cal You may enter any value between 75 and 125 4 The temperature sensor is usually very accurate but you can adjust the calibration using the entry for Temp Cal Final note After you finish the installation please remember to fill out the Warranty Card included with this manual ...

Page 32: ... do one job during a normal display and a different job when you are setting up the unit In this section we will use symbols like this PWR and SETUP to indicate the buttons on the front of the unit PWR This button turns the power on and off To turn on the power Press once to turn the power on To enter the Lamp Contrast Menu To bring up the Lamp Contrast Menu in any operating mode press the PWR key...

Page 33: ...er split screen Window Page options F G or H is enabled this button must be pressed three times During setup Once you make a change press SETUP to save the change and go back to the normal display CLEAR During normal display When an alarm is triggered use CLEAR to turn off the buzzer The alarm will continue to be indicated on the display During setup Once you make a change press CLEAR to save the ...

Page 34: ... the displays English is the default language You may also select any of six other languages You can change this setting at any time using the System Setup Menu To turn the power off press and hold the PWR button for more than 3 seconds Setup Memory When you first turn on the power the unit will be prepared to operate using a number of preset values These default values are stored in the unit at t...

Page 35: ...by pressing the PWR button for a moment Adjust lamp brightness The L470 FishFinder has a backlit display and keypad This feature allows you to use the unit at night The backlight for the display is adjustable to five levels of brightness To turn the lamp on or adjust the brightness use the or controls on the Page Control Pad Adjust contrast You can also adjust the contrast of the display This is a...

Page 36: ...age Right half of the display operates the same as the FishFinder Page Left half of the display is a user selectable window showing digital information or sidelooker information when the optional Sidelooker transducer is used page 41 Sidelooker Page View of either side of centerline using optional of boat used only with Sidelooker Sidelooker transducer transducer page 43 Digital Page Numerical dis...

Page 37: ...31 Operating Instructions FishFinder Page Digital Page Window Page Sidelooker Page Return to FishFinder Page Only if Sidelooker feature is turned on Fig 3 3 Operating Pages CLEAR Lamp Contrast Menu ...

Page 38: ...r draws a graph of the bottom The bottom graph helps you to tell whether the bottom is rising or falling It also allows you to identify the shape or structure of the bottom This can indicate a reef or shipwreck Notice that the scrolling speed of the display does not necessarily match the speed of the boat The scrolling speed of the display is called the Fig 3 4 FishFinder Page Deep alarm set Shall...

Page 39: ...r setting is off indicating that the buzzer is disabled for all of the alarms this symbol will be empty Shallow alarm set You can set an alarm to go off if the boat moves into water which is shallower than a certain depth If you set this type of alarm the S indicator will appear on the display If the alarm is triggered the S symbol will flash If the buzzer has been turned on in the System Setup Me...

Page 40: ...ell the difference between echoes of different strengths A higher sensitivity setting makes it easier to see smaller fish but also may pick up background noise When auto sensitivity is on the FishFinder chooses the correct sensitivity setting automatically Auto zoom on Z The zoom can be used to magnify the image from a small section of the water below the boat This is used with the Zoom Mode which...

Page 41: ...units as the rest of the display This could be feet FT fathoms FA or meters M depend ing on the setting you make in the System Setup Menu Depth markers These markers show depths between the surface and the full depth range In this example the unit is set for a depth range of 100 feet This means that each of the depth markers shows an interval of 20 feet Speed This entry shows the speed of the boat...

Page 42: ... depth indicator is turned off when the fish symbol function is off Bottom of display Bottom indication This shows the bottom of the lake or sea You can compare this to the range depth shown in the lower right hand corner In this example the checkered pattern shows the unit is getting a strong echo return from the bottom See the information on the White Line feature in the Setup Instructions Range...

Page 43: ... setting the display is produced using the signal from the 50 kHz beam with additional information from the 200 kHz beam Using the Dual 200 kHz setting the display is produced using the signal from the 200 kHz beam with additional information from the 50 kHz beam If you are using one of the dual frequency settings you can get some useful information from the fish symbols If the fish is spotted by ...

Page 44: ...is close to the surface and the other is near the bottom The fish which is close to the surface will have a larger symbol This is because the fish which is closer returns more of the sound waves back to the FishFinder Actually the sound waves are usually reflected by the air sac near the center of the fish and not by the body of the fish The size of this air sac is different for different kinds of...

Page 45: ...e longer If the boat is moving more quickly the arches are short and peaked If the boat is moving very fast a fish may be indicated by a single vertical line You can select the frequency from the Setup Menu Bottom Indications The bottom usually produces a strong echo so it is easy for the FishFinder to see a lot of detail The FishFinder can indicate many different kinds of bottom conditions See Fi...

Page 46: ...y be reflected by a more solid layer below It is also possible that the sound waves are making two complete trips hitting the seabed bouncing off of the bottom of the boat then reflecting off the seabed again This can happen if the water is shallow the seabed is hard or the sensitivity is set to a high value ...

Page 47: ...age On the left side of the Window Page is one of eight selectable windows each of which shows a portion of the Digital Page or the Sidelooker Page You select which window to display using the Window option in the Setup menu The eight Window selections are designated A through H and are illustrated in Fig 3 8 Window Contents A Large Depth small Speed Log Temperature B Large Speed small Log Tempera...

Page 48: ...42 Operating Instructions Fig 3 8 Options for Window Page Option A Option B Option C Option D Option E Option F Option G Option H ...

Page 49: ... identically to those in the full screen Sidelooker Page see page 44 These options will only be displayed if the Sidelooker feature is enabled Sidelooker Page This feature will only work if an optional Sidelooker transducer has been installed and if the Sidelooker feature has been turned on in the System Setup Menu The Sidelooker feature is very helpful for certain kinds of fishing It allows you t...

Page 50: ... of the display and older information moves towards the bottom There is no relationship between the chart speed of the FishFinder and the speed of the boat The speed at which the display moves is set by the entry for chart speed in the Setup Menu When the Fish Symbol feature is turned off any fish detected will appear as long vertical lines These will be slightly arched towards the center of the d...

Page 51: ...e appear on the right side of the screen View G looks to both sides of your boat The boat symbol appears at the top of the display and the dashed vertical line appears in the center of the screen View H looks only to the starboard right side of your boat The boat symbol appears at the top of the display and the dashed vertical line appears on the left side of the screen Here are the special items ...

Page 52: ...ts used here are chosen using the entry for Depth Units in the System Setup Menu If you have selected feet FT or fathoms FA the distance shown here will be measured in feet If you have selected meters M the distance shown here will be in meters Bottom Shore Indication This indicates the area where the transducer beam is start ing to see the bottom shore or some other object Again remember that the...

Page 53: ...ers depending on your selection in the System Setup Menu If the unit loses its lock on the bottom the last known depth will flash on and off Speed The speed of your boat through the water derived from the impeller This is measured in MPH statute miles per hour KTS knots or nautical miles per hour or KPH kilometers per hour depending on your selection in the System Setup display The speed value may...

Page 54: ... 00 00 00 from the Setup menu when the Digital Page is visible See page 76 for details Temperature The measured temperature of the water at the transducer in degrees Fahrenheit or degrees Celsius depending on your selection in the System Setup Menu The temperature value may be calibrated from the System Setup Menu See page 64 for details The temperature variation over time is displayed in a scroll...

Page 55: ...49 Operating Instructions Fig 3 12 Performance Modes FishFinder Page ZOOM A SCP Zoom Mode A Scope Mode BOT LOCK Bottom Lock Mode ...

Page 56: ... display area The zoomed display is actually larger only in the vertical direction You can reach Zoom at any time by pressing the ZOOM button For a moment the display will say ENTERING ZOOM MODE then the zoomed image will appear In Figure 3 13 only part of the display is zoomed In this split display the right side shows the same information as the FishFinder Page The left side shows the magnified ...

Page 57: ...e of this display shows the area or window of the water being enlarged When the FishFinder is set for Auto Zoom it will choose the zoom area automatically The unit always chooses an area of the water which includes the bottom The unit then moves this area up or down to keep the bottom in the picture The Auto Zoom feature is great for bottom fishing You may also set the zoom area manually While the...

Page 58: ...ed from a fish You can reach the A Scope Mode at any time by pressing the A Scope button Figure 3 14 The left section of the A Scope Mode shows a section of the normal FishFinder Page The right section shows the A Scope image A Scope image The normal FishFinder Page with the White Line feature enabled see Fig 3 4 allows you to tell the difference between two levels of echo strength Weak targets ar...

Page 59: ... the bottom This is computed using the beam angle of the transducer for the frequency you have selected If the entry for Depth Units in the System Setup Menu is set to Feet or Fathoms the bottom coverage will be reported in feet If the Depth Units entry is set to Meters the bottom coverage will be reported in meters The beam angle used for the computation depends on the frequency selected in the S...

Page 60: ...hows a section of the normal FishFinder Page The left section shows the Bottom Lock image Bottom indication The actual surface of the bottom under your boat varies in depth and contour The bottom lock feature flattens out the bottom image to give you greater visibility of fish targets or structure resting on or near the bottom On the Bottom Lock image the bottom itself is shown as a flat surface a...

Page 61: ... Bottom Lock feature is enabled See page 73 The current setting for the Bottom Lock Range is shown in the upper right corner of the Bottom Lock image This number is the maximum distance above the bottom the unit will display on the Bottom Lock image If the Bottom Lock Range number is larger than the actual depth of the water the unit will not show any target in water shallower than the transducer ...

Page 62: ...avail able will change depending on the display or combinations of displays the unit is presenting when you press SETUP Figure 4 1 shows the order of the menu items if you start from the normal FishFinder Page The Frequency Menu Item FishFinder Page SET UP Chart Speed Menu Item Sensitivity Menu Item Range Menu Item Log Reset Menu Item PAGE PAGE PAGE PAGE press twice ...

Page 63: ...eturn to the normal display quickly Range Setting See Fig 4 2 The range sets the maximum depth the unit will be able to see Use the and arrows of the Page Control Pad to select Auto or Manual range The Range menu item for the downlooker is available from all pages except the Digital Page and the Sidelooker Page The Sidelooker Page does have a Range menu item but only for the Sidelooker Auto range ...

Page 64: ...e Page Control Pad Sensitivity Setting The sensitivity adjusts the ability of the unit to tell the differences between echoes of different strengths In general the sensitivity should be as high as possible to detect the fish and show the detail on the bottom However if the sensitivity is too high the unit will begin to see bubbles in the water debris and other background noise Use a higher sensiti...

Page 65: ...to sensitivity Once you select Auto sensitivity using the menu item shown in Fig 4 3 use the V arrow of the Page Control Pad to go to the next line Use the and arrows of the Page Control Pad to fine tune the sensitivity setting To reset the Auto sensitivity to its normal or default setting switch the sensitivity from Auto to Man and back to Auto again It will also be reset when the FishFinder is t...

Page 66: ...rt speed setting Figure 4 4 shows how the chart speed setting affects the display In both cases the unit is showing the same section of the bottom Using a faster chart speed the display has more space on the display to show this section so it can include more detail Using a slower chart speed this same information is displayed in a smaller horizontal space A faster chart speed setting shows more d...

Page 67: ...ntinue to update If you are done with your setup changes press the CLEAR button to go back to the normal display To select the next menu item press the V arrow of the Page Control Pad Frequency Setting Frequency is a measure of how fast the sound waves from the trans ducer change or vibrate This unit uses sound waves with two different frequencies 50 kHz and 200 kHz For an explanation on the uses ...

Page 68: ...appear solid 50 kHz single frequency The unit will use the wider 50 kHz beam If the fish symbols are enabled in the System Setup Menu they will appear hollow 200 kHz dual frequency The presentation of the bottom image and fish targets is the same as with the single 200 kHz frequency If fish symbols are turned on in the System Setup Menu then they are displayed using the signal from the 200 kHz bea...

Page 69: ...he next menu item press the V arrow of the Page Control Pad Resetting the Log The log measures how far the boat has traveled through the water The log records the distance traveled since it was last reset You can reset the log at any time using the display shown in Fig 4 7 Distance reading The number inside the box shows the distance reading now being displayed by the unit To reset the log to zero...

Page 70: ...cted you must press SETUP a third time This means that you can reach this display make a change then return to the normal display quickly Figure 4 9 shows the items in this menu Setup Menus Fig 4 9 System Setup Menu Note The System Setup Menu is not the same as the Setup Menu described earlier The Setup Menu includes a series of small screens shown in Fig 4 1 The System Setup Menu is a single disp...

Page 71: ...English is the default language which is selected at the factory You may specify a different language at any time using this menu item As you scroll through the languages in the menu the wording on the menu will change to that language as well The language choices are English Spanish French German Italian Swedish and Norwegian Fish Symbols When the Fish Symbols are turned off fish are displayed as...

Page 72: ...looker Mode is in use there may be two vertical VRM lines one to either side of the centerline You can move these lines toward or away from the centerline using the and V controls on the Page Control Pad Keep in mind that if Zoom is set to Manual the VRM on the FishFinder Page is linked to the Zoom adjustment That is they are adjusted together using the and V controls Sidelooker This item is used ...

Page 73: ...se the and controls to change the value Depth Digits This item sets the size of the digits used to show the bottom depth on all of the display pages except for the Window and Digital Pages The STD standard setting will display digits which are 7 mm tall and the LARGE setting will display digits which are 15 mm tall Use the and controls to change the setting Shallow Alarm You can set an alarm to tr...

Page 74: ...zer The letter D will continue to flash until you move into shallower water To turn this feature off press the control on the Page Control Pad until the display indicates 2500 feet 450 fathoms or 800 meters When these values are displayed in the Deep Alarm pop up window you will notice that the menu item in the System Setup Menu will read Off Note You may want to use both the Shallow Alarm and Dee...

Page 75: ... water then returned to shallow water You can silence the buzzer again by pressing the CLEAR button The Buzzer entry in the System Setup Menu can be set in three possible ways Use the and controls to make your choice When the Buzzer entry is set to Off the buzzer is silenced for all of the alarms Once you choose the Off setting the buzzer symbol at the top of the screen will appear hollow If the B...

Page 76: ...you do not want to see this item you can turn it off using this line of the System Setup Menu Use the and controls to make your choice The value for Speed will still appear on the Window and Digital Pages Log On all of the normal displays an entry for log indicates the distance traveled You can turn off this item using this line of the System Setup Menu Use the and controls to make your choice The...

Page 77: ...of the Page Control Pad to select x2 x4 x6 or x8 Zoom magnification Press CLEAR to return to the normal display or press the V arrow of the Page Control Pad to select Auto or Manual Zoom Auto zoom Once you have set the zoom magnification you may select either Auto or Manual Zoom control If you select Auto Zoom the FishFinder will automatically control the position of the Zoom window The Auto Zoom ...

Page 78: ...ge of the display If you are done with your setup changes press the CLEAR button to go back to the normal display To select the next menu item press the V arrow of the Page Control Pad Zoom Screen Split Full Menu Item The Zoom Screen Split Full Menu Item is available from the FishFinder Page or the Window Page when the Zoom Mode is enabled From the Zoom Select Menu Fig 4 10 press the V arrow of th...

Page 79: ... page currently selected Just press SETUP while in the Bottom Lock Mode and scroll through the menu items until the desired menu item is displayed Bottom Lock Range Menu Item If you press SETUP while the unit is displaying the Bottom Lock Mode you will see the setup menu shown in Fig 4 12 Bottom Lock Range This range setting controls the maximum depth the unit will be able to see Notice that only ...

Page 80: ...ull screen Bottom Lock display From the Bottom Lock Range Menu Item Fig 4 12 press the V arrow of the Page Control Pad Figure 4 13 shows the next menu item Bottom Lock Split Full This entry indicates whether the Bottom Lock image will share the display with part of the normal display or will use the whole display area Use the and arrows on the Page Control Pad to select the type of Bottom Lock dis...

Page 81: ...options A through E will appear every time you see this menu The last three items F through H only appear when the optional Sidelooker feature is turned on We explained the choices in the material on the Window Page in Section 3 See page 41 and Fig 3 8 To make a choice use the or controls then press CLEAR to save the change Notice that these options only control the information presented on the le...

Page 82: ...ooker transducer We de scribed the operation of this transducer in Section 3 If your boat has this transducer there are some extra setup steps required The Sidelooker feature must be turned on using the System Setup Menu Figures 4 8 and 4 9 show how to reach this Menu Press the SETUP button twice to reach the System Setup Menu Press the V arrow of the Page Control Pad to reach the line labeled Sid...

Page 83: ...e The menu item shown here sets the range for just the Sidelooker This will not change the range setting for the other display pages The range for the Sidelooker uses the Manual setting only Use the and controls to select the range you want to use Possible Sidelooker Range Settings In feet 5 10 15 20 30 40 50 60 80 100 150 In meters 2 4 6 8 10 15 20 25 30 40 50 If you are done with your setup chan...

Page 84: ... the next menu item press the V arrow of the Page Control Pad Sidelooker Chart Speed Menu Item Fig 4 17 Sidelooker Chart Speed Menu Item The Chart Speed Menu Item in the Sidelooker Page adjusts the chart speed for the Sidelooker display and the FishFinder display Remember if you adjust the chart speed in any menu both displays will be affected Using a faster chart speed there is more space on the ...

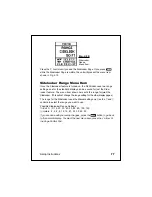
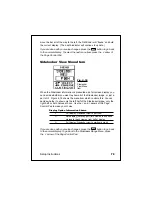
Page 85: ...o show all of the Sidelooker image or just a part of it Figure 4 18 shows the menu item which controls this You can decide whether to show only the left half of the Sidelooker image only the right half or both halves at once Use the and arrows of the Page Control Pad to make your choice Display Option Information Shown F Full display Sidelooker view to port left G Split display vertical port left ...

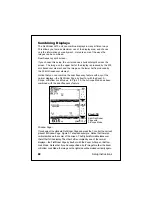
Page 86: ...re with any of the normal displays the FishFinder Page by itself or with the Zoom A Scope or Bottom Lock Modes In Fig 4 19 the A Scope Mode has been combined with the dual frequency feature Fig 4 19 Split FishFinder Page with A Scope Mode Window Page If you begin at the standard FishFinder Page and press the control the unit will present a Window Page Figure 3 7 shows an example Notice that there ...

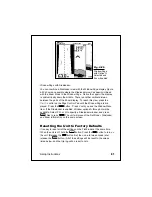
Page 87: ...ee the Window Menu Item If the Sidelooker is enabled Window options A through H will be available Select F G or H to specify a Sidelooker window and press CLEAR Next press ZOOM The unit will present the FishFinder Sidelooker and Zoom information on the same screen Resetting the Unit to Factory Defaults It is easy to reset all of the settings on the FishFinder at the same time When the unit is off ...

Page 88: ...0 kHz Auto 200 kHz Simulator Off Off Language English English Fish symbols On On White line On On VRM Off Off Sidelooker Off Off Speed calibration 100 100 Temp calibration 0 0 0 0 Depth digits Std Std Shallow alarm Off Off Deep alarm Off Off Fish alarm Off Off Buzzer On On Depth units FT feet M meters Speed units MPH miles per hour KPH kilometers per hour Temperature units F Fahrenheit C Celsius S...

Page 89: ...can reduce the performance in just a few weeks To prevent this coat the bottom of the transducer with a thin layer of paint Use only a water based antifouling paint or a water based paint specifically designed for transduc ers Apply it with a brush If your transducer becomes fouled or stops working because of sand or sea growth use a stiff brush to clean it You may sand the surface with a fine gri...

Page 90: ...oved all of the way to the left the display will freeze 2 A source of electrical noise may be interfering with the unit s operation Both the transducer cable and the power cable for the FishFinder should be routed as far as possible from all other wiring on the boat To locate the source of the noise turn on the FishFinder Next turn on each electrical device on the boat but just supply power to one...

Page 91: ...thin 10 of vertical 5 If the transducer is an in hull type be sure that it is installed correctly The transducer should be looking through just one layer of fiber glass hull material no more than 1 25 mm thick The transducer should be firmly attached to the hull using the correct type of adhe sive sealant 6 The face of the transducer may be covered or fouled Use a stiff brush to clean it You may a...

Page 92: ...the unit can lose its ability to see the bottom or fish Check for problems with the wiring as described in the section on The display unit freezes The display unit shows lots of background noise 1 The unit may be set to use the manual sensitivity adjustment and the sensitivity may be set too high See the information on Setup Instructions 2 The transducer may be mounted incorrectly or may be fouled...

Page 93: ...ucer housing Do not leave the transducer without the speed or dummy insert in place How to Contact Raymarine For marine product and services information Visit the Raymarine World Wide Web site for the latest information on the newest Raymarine electronic equipment and systems www raymarine com For accessories and parts Many Raymarine accessory items and parts can be obtained directly from your aut...

Page 94: ...n the event that repairs cannot be obtained conveniently product service may also be obtained by returning the unit to Raymarine s Product Repair Center using the prepaid shipping tag supplied with the unit Return the unit to Raymarine Product Repair Center 22 Cotton Road Unit D Nashua NH 03063 4219 USA The Product Repair Center is open Monday through Friday 8 15 a m to 5 00 p m Eastern Standard T...

Page 95: ...epair Center for all warranty repairs This service is available only to customers within the continental United States To return your Raymarine unit for warranty repair please follow these steps 1 Fill out the service information card completely 2 Pack your FishFinder and the service information card in a suitable shipping container It is best to use the original carton if it is avail able 3 Fill ...

Page 96: ...90 Maintenance and Troubleshooting ...

Page 97: ...perating pages FishFinder Page standard Window Page Sidelooker Page Digital Page Performance modes Zoom Mode A Scope Mode Bottom Lock Mode Keys Silicon rubber Memory backup Non volatile no battery required Power source 10 8 to 16 1 V DC Power consumption backlight off approx 2 0 W backlight on approx 4 5 W Dimensions w o bracket 5 3 H 134 mm x 6 6 W 169 mm x 2 8 D 72 mm Weight 1 1 lbs 0 5 kg Water...

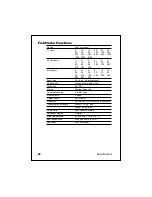
Page 98: ...300 400 500 650 800 Zoom size x2 x4 x6 x8 auto manual Chart speed Freeze slow medium fast White line On Off Alarms Shallow deep fish Reset distance log 0 to 999 units Fish symbols 8 sizes Output power 500 W rms Frequency 50 kHz 200 kHz dual or split operation Transducer beam angle 200kHz 16 6db 50kHz 65 6db Depth units Feet fathoms meters Numerical display 3 digits Water temperature 32 0 to 99 9 F...

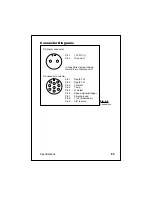
Page 99: ...2 Ground DC power connector Pin 1 Depth TX Pin 2 Depth TX Pin 3 L Select Pin 4 Temp Pin 5 R Select Pin 6 Speed signal voltage Pin 7 Shield ground Pin 8 12V sidelooker Pin 9 L R receive Transducer connector Connectors viewed looking toward rear of display unit Fig 6 1 Connectors ...

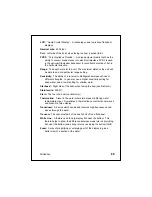
Page 100: ... sured in the side to side direction Default value A value or setting which is pre loaded into the unit at the factory Fairing block A block used when mounting a thru hull transducer The fairing block shims the transducer to align it on a perfect horizontal plane versus the rise of the hull Fathom A unit of depth equal to 6 feet Frequency The rate at which a sound source vibrates or the rate at wh...

Page 101: ...higher sensitivity setting for deep water and a lower setting for shallow water Starboard Right side of the boat when facing the bow nautical term Statute mile 5280 ft Stern The rear of a boat nautical term Thermocline A level in the water where two areas of differing water temperature meet Sometimes a thermocline can reflect sonar waves and present a false display Transducer A device which sends ...

Page 102: ... in impeller carriers impellers impeller bearings and impeller shaft are specifically excluded from this Warranty Magnetrons Cathode Ray Tubes CRT TFT Liquid Crystal Displays LCD and cold cathode fluorescent lamps CCFL hailer horns and transducers are warranted for 1 year 12 months fromdate of sale These items must be returned to a Raymarine facility All costs associated with transducer replacemen...

Reviews: