background image

INSTRUCTION, USE AND  

MAINTENANCE MANUAL

EN

Page 67 of 77

Move the tip of the width measuring device (

Fig. 81 

ref. 1

)  in  line  with  the  outer  surface  of  the  flange 

(

Fig. 81 ref. 2

).

Fig. 81

(OPTIONAL)

Press button 

. At the end of the operation, the 

following screen will appear on the monitor:

The calibration of the external data gauge is finished.

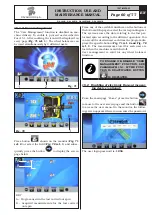
Calibration  of  automatic  width  measuring  device 

unit (standard on some models)

Mount the sizing body onto the chuck and fix it through 
the special locking devices.

Press the button 

 to display the following screen 

page on the monitor:

Close  the  wheel  cover  until  bringing  the  automatic 
width  sensor  next  to  the  sizing  body  previously  in-
stalled.

Press button 

. At the end of the operation, the 

following screen will appear on the monitor:

The calibration of the automatic external data gauge 
is finished.

1297-M005-03

RAVAGLIOLI S.p.A.

G4.140R - G4.140WS - G4.140WSLB - GP4.140WS

Summary of Contents for G4.140R

Page 1: ...T OF COMPONENTS section TRANSLATION FROM THE ORIGINAL INSTRUCTIONS 1297 M005 03 1297 M005 03 G4 140R G4 140WS G4 140WSLB GP4 140WS Technical services RAVAGLIOLI S p A Via 1 Maggio 3 40037 Pontecchio M...

Page 2: ...on some models _____________30 13 0 CONTROL PANEL___________________ 30 14 0 WHEEL BALANCING________________ 31 14 1 Switching the machine on and off______31 14 2 Balancing programs setting__________...

Page 3: ...calibration standard on some models _________68 15 3 5 Touch screen monitor calibration for touch screen monitors optional ___________________________69 16 0 ERROR SIGNALS____________________ 70 17 0...

Page 4: ...ar ring nut Tyre locking sleeve Cones Manual caliper Weight pliers Carriages counterweight External data gauge Run out OPT Ultrasound Run out OPT 6 o clock laser OPT 12 o clock laser device OPT OPT OP...

Page 5: ...INSTRUCTION USE AND MAINTENANCE MANUAL EN Page 5 of 77 GENERAL DESCRIPTION Fig 1 1297 M005 03 G4 140R G4 140WS G4 140WSLB GP4 140WS RAVAGLIOLI S p A...

Page 6: ...rd on some models 16 Pressure ring 17 Car ring nut on models with threaded chuck 18 Pneumatic locking sleeve on models with pneumatic chuck 19 Cones 20 Manual caliper 21 Grippers for weights 22 Carria...

Page 7: ...ons or jobs to be per formed compulsorily Warning Be particularly careful possible material damages Symbols Description Danger Be particularly careful Note Indication and or useful information Move wi...

Page 8: ...plate 999914160 Voltage 230V 50 60 Hz 1 Ph plate 999916311 Skip plate 999920170 Machine nameplate 999920540 Laser point danger plate standard on some models 999922910 Manufacturer trademark nameplate...

Page 9: ...a small degree of maintenance and care this wheel balancer will give you many years of trouble free service and lots of satisfaction 2 0 INTENDED USE The machines described in this manual and their d...

Page 10: ...se the laser device is present USE OF CONTROLS OR ADJUST MENTS OR PERFORMANCE OF PROCEDURES OTHER THAN THOSE SPECIFIED HEREIN MAY RESULT IN HAZARDOUS RADIA TION EXPOSURE 3 1 Residual risks The machine...

Page 11: ...rea around the machine is free of potentially dangerous objects and that there is no oil since this could damage the tyre Oil on the floor is also a potential danger for the operator UNDER NO CIRCUMST...

Page 12: ...scissors Use a small knife to cut along the lateral axis of the box and open it like a fan It is also possible to unnail the cardboard box from the pallet it is fixed to After removing the packing an...

Page 13: ...ssure 860 1060 hPa mbar The use of the machine in ambient conditions other than those specified above is only allowed after prior agreement with and approval of the manufacturer 8 1 Working area Fig 3...

Page 14: ...Anchoring system The packed machine is fixed to the support pallet through the holes prearranged on the frame Such holes can be used also to fix the machine to the ground through floor anchor small bl...

Page 15: ...umatic chuck FITTING 1 After making power and air connections switch on the machine the pneumatic chuck always opens when the machine is switched on 2 Switch the machine off by using the main switch F...

Page 16: ...he chuck by pressing the brake and turn the pneumatic shaft screw Fig _8 ref 1 onto the flange Fig _8 ref 2 until it stops Fig 8 5 Tighten with the wrench provided Fig _8 ref 3 REMOVAL 1 Open the pneu...

Page 17: ...ewed nuts and washers again Fig 12 DURING THIS OPERATION PAY PARTICULAR ATTENTION TO THE POWER SUPPLY CABLE TO THE HDMI CABLE AND TO THE KEYBOARD CABLES FIG 12 REF 5 IN ORDER NOT TO DAM AGE THEM MAKE...

Page 18: ...2 Make the cables Fig 15 ref 5 pass into the plate s hole Fig 15 ref 6 and fix the latter to the monitor support Fig 15 ref 4 by means of the supplied screws Fig 15 ref 7 and washers Fig 15 ref 8 Fig...

Page 19: ...he tab washers Fig 18 ref 5 6 2 Tighten the screws Fig 18 ref 3 in order to make the guard Fig 18 ref 1 lift or lower with out bumping against the limit switch Carry out the adjustment so that it s po...

Page 20: ...side of the frame Lock the gauge arm Fig 19 ref 3 to the bracket Fig 19 ref 2 using the 2 screws Fig 19 ref 4 and the washers Fig 19 ref 5 Lock the screws Fig 19 ref 4 with the washers Fig 19 ref 5 a...

Page 21: ...of external data gauge Run out optional on some models 1 Remove the rear covering Fig 23 ref 1 from the machine 2 Introduce the 4 screws Fig 23 ref 2 to the gauge bracket Fig 23 ref 3 and screw them...

Page 22: ...cable with clamps 6 Enable the external data gauge and carry out the device calibration Fig 25 7 Mount the rear covering Fig 23 ref 1 of the machine again 9 2 8 Fitting of ultrasound Run out stand ar...

Page 23: ...r protection guard again FOR THE CONNECTIONS REFER TO WIRING DIAGRAMS 9 2 9 Fitting of ultrasound Run out with sup port standard on some models 1 Remove the rear covering Fig 28 ref 1 from the machine...

Page 24: ...ALL MAIN POWER COMPO NENTS ARE IN GOOD CONDI TION THE ELECTRICAL SYSTEM IS PROPERLY GROUNDED GROUND WIRE MUST BE THE SAME CROSS SECTION AREA AS THE LARGEST POWER SUP PLY CABLES OR GREATER MAKE SURE TH...

Page 25: ...f 1 Fig 30 11 0 AIR CONNECTION On models with pneumatic chuck EACH PNEUMATIC INTERVENTION MUST BE CARRIED OUT BY PRO FESSIONALLY QUALIFIED STAFF IN CASE OF A CHANCE SUP PLY FAILURE AND OR BEFORE ANY P...

Page 26: ...ALANCERS ARE USED Wheel fitting using the cones provided is illustrated be low For alternative fittings using optional accessories refer to the special instructions provided separately 12 1 Wheel asse...

Page 27: ...wheel 1 Remove any type of foreign body from the wheel Fig 37 ref 3 pre existing weights stones and mud and make sure the chuck Fig 37 ref 1 and the rim centring area are clean before fitting the whe...

Page 28: ...wheel balancer until the wheel is up against the support flange Fig 39 ref 2 Fig 39 7 Fit the cone Fig 40 ref 3 with the narrowest part turned towards the wheel 8 Fit the pressure ring Fig 40 ref 1 i...

Page 29: ...g 42 For what concerns exceptionally large wheels sensor support may be moved outside the loading space of the same wheel so that it can be easily mounted onto the chuck slacken the handwheels Fig 43...

Page 30: ...example indicating where the operator shall fit adhesive or clip weights and the balancing mode and or option used as well as correct wheel rotation for inner outer weights positioning TO INTERACT OPE...

Page 31: ...a few seconds up to the complete loading of the op erational program The equipment is ready to operate when the main screen Home appears on the monitor Fig 47 1 2 3 4 5 A B C KEY A Displaying operatio...

Page 32: ...he lower bar B can be se lected by touch For both versions Press the button Fig 47 ref 3 to display a second page where you can access the Technical assistance menu and the Run out menu see Fig 48 Fig...

Page 33: ...2 Fig 50 bring into contact the weights fitting gripper with the inner part of the rim 2 contact points see Fig Fig 49 to select ALU S program REPEATEDLY BRINGING THE CALIPER ARM FIG 50 REF 1 IN CONTA...

Page 34: ...button see Fig 54 ref 1 1 Fig 53 1 Fig 54 After entering all the required measures you can spin the wheel by pressing the button and closing the protective guard Standard on some models EACH TIME THAT...

Page 35: ...es the current position of the rim 12 o clock green 4 Value in mm of the highest peak of imperfec tion detected on the rim 5 Value in mm of imperfection of the rim at the current position 6 Value in m...

Page 36: ...NTIL THE ABOVE CONDITION IS REACHED Press the button to display the following pro grams selection screen page Use the arrows and or to select the wished mode blue In this mode you can select the 11 st...

Page 37: ...IF ANY HOWEVER THE POSITIONING IN DEPTH WILL BE AT THE DISCRE TION OF THE OPERATOR Depending on the type of program selected the machine shows on the monitor the guideline points where to take measure...

Page 38: ...ctive field turns blue Pressing the buttons or you can change the value and or program inside the active field To change the selected active field simply press the button until the desired field is co...

Page 39: ...isplay of the weight with the maximum reso lution of 1 g 0 05 oz 8a Display of the weights in grams 8b Display of the weights in ounces grams 9 By pressing the button you will see the following page w...

Page 40: ...maximum resolution 0 05 oz to be fitted on the wheel expressed in ounces The following screen will appear on the moni tor Press the button to set the display of the weights to be fitted on the wheel...

Page 41: ...ight on the arm grippers Fit the adhesive weight in the pliers of the gauge rod 2 Pull out the gauge until the arrows Fig 59 ref _6 both turn green 3 Rotate the gauge arm until the weight touches the...

Page 42: ...at the discretion of the operator depending on where remembers taking the measure BE SURE TO APPLY THE INTER NAL OR EXTERNAL WEIGHT AS INDICATED BY THE 2 GREEN AR ROWS FIG 59 REF 2 OR 3 ON THE CORRESP...

Page 43: ...ht s in depth shall be at the discretion of the operator depending on where remembers taking the measure BE SURE TO APPLY THE INTER NAL OR EXTERNAL WEIGHT AS INDICATED BY THE 2 GREEN ARROWS Fig 59 ref...

Page 44: ...the desired value press button to shift to the next value After entering all the required measures you can spin the wheel by pressing the button and closing the protective guard NOTE if the distance d...

Page 45: ...only for wheel inner side At the end of the procedure the wheel balancing condi tions can be checked by performing a trial spin The procedure has now been completed 14 7 4 Dynamic The DYNAMIC program...

Page 46: ...ocedure the wheel balancing condi tions can be checked by performing a trial spin The procedure has now been completed 14 7 8 ALU 1 ALU 1 function permits balancing wheels with light alloy rims by fit...

Page 47: ...NECESSARY THAT THE DISTANCE DIAMETER CALI PER ARM IS ENABLED IN THE OPTIONS MENU DESCRIBED IN PAR 15 1 THE ECO WEIGHT PROCEDURE CAN ONLY BE USED WITH THE PROGRAM ALU S This procedure represents a mode...

Page 48: ...nbalance value if the value is blue it is not to carry out ECO WEIGHT pro cedure 6 Arrows indicating the weight fitting point with distance diameter caliper arm Fig 63 Press the brake pedal and fit th...

Page 49: ...ON SCREEN IF YOU ARE NOT WISHING TO OP ERATE WITH ECO WEIGHT PRO CEDURE PRESS BUTTON ONCE MORE ALU S UNBALANCE VALUES WILL BE DISPLAYED AGAIN WHILE IF YOU WISH TO OPERATE WITH THE ECO WEIGHT PROCE DUR...

Page 50: ...elect the outer weight to edit Press buttons or to increase or decrease the total weight to be fitted THE BLUE VALUE INDICATES WHICH VALUE IS ACTIVE AND YOU ARE EDITING THE HIGHER THE CHOSEN WEIGHTS V...

Page 51: ...ositioning may not look attractive on some types of rims In this case weights hidden behind spokes mode can be used it splits any correction weight on the outer side into two parts to be hidden behind...

Page 52: ...own by the machine as done for the first weight Press the button to confirm that you have ap plied the SECOND weight and get back to the initial situation of unbalance before performing the weights hi...

Page 53: ...e the wheel from the wheel balancer Remove the tyre and turn it on the rim through 180 Fit the wheel back on the wheel balancer positioning the reference mark on the rim in line with the arrow on the...

Page 54: ...o clock see Fig 67 Fig 67 Reference mark on RIM Press the button to bring the wheel into posi tion Mark the reference mark on the TYRE at 12 o clock position Press button to confirm that step 3 has b...

Page 55: ...for the ALU S mode see Par 14 7 5 14 10 Recalculation function After making a spin the wheel automatically stops indicating the weight s to be fitted and its their position In case the operator does n...

Page 56: ...s the button to switch to programs and measurements acquisition selection screen below Use arrows and or to select the mode desired At the end press push button The machine will be configured as follo...

Page 57: ...livery It allows you to set the thresholds for each of the balancing mode weights see Par 15 1 1 Enable disable the lock function for caliper arm in position disabled on machine delivery It allows you...

Page 58: ...val of the measures by eye readout of measures printed on the rim and the graduated scale of the distance di ameter caliper disabled on machine delivery NOTE it is activated only if distance diameter...

Page 59: ...play resolution default value 5 g 0 25 oz 4 Weight reduction in ECO WEIGHT function 0 200 default value 100 1 2 3 4 Default values Work range g oz g oz 5 0 25 2 50 0 05 2 00 7 0 35 2 50 0 05 2 00 5 0...

Page 60: ...the page to select the corresponding user The system stores the data relating to the last per formed spin according to the different operators You can recall the desired user each time the program di...

Page 61: ...he button After you select deselect the desired options exit the menu by pressing push button Remove symbol X on the Run out icon Fig 73 ref 1 15 3 Machine calibrations Press the button Fig 69 ref 2 t...

Page 62: ...in of the wheel without weights IN THE VERSIONS WITH AUTO MATIC WIDTH MEASURING DE VICE WHEN THE GUARD IS LOW ERED THE RIM WIDTH IS MEAS URED AUTOMATICALLY AND THE SIZING SPIN IS CARRIED OUT At the en...

Page 63: ...manually the wheel until You have the weight of 100 g on the outer side at 12 o clock Press the brake pedal and hold it down during the whole the following operation to avoid unexpected rotation of t...

Page 64: ...readed chuck or 256 mm for pneu matic chuck must be equal to the value positioned above the gauge Fig _76 ref 2 1 mm IF THE MEASUREMENT GAUGE IS NOT EXACTLY POSITIONED ALONG THE UPPER EDGE OF THE FLAN...

Page 65: ...nitor the next screen page will be dis played Measure the exact diameter of a rim see Fig 77 and place it on the screen on the monitor by pressing the or buttons Fig 77 Fit the measured wheel on the b...

Page 66: ...ACCESSORIES MOUNTED ON IT AND WITH CLOSED PNEUMATIC CHUCK Move the tip of the width measuring device Fig 79 Fig 80 ref 1 by the chuck end Fig 79 Fig 80 ref 2 in case of pneumatic chuck move it next to...

Page 67: ...utomatic width measuring device unit standard on some models Mount the sizing body onto the chuck and fix it through the special locking devices Press the button to display the following screen page o...

Page 68: ...rim At the end of the operation press push button On the monitor the next screen page will be displayed Let the weights fitting gripper of the caliper come into contact with the previously applied we...

Page 69: ...wing screen page will be displayed The calibration of the laser is finished 15 3 5 Touch screen monitor calibration for touch screen monitors optional Press the button Fig 74 ref 5 to display the foll...

Page 70: ...der samples not sufficient 7 Chuck calibration error 8 Piezo calibration values out of tolerance 9 Wheel rotations not completed 10 Pneumatic chuck open 11 Incorrect gain calibration 12 Distance diame...

Page 71: ...to clean the pressure regulator ANY DAMAGE TO THE MACHINE DEVICES RESULTING FROM THE USE OF LUBRICANTS OTHER THAN THOSE RECOMMENDED IN THIS MANUAL WILL RELEASE THE MANUFACTURER FROM ANY LIABILITY 17 0...

Page 72: ...Balancing precision g 1 Rim width inches 1 5 22 Rim diameter inches 10 30 manually up to 34 Max wheel diameter inches 44 Cycle time sec 6 Sound emission level dBA 70 Max wheel weight kg 80 Recommende...

Page 73: ...INSTRUCTION USE AND MAINTENANCE MANUAL EN Page 73 of 77 18 3 Dimensions Fig 84 Standard on some models 1297 M005 03 G4 140R G4 140WS G4 140WSLB GP4 140WS RAVAGLIOLI S p A...

Page 74: ...PPING When the decision is taken not to make further use of the machine it is advisable to make it inoperative by removing the connection pressure hoses The machine is to be considered as special wast...

Page 75: ...GND GND EV O EV C JP27 24 JP7 JP4 JP2 55 57 56 24V JP7 JP4 JP7 JP7 JP4 JP2 55 59 58 15V 62 61 60 4 110V 60Hz 110V 24V 7 4 63 5 Connection modes without AUTOMATIC WIDTH versions without spot laser see...

Page 76: ...chuck versions 33 Solenoid valve mounting only for pneumatic self centring chuck versions 34 Cable for pedal micro only for pneumatic self centring chuck versions 35 Limit switch only for pneumatic s...

Page 77: ...NEUMATIC CONNECTION DIAGRAM RAVAGLIOLI S p A 1297 M005 03 GP4 140WS Drawing N B Rev 0 129600170 EVO EVC 1 2 3 4 KEY 1 Pneumatic self centring chuck 2 Pneumatic tightening system 3 Solenoid valve unit...

Page 78: ...n Normen entspricht objet de cette d claration est conforme aux Directives applicables suivantes al que se refiere esta declaraci n cumple con las siguientes Normas aplicables 2006 42 CE Direttiva Mac...

Reviews: