ALL APPLICATIONS (VENTED and VENT FREE OPERATION)
C7-M or DFC7-M (MANUAL CONTROL) LIGHTING and OPERATION
Pilot Lighting:
1.
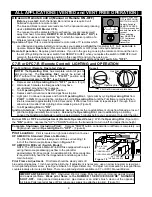
Push in Valve Knob and turn completely clockwise to “O F F ”. Figures 5 and 6
2.
Wait five minutes before lighting.
3.
Slightly push in the Valve Knob and turn counter clockwise to the “PILOT”
position (the first detent counter clockwise from "OFF").
4.
Fully depress valve knob until air is bled and gas flows to pilot. Press Piezo Ignitor
Button (Figure 5) to light pilot. Hold valve knob in until Pilot remains lit when knob
is released (approximately 30 seconds).
5.
If the appliance fails to light or if pilot goes out, repeat steps 1 through 5.
Manual Valve Knob
AT PILOT POSITION
SLIGHT PUSH TO
TURN OFF
FULL PUSH TO
LIGHT
OFF ON
PILOT
NORMAL
BOOST
OFF
. .
.
.
Figure 6
Burner Lighting:
Depress valve knob and slowly turn counter-clockwise to “ON-NORMAL” (next detent
counter clockwise from "PILOT"). This is the normal operating setting. Continue to turn valve knob counter
clockwise to the "BOOST" setting to obtain maximum heat output.
Shutdown
: For complete shutdown (including Pilot), push Valve Knob in and turn fully clockwise to “O F F ”.
C7-S or DFC7-S (Switch Control) LIGHTING and OPERATION
Pilot Lighting:
1.
Depress and turn the Primary Gas Valve Control Knob (located at the base of the
right rear grate leg, clockwise to the "OFF" position. See Figures 5 and 8.
2.
Place the 3 Way Control Selector Switch in OFF (Fig 7). Turn off all Remote
Accessory Controls (Switch or Hand Held Remote) or place Thermostat to lowest setting.
3.
Wait at least 5 minutes prior to lighting
4.
Depress and turn Primary Gas Valve Control Knob counter clockwise to the
"PILOT" position. (Figure 8)
SWITCH OFF REMOTE
ON ACCESS
ON
3 WAY CONTROL
SELECTOR SWITCH
Figure 7
5.
Depress fully and hold in the Primary
Gas Valve Control Knob until all air is
bled and gas flows to pilot.
6.
Press Piezo Ignitor Button
(Figure 3) to light pilot. Continue to hold
in Primary Gas Valve Control Knob
until the Pilot flame remains lit when knob
is released (approx 60 to 90 seconds). If
Pilot does not remain lit, repeat steps 1 .
through 5 . and allow additional time after
Figure 8
"ON" POSITION
+
+
v
+
"OFF" POSITION
+
+
v
+
"PILOT" POSITION
PILOT
+
v
+
+
PILOT ADJUST COVER CAP
lighting Pilot before releasing knob.
Switch Control (Manual ON-OFF):
After successful pilot lighting, allow 60-90 seconds for the
Thermogenerator to heat up. To turn burner on, place Control Selector Switch in the "ON" position (see
Figure 7). To turn burner off (pilot remains lit) place Control Selector Switch in the "OFF" position.
NOTE: Flame size at the burner is adjustable at the Primary Gas Valve Control Knob (see Figure 8).
Shutdown
: For complete shutdown (including Pilot), place Control Selector Switch in the "OFF" position
and push Primary Gas Valve Control Knob (Fig 8) in and turn fully clockwise to “O F F ”.
Switch Accessory Wiring:
Wiring from the Accessory Control (Remote, Thermostat or
Switch) is connected to the two outside terminals of the
Control Selector Switch as shown.
NOTE: Wire length for Thermostat or Remote or controls
should not exceed 20 feet. Thermostat wiring should be 20
AWG Type CL2.
Switch Accessory Operation:
Place manual switch in the
"R E M O T E A C C E S S O N " position. Burner "O N " or "O F F " is
now controlled by the position of the accessory control being
used with the burner.
From THERMOPILE
Valve
Terminals
3 Way Control Selector Switch
To ACCESSORY CONTROL
Outside
Terminal
Piggy
Back
Outside
Terminal
Switch Control Accessory Options:
Ultra-Sonic Wireless Remote (F10-AB)
Wall Switch (WS-1)
Wall Timer (60 Minute Timer) (WT-1)
IR Wireless Remote With Thermostat (IRRC)
Wall Thermostat (TS-1)
CRACKLER Sound Module for F10AB or IRRC (CF5)
REMOTE LOG HOUSE (RH) heat resistant "log" for F 1 0 - A B or IRRC receiver.
CRACKLER LOG HOUSE (CH) heat resistant "log" for F 1 0 - A B and IRRC Sound Generator option.
8


