9
INSTALLATION \ WIRING
PLUMBING
WARNING:
• All installations made below the waterline MUST be
protected by installing vented loops in proper location
• Always double-clamp fittings below waterline
• Do Not use metal fittings
NOTE: Use teflon tape or non-permanent thread sealing
compound on threaded PVC fittings and connections. Avoid
low areas in hose that would allow untreated waste to collect.
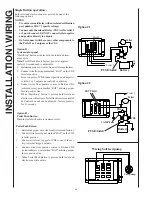
1. Connect discharge of toilet to one inlet port.
2. Insert plug or second toilet discharge into other inlet port.
3. Determine position and glue discharge elbow to top of
tank using PVC cement.
4. Connect discharge hose from elbow to thru hull fitting.
WIRING
WARNING: Hazard of Shock and Fire
•
Always use proper wire, wire connectors and fuse/
circuit breaker. See Specification Chart.
•
Secure wire properly.
•
Do not connect other appliances to electro scan circuit.
•
Make sure power is off before proceeding.
•
Improper wiring can damage the Circuit Board and
void warranty.
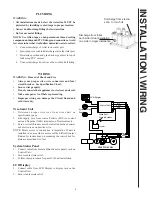
Treatment Unit
1. Determine proper wire size from wire chart on
specifications page.
2. Run supply wire from source Positive (POS) to control
unit and Negative (NEG) terminals on Treatment tank.
3. Fuse or circuit breaker must be installed between source
and electro scan on positive wire.
NOTE: Future access to control box is imperative. If unit is
installed in an area where access will be difficult contact
Raritan for instructions on mounting the control box for
distance more than two feet.
System Status Panel
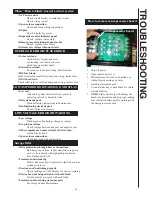
1. Connect cable from System Status Panel to panel 1 jack on
Control Unit.
2. Secure cable strain relief.
3. Follow same procedure for panel 2 if dual installation.
LCD Display
1. Connect cable from LCD Display to display jack on the
Control Unit.
2. Secure cable strain relief.
Discharge from toilet:
each side if dual installation
one side in single installation
Discharge from electro
scan to thru-hull
Orange
+
-
BATTERY
Black
White
Red
electro scan
Orange
Black
White
Red
Main Fuse/
Circuit Breaker
Control Unit
LCD Display
System Status
Panel
Summary of Contents for Electro Scan EST12
Page 12: ...12 This page left blank...


