background image

PG

 18

PG

 18

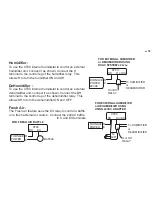
Humidifier -

To use the CT80 internal humidistat to control an external 

humidifier unit, connect it as shown. Connect the H 

terminal to the control leg of the humidifier relay.  This 

allows H to turn the humidifier ON and Off.


DeHumidifier - 

To use the CT80 internal humidistat to control an external 

dehumidifier unit, connect it as shown. Connect the DH 

terminal to the control leg of the dehumidifier relay.  This 

allows DH to turn the dehumidifier ON and OFF.

Fresh Air - 

The Fresh Air feature uses the EX relay to control a baffle 

on a fresh external air source.  Connect the 24VAC baffle 

to C and EX terminals.    

H or D

H

To HUMIDIFIER 

or 

DEHUMIDIFIE

R

RELAY

RH

FOR EXTERNAL HUMIDIFIE

or DEHUMIDIFIER USING 

HVAC SYSTEM's 24

VAC

H or D

H

R

C

CT80 

FURNACE 

POWE R

24VAC

H or D

H

To HUMIDIFIER 

or 

DEHUMIDIFIE

R

RELAY

RH

USING 24VA

ADAPTE

R

H or D

H

R

C

CT80 

FURNACE 

POWER

AC 

ADPT

FOR EXTERNAL HUMIDIFIE

or DEHUMIDIFIER USING 

BAFFLE

RH

FOR FRESH AIR BAFFLE


EX

R

C

CT80 

FURNACE 

POWER

Summary of Contents for CT80

Page 1: ...VAC and millivolt systems with a separate 24VAC power adapter The thermostat relay load should be limited to 1 0 amp higher amperage may cause damage to the thermostat To avoid electrical shock and to prevent damage to the furnace air conditioner and thermostat disconnect the power supply before beginning work This can be done at the circuit breaker or at the HVAC system Caution ENGLISH Caution Sa...

Page 2: ...ot install it where there are unusual heating conditions such as in direct sunlight near a lamp radio television radiator register fireplace near hot water pipes in a wall or near a stove on the other side of a wall Do not locate in unusual cooling conditions such as on a wall separating an unheated room or in a draft from a stairwell door or window Do not locate in a damp area This can lead to co...

Page 3: ...moving any wiring from existing thermostat Wires must be labeled before they are removed THERE IS NO STANDARD COLOR CODE When remov ing wires from their terminals ignore the color of the wires and LABEL THEM by the terminal where they were screwed Label the wires one at a time You must label all the wires before you proceed With all wires labeled remove them from the old unit Make sure the wires d...

Page 4: ... not have a C wire you can run a new wire from the HVAC or use a standard 24VAC 100mA or greater wall transformer IMPORTANT If you have both RH and RC wires you need to move the RC RH switch to the UP position which separates these terminals Prepare Wires Please follow these guidelines for safe and secure wire connections You will need at least 2 6 of wire for each of your connections to the CT80 ...

Page 5: ...tact customer support for help When handling take care not to damage the labels for each wire G W Y RH RC G 6 Wire Heat Cool From HVAC RC C Y RH W W Y R G 5 Wire Heat Cool From HVAC G C Y R W W R G 4 Wire Heat From HVAC C R G W From HVAC C W W R R 3 Wire Heat WIRES WIRES WIRES WIRES G R Wn Yn R G Multi stage Cool From HVAC Yn C Wn Bor O AUXn Yn RG Multi stage Heat Pump w Multi stage Multi stage He...

Page 6: ...up over the terminal area Do not bunch wires behind the CT80 Feed any slack back into the wall opening Connect Your Wires Connect labeled wires only to a terminal with the same letter label Insert the wire in the terminal well and tighten the screw securely NOTE If you wish you can mount the CT80 to the wall first and then connect the wires The CT80 can be externally powered with a power source ra...

Page 7: ... 3 Attach the CT80 to the wall with the screws provided 4 If you are mounting the CT80 to sheet rock or if you are using the old mounting holes use the plastic anchors provided 5 Mark first and drill a 3 16 in 4 8mm hole for the insert at each screw location then mount the unit Wall Wires Wall anchor CT80 Screw to wall Place wires like this inside wire groove from HEAT COOL system C W Y RH G ...

Page 8: ...bar to the right of the display and touch OFF Heat and Cool systems must be configured separately except with Heat Pumps The CT80 uses an easy to use interview to determine the proper setup for your HVAC system You must know what type of HVAC system you have before answering the interview questions If you are not sure go to the HVAC unit and determine the make and model then get a manual for the s...

Page 9: ... heat do you have ELEC or GAS OIL How many stages of aux heat do you have 1 stage 2 stage 3stage Maximum of 5 stages total pump and aux Thank you your thermostat is configured to control your heating and cooling When you have completed set up completing interview go to pg 11 and test your installation FASTSET for NORMAL systems not a heat pump 1 Press the purple MENU button on the control bar and ...

Page 10: ...T UP 2 Touch and highlight COOL in the upper left corner of the display 3 Select the number of stages of compression for your cooling system 1 or 2 by touching the number of STAGES and using buttons to increase or decrease 4 Touch to select the appropriate FAN CONTROL setting HVAC or TSTAT NOTE Most cooling systems require that the thermostat TSTAT control the fan 5 Press HOME to return to the Hom...

Page 11: ...8 Press HOME button to return to the Home screen NOTE For heat pump system your cooling is already configured since the heat pump unit provides both heating and cooling Check HVAC system Test Installation Follow these procedures to verify you have correctly installed the CT80 TO CHECK FAN If you connected the G wire Touch the fan icon and turn the fan ON Verify that air is blowing from the system ...

Page 12: ... 1 Press the mode control and select COOL 2 Press the blue button to lower the cool target temperature to 50 o F Allow the system 5 minutes to respond 3 Verify that cool air is blowing from the system 4 Return mode to OFF Congratulations you have successfully installed your unit Please proceed to the OPERATING Guide to initialize the CT80 IMPORTANT After you have labeled and connected your wires a...

Page 13: ...g and cooling compressors from damage This thermostat uses a new technique called sequential staging for more comfort with faster reaction to requested temperature changes 24VAC is Required This thermostat can run on the HVAC system s 24VAC common C wire or an external adapter 12V to 24V AC or DC connected to the C and RH no polarity The 24VAC C wire is the other side of the 24VAC heating transfor...

Page 14: ...Wire Heat STEP 1 Connect the R or RH wire to the RH terminal This connects the heat power STEP 2 Connect the W wire to the W terminal This connects the heat STEP 3 Connect the G wire to the G terminal on the thermostat This connects the fan STEP 4 Connect the C wire to the C terminal Your system is now connected to the CT80 Please Go To Page 6 RC and RH connected RC and RH connected POWER HVAC SYS...

Page 15: ... W wire to the W terminal This connects the heat STEP 2 Connect the Y wire to the Y terminal This connects to the cooling compressor STEP 3 Disconnect the RC and RC terminals by placing the RC RH switch in the UP position STEP 4 Connect the RH wire to the RH and the RC wire to the RC terminals This connects power STEP 5 Connect the G wire to the G terminal This connects the fan STEP 6 Connect the ...

Page 16: ...Heat STEP 1 Connect O wire to the O terminal or B wire to the B This connects the change over valve If you have both O and B connect only the O wire to the O terminal and DO NOT connect B to B terminal see wire reference under Trane for B wire terminal STEP 2 Connect the Y wire s to the Y terminal s This connects the compressor stages STEP 3 Connect the R or RH wire to RH This connects the power S...

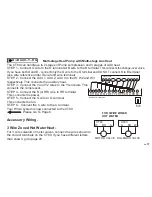
Page 17: ... the Y and Y2 wires to the Y terminals This connects the compressor STEP 4 Connect the R or RH wire to RH terminal This connects the power STEP 5 Connect the G wire to G terminal This connects the fan STEP 6 Connect the C wire to the C terminal Your HVAC system is now connected to the CT80 Please Go To Page 6 Accessory Wiring 3 Wire Zoned Hot Water Heat For 3 wire solenoid or motor valves connect ...

Page 18: ... of the dehumidifier relay This allows DH to turn the dehumidifier ON and OFF Fresh Air The Fresh Air feature uses the EX relay to control a baffle on a fresh external air source Connect the 24VAC baffle to C and EX terminals H or DH To HUMIDIFIER or DEHUMIDIFIER RELAY RH FOR EXTERNAL HUMIDIFIER or DEHUMIDIFIER USING HVAC SYSTEM s 24VAC H or DH R C CT80 FURNACE POWE R 24VAC H or DH To HUMIDIFIER o...

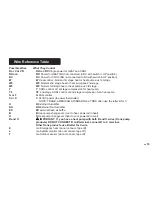
Page 19: ... stage COOL control or 2nd stage compression for a heat pump G or F G FAN control C or X C 24VAC power to power thermostat NOTE TRANE AMERICAN STANDARD and YORK often use the letter B for C H H External Humidifier DH DH External De Humidifier EX EX external fresh air baffle B B Heat pump changeover cool to heat powered in heat O O Heat pump changeover heat to cool powered in cool B and O IMPORTANT...

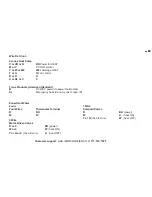
Page 20: ...merican Standard B C 24VAC power to power thermostat X2 Emergency heat do not connect tape off Zoned Hot Water 2 wire Your Wires Thermostat Terminal R RH W W 3 Wire Motor Driven Valves R or 5 RH power W or 4 W heat ON Y or G or 6 the 3rd wire A heat OFF 3 Wire Solenoid Valves R RH power W A heat ON Y or G the 3rd wire W heat OFF Customer support www radiothermostat com or 877 602 5028ea ...

Page 21: ... off and the 1st stage stays on to the new target temperature Staging for 2 or 3 stages normal Heat Target Temperature Maintenance in HEAT If the room temperature is within the target temperature minus the 2nd stg on at setting the 1st stage of heat will turn on If the target temperature is not reached within 15 minutes the 2nd stage of heat will turn on with the 1st stage to the target temperatur...

Page 22: ... within the target temperature minus the aux on at setting the auxiliary heat will not be used just the heat pump 1 or 2 stages as explained above in target temperature maintenance Target Temperature Recovery If the room temperature is beyond the new target minus the aux on at setting the 1st stage of heat pump will turn on ten seconds later the 2nd stage of heat pump will turn on ten seconds late...

Page 23: ...fresh air until FAN control is returned to AUTO Energy saving with Fresh Air You can use your FRESH AIR baffle as a source of HEAT or COOL Your fresh air baffle can help you save money by allowing you to use it as your first stage of Heat or Cool depending on the outside air temperature For example you can use it to cool off the house after a hot day when the outdoor night time temperature cools down...

Reviews: