background image


© Copyright QVIS® All documentation rights reserved.  

51


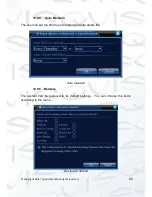
UPNP

 
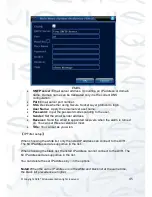
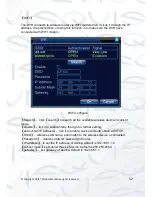
UPNP protocol allows you to auto port forwarding on router The precondition of 
using this function is to make sure the UPNP function of router is enabled. 


 UPNP 


Enable

: Choose Enable to make sure all UPNP settings are available 


HTTP

: Router will automatically distribute HTTP port for the device,  

during web browser viewing. 


TCP

: Router will automatically distribute TCP port for the device, 

when monitoring via CMS. 


Mobile Port

: Router will automatically distribute Mobile Port for the 

device  when using your smart phone to monitor the DVR. 


Summary of Contents for Pioneer-4

Page 1: ...4 8 16 CHANNEL HDA DVR PIONEER 4 PIONEER 8 PIONEER 16 User s Manual V1 0 12 2014...

Page 2: ...ain Menu 11 10 Preview 15 11 Desktop Shortcut menu 15 12 Recording Config 16 13 Backup 17 14 Snapshot Storage 20 15 Playback 21 16 Network Setup 23 17 Alarm 24 18 PTZ Control 36 19 System Setup 37 20...

Page 3: ...deo footage to ensure only relevant information is recorded For added ease of use the DVR is designed so that it offers a streamlined setup process The user can achieve great ease of use applicability...

Page 4: ...surveillance recording checking downloading and more Multi tile playback mode Zoom into arbitrary regions Remote Network Operation Ethernet connection for real time surveillance across a structured n...

Page 5: ...o liability or responsibility for all the fires or electrical shock caused by improper handling or installation 2 Transportation security Heavy stress violent vibration or water splash are not allowed...

Page 6: ...r Before installation please open the package and check all the components are included Contact your local retailer ASAP if something is broken in your package 2 Front Rear Panels 2 1 Front Panel 2 4...

Page 7: ...Previous Frame 22 Power switch 7 HDD indicator light 15 Next Frame 23 IR remote receiver 8 Previous File 16 Play 24 USB port external storage 2 2 Rear Panel 16 Channel device shown below 1 RS485 Alar...

Page 8: ...can be used for a mouse flash disk WIFI or 3G module dongle etc 3 3 Monitor connection To view DVR menu and interface system you will need to connect a computer monitor to the device The rear panel h...

Page 9: ...to the burnout of the internal chipset 4 5 Alarm input type unlimited The DVR alarm output port is set to a constant opening type 5 Startup Once you have setup the peripheral device connections HDD in...

Page 10: ...min user account allows unlimited access to the system setup and Guest user account only allows the preview and playback functions to be used User can modify the password of Admin and Guest but cannot...

Page 11: ...own as below Main Menu Window 8 Logout You have two options Logout or Reboot You can use the desktop shortcut menu or enter the main menu to access the Logout Menu Logout window Logout Quits the menu...

Page 12: ...Alarm Motion detection Set the motion detect alarm channel sensitivity area linkage parameters defending time section alarm output screen hint recording screen shot PTZ patrol buzz email and FTP uplo...

Page 13: ...Set algorithm rule trajectory display sensitivity minimum pixel alert mode and setting linkage parameters period alarm output screen prompt record PTZ tour buzzer EMAIL FTP upload System configuration...

Page 14: ...interval Digital Set channel mode check channel status and configure the digital channel etc Management tools Hard disk management Set appointed hard disk as read write disc read only disc or redunda...

Page 15: ...ce hardware configuration and message Import Export Export the device s log or configuration to external device like USB flash disk Input the configuration with external device like USB flash disk Sys...

Page 16: ...re shown in each window see Chart 1 1 Recording status 3 Video loss 2 Motion detect 4 Camera lock Chart icons on preview window 11 Desktop Shortcut Menu When in preview mode you can right click on the...

Page 17: ...ding Config Channel Choose the corresponding channel number to set the channel Choose the All option to set every channel Redundancy Check this option when you have a second HDD drive to use as a back...

Page 18: ...ing this option will initiate regular recording in the set time section The video file type is R Detect Selecting this option will set the motion detect trigger function when there is video blindness...

Page 19: ...erved 18 Backup option screen Detect Detect the storage connected with the DVR such as hard disk or universal disk Backup Click backup button and the dialog box is popped up You can choose the backup...

Page 20: ...at you require You can choose between two different formats which are H 264 or AVI Start pause Click the play button to start the backup and click the pause button to stop the backup Note During backu...

Page 21: ...ot to select related setting see pic 3 the function is closed in default Note To instruct system to save snapshots on the primary HDD set Snap at Main Menu Advanced HDD Manage Snapshot Pic 3 Snapshot...

Page 22: ...ktop shortcut menu 2 Main Menu Record Playback When you enter the playback interface you can playback video from a multiple of channels at the same time Note The hard disk that saves the video files m...

Page 23: ...layback time code Displays the current time code and selected playback operation Playback refer to the following sheet for full explanation Chart 2 Playback controls key Note Frame by frame playback c...

Page 24: ...way Default 192 168 1 1 Pic 5 Network setting You can manually configure the options above to correctly setup your local network by replacing the default IP addresses with the ones allocated to the cu...

Page 25: ...is not in alarming status means it is in alarming status You can use desktop shortcut menu or click main menu alarm function alarm output to enter the alarm output interface Alarm output Configuration...

Page 26: ...when the motion sensor has detected movement between certain periods of time To set these options Choose Main Menu Alarm Motion Detect then enter the setup interface Choose the camera channel you wan...

Page 27: ...vice Activating the buzzer local buzzer To upload trigger data through the FTP Set other channels alarm parameter following step 2 and step 3 Note Video blind video loss and alarm input s setup method...

Page 28: ...elay Delay a few moments and stop when the alarm state is turned off The range is 10 300 seconds Record channel Choose the recording channel multiple option supportive Trigger the video signal when th...

Page 29: ...deo picture of related record channel snapshot channel will be uploaded to assigned position Note FTP upload need be set at Netservice Buzz When alarm is triggered the device will emit a buzzing sound...

Page 30: ...menu screen Event Type Selecting abnormity you want to inspect Enable Select it to make sure abnormal function workable Show message Automatically alarm cue dialog box come out of the main screen Buzz...

Page 31: ...ted areas within the footage frame so that when an object has been analysed entering the picketed area the alarms will be triggered Intelligent Video Analysis Intelligent analysis function you can set...

Page 32: ...moving object meet preset cordon rules the alarm will be triggered Warning area can set 3 kinds of prohibited directions bidirectional prohibited enter and leave when the moving object meet preset war...

Page 33: ...ce you have set your rules you need to set the picket mode choose picket line or picket area Click setting to enter the config interface then right click the mouse and choose Add Use the mouse to set...

Page 34: ...nalysis alarm is triggered there will be red box line in the preview image The intelligent analysis function mainly includes the 2 facets detailed below Touch line detection bidirectional touch line s...

Page 35: ...3 options in the drop down box Minimum image distance range between 0 30 the more flexible the less image distance Alert way three modes available Items stranded object appears within warning area and...

Page 36: ...stranded see image below Rule click Set enter the setting page of rule right click mouse choose add use mouse to fix several points and then connect them to form an irregular region right click mouse...

Page 37: ...use button to operate the PTZ directly moving the mouse controls the direction of PTZ use the scroll wheel in the middle of the mouse to zoom in or zoom out 3 Operation interface is as followed The fu...

Page 38: ...Z rotation 8 directions control is supportive 4 directions in Front panel is supportive High speed PTZ Full screen shows channel image Left press mouse and control PTZ to rotate orientation Left press...

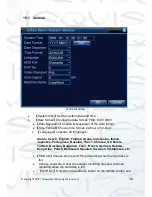
Page 39: ...age supports 29 languages Arabic Czech English Finnish Greek Indonesian Italian Japanese Portuguese Russian Thai T Chinese S Chinese Turkish Brazilian Bulgarian Farsi French German Hebrew Hungarian Po...

Page 40: ...in the range of 0 60 0 means no latency time Machine Name Set the device s name DST Choose the summer time option and the pop up dialog box appears DST week DST date 19 2 Encode This menu will allow...

Page 41: ...4 main profile Resolution Resolution type 1080P 720P 960H D1 HD1 CIF QCIF Frame Rate P 1 frame s 25 frame s N 1 frame s 30 frame s Bit Rate Type You can choose limited code stream or variable code str...

Page 42: ...deo and audio multiplex stream Extra stream Settings Extra stream is used for client side monitoring mobile monitoring Channel title select channel title and then to choose whether need enable video a...

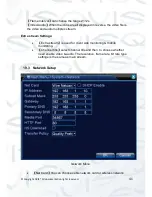
Page 43: ...set and reboot then it works Media port Default 34567 HTTP port Default 80 HS Download Transfer Policy There are three strategies self adaption image quality precedence and fluency precedence The cod...

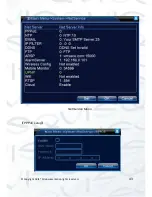
Page 44: ...Copyright QVIS All documentation rights reserved 43 NetService Menu PPPoE setup...

Page 45: ...up the IP address in the IP address and obtain the current IP address Then use this IP address to visit the DVR through user port NTP setup NTP The NTP server must be installed in the PC Enable Rever...

Page 46: ...Set the email sender address Receiver Send the email to appointed receivers when the alarm is turned on You can set three receivers at most Title You can set as you wish IP Filter setup When choosing...

Page 47: ...Copyright QVIS All documentation rights reserved 46 IP Filter DDNS DDNS setup...

Page 48: ...e IE address column to visit Note The DNS setup must be configured correctly in the network setup FTP setup FTP is available only when alarm is triggered or alarm activates record and snapshot functio...

Page 49: ...ce to do so ARSP Startup DDNS server to add devices and manage it in the DDNS server ARSP Type choose DNS Enable means it is chosen Sever IP IP address of DDNS server Port Port No of device related DD...

Page 50: ...the alarm server Alarm server setting Protocol type GENERAL Enable To tick it means enable Server IP IP address of Alarm Server Port Device Port No Alarm Report Tick it means to report alarm informati...

Page 51: ...0 Wireless Config Enable Choose Enable to make all settings available Type Dial type default AUTO Wireless AP 3G access point Dial Number 3G Dial Number User Name User name of 3G Password Password of...

Page 52: ...router is enabled UPNP Enable Choose Enable to make sure all UPNP settings are available HTTP Router will automatically distribute HTTP port for the device during web browser viewing TCP Router will a...

Page 53: ...rch all the available wireless device in current range enable tick it to enable firstly then go for further setting auto obtain IP address tick it to enable device will auto obtain a WIFI IP SSID wire...

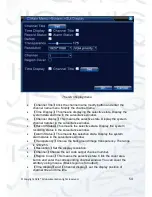
Page 54: ...setting Port the default port is 554 19 5 GUI Display Configure the video output parameters including the front output mode and encode output mode Front output The local preview mode includes channel...

Page 55: ...ans the selective state Display the system recording status in the surveillance window Alarm Status This means the selective state Display the system alarm status in the surveillance window Transparen...

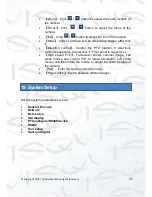
Page 56: ...dome address Default 1 Note The address must be consistent with the dome address Baudrate Choose the corresponding dome baud rate length You can control the PTZ and vidicon Default 115200 Data bits I...

Page 57: ...patrol routine of the DVR This means that the tour mode has been enabled You can choose the single view four view six view of the single mode tour Tour configuration menu interval Set the patrol switc...

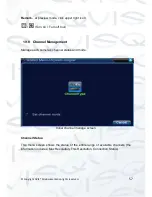
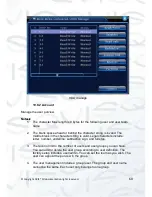
Page 58: ...t icon Turn on Turn off tour 19 8 Channel Management Manage each camera s channel status and mode Initial channel manage screen Channel Status This menu screen shows the status of the entire range of...

Page 59: ...Copyright QVIS All documentation rights reserved 58 For example When a channel is added to the device but it is not enabled Not Configured will be displayed...

Page 60: ...age Configure and manage the hard disk The menu displays current hard disk information hard disk number input port type status and overall capability The operation include setup the write read disk re...

Page 61: ...haracter string is valid Legal characters include letter number underline subtraction sign and full stop 3 There is no limit to the number of users and user groups you can have You can add or delete t...

Page 62: ...ify Group Modify the existing team attribute Modify Password Modify the user password You can set 1 6 bit password The blank ahead or behind the character string is invalid The middle blank in the cha...

Page 63: ...enu interface and input the user name and password Choose the team and choose whether cover using the user Cover using means that the account can be used by multiple users at the same time Once you ha...

Page 64: ...ion rights reserved 63 Add User Add Group Add a user group and set the purview There are 33 different purviews Which allows you to either shut down the equipment real time surveillance playback record...

Page 65: ...l documentation rights reserved 64 Add group Delete User Delete the current user Choose the user and click the delete user button Delete Group Delete the current group Choose the group and click the d...

Page 66: ...9 3 Online user To check the information of network user that connected with local device also can tick the selected user to break up connection make at the box then the user will be frozen after con...

Page 67: ...reserved 66 19 9 4 Auto Maintain The user can set the time to auto reboot and auto delete file Auto maintain 19 9 5 Restore The system can be restored to its default settings You can choose the items...

Page 68: ...erved 67 19 9 6 Upgrade Upgrade Upgrade choose USB interface Upgrade file choose the upgrade file 19 9 7 Device Info This provides the device interface info like audio in alarm in out so that it can b...

Page 69: ...8 Import Export Users can export the log info and the configure file from device to connected flash stick and also they can import related configure file from flash stick to settings which greatly br...

Page 70: ...9 10 1 HDD info This interface displays the hard disk state hard disk type overall capability residual capability the recording time etc HDD info Tips means that the hard disk is normal X means that t...

Page 71: ...d disk capability MB H in real time It displays the information in a wave sketch map BPS 19 10 3 LOG This is to search the log information database using a set search mode Log information This include...

Page 72: ...Copyright QVIS All documentation rights reserved 71 Press Page up or Page down button to look up and press delete button to clear all the log information Log information...

Page 73: ...l number NAT status and so on Version information 20 Web Monitoring 1 When connecting to a network use the browser on your PC to login to the DVR to use the remote control functions To do these please...

Page 74: ...h all the videos after login you need to choose the network stream LAN networks use the main stream to transfer whilst WAN networks use the extra stream to 5 transfer If network bit rate is poor what...

Page 75: ...Local config To set device alarm enable to linkage function on the remote network client side Channel control Open the video choose the video on the left video window and then choose channel on the ri...

Page 76: ...d options to help increase the variety of customisable setups The main options you can configure are Video encoding resolution compression codex Multi channel playback Video data streaming rates File...

Page 77: ...l four Note video resolution network data transfer requirement speeds Video Encode Required bit rate D1 512 2560kbps HD1 384 2048kbps CIF 64 1024kbps QCIF 64 512kbps 1080P 1024 8196kbps When using the...

Page 78: ...ithin the monitor windows on the playback page Pic 11 Playback To combine different channels together please follow these steps 1 Main Menu Record Record to set the record parameter for each channel 2...

Page 79: ...upporting video file which are burnt real time to CD Real time remote storage the device supports storing video files in real time to a remotely connected data storage device 17 2 File download Using...

Page 80: ...The power of the switch power supply is low D Frontal video signal is not stable E Bad heat radiator or too much dust or bad running circumstance for the DVR F The hardware of the DVR is damaged 3 Sy...

Page 81: ...video transmission line is too large D The color and brightness setting of the DVR is wrong 6 I cannot find the video files in local playback mode Possible reasons A The data line of the hard disk is...

Page 82: ...The battery has a bad connection or the voltage is too low C The oscillation is damaged 11 The DVR cannot control the PTZ Possible reasons A There is something wrong with the frontal PTZ B The settin...

Page 83: ...alled or blocked by web browser C The version DX display driver is not DX8 1 or later Update the display card driver D Network connection failure E Network setting issues F Invalid password or user na...

Page 84: ...vice C The backup equipment is not compatible D The backup equipment is damaged 17 The keyboard cannot control the DVR Possible reasons A The serial port of the DVR is not set correctly B The address...

Page 85: ...e C The battery has fully discharged D The remote controller or the front panel of the recording machine is damaged 21 The storage time is not enough Possible reasons A Front Vidicon quality is bad Th...

Page 86: ...on of added device is too large to display by the monitor 24 Click search why not search out any of the device Possible reasons A There is no other device existing within the Local area network B The...

Page 87: ...al channel need few seconds shift device means to show new picture so it needs several seconds to buffer Appendix 1 Remote controller operation No Name Function 1 Multi channels button Multi channels...

Page 88: ...e click the playback video to zoom in or out the screen Double click the channel to make it preview in full screen display Double click again to resume the multi channel display Left click Choose acco...

Page 89: ...Mixed 4 AHD M Analog 4 720P IP IP 1 1080P 8 720P 4 1080P 20 960H Audio Audio compression G 711A Intercom support Recording and Playback Record mode Manual alarm motion detection timing Playback Channe...

Page 90: ...support multiple PTZ protocols USB 2 USB ports Hard disk 1 SATA 4TB Max capacity Wireless 3G WIFI expand via USB Other Power 12V 2A dimension 310mm length 215mm width 45mm height For further informat...

Page 91: ...reserved 90 ENHANCE YOUR DVR WITH OUR WIDE RANGE OF QVIS CAMERAS OUR PRODUCTS ARE FULLY TESTED TO WORK TOGETHER FOR COMPATABLE CAMERAS LOOK FOR THESE COLOUR ICONS ON THE SIDE OF THE BOX DON T SETTLE F...

Reviews: