background image

▒ 5-13-1. How to use  Qvia App - SD Card ▒

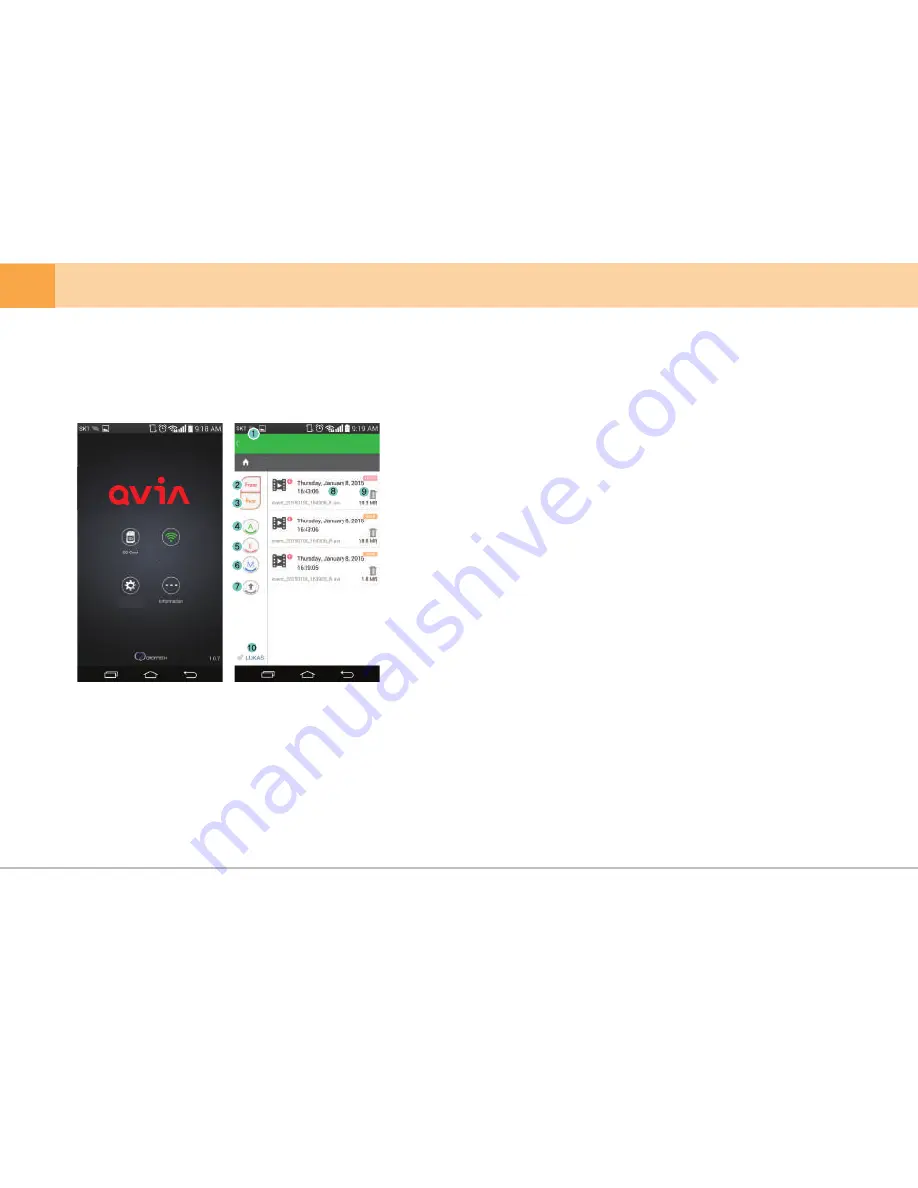
You can view your recorded footage saved on the SD Card right from the Qvia App

1. 

Navigation 

: Navigate to the Main Screen.

2. 

 Front Camera 

: Display footage captured by the Front Camera.

3. 

Rear Camera 

: Display footage captures by the Rear Camera.

4. 

Always Video 

: Display footage captured in Always Recording mode.

5. 

Event Video 

: Display footage captured in Event Recoding mode.

6. 

Motion Detection Video 

: Display footage captured in Motion Detection mode.

7. 

Customize 

: Arrange order of footage by time sequence (ascending/descending).

8. 

Play 

: View footage file.

9. 

Delete 

: Delete footage file.

10. 

Wi-Fi 

: ‘Navigate to ‘Qvia Connection’.

QVIA

Connection

Settings

QVIA

/QVIA

36 

... DASH CAM

Summary of Contents for z970 WD

Page 1: ...nd on the Google Play Store and the App Store The Qvia application can be used with Android 4 0 or later iOS 5 0 or later Qvia Application can be different in actual depending on version or model Wi F...

Page 2: ...format free feature However the memory card s may obtain corrupt images image recording omissions image cuts frame change omissions other recording defects due to a decrease in reading writing speed F...

Page 3: ...17 Features 8 1 2 3 4 Product Usage 5 1 Standard Operation Guide 5 2 Operating Dash Camera 5 3 Play Recorded Videos 5 4 Real time Video 5 5 Configuration 5 6 Formatting Memory Card 5 7 Time Setting 5...

Page 4: ...e impacts to this device can cause a malfunction Handle the product with care 6 Only use manufacture approved power cable and accessories Any damages or loss to device vehicle as a result of accessory...

Page 5: ...not operate properly in environments with poor lighting conditions due to noise and vehicle security LED s The left right side image quality of this device may vary due to characteristics of the wide...

Page 6: ...Please ensure the surrounding area is clutter free to avoid reflections vibrations that may reduce the image audio quality 2 Ensure camera lens is clean at all times 3 Do not attempt to operate or ins...

Page 7: ...rds not provided by us 5 Operating temperatures may vary depending on the performance of memory cards 6 Be sure to backup your recorded videos using an extra storage device PC external HDD etc A backu...

Page 8: ...e Thai Vietnamese German Mogolian Turkish Italian Hindi Czech Cantonese Portuguese Bahasa Indonesia Bahasa Melayu Continuous recording generates recording files at three minute interval continuously E...

Page 9: ...e upgrade support Firmware will be upgraded for improvement of product function and error correction Video playback Video can be viewed from the PC Mac dedicated Viewers or on the LCD screen of the ca...

Page 10: ...image quality and etc This model has a format free feature However past video clips can be played back through general media players depending on file size This model has a format free feature However...

Page 11: ...video and video being recorded Set configuration settings Display dash cam operation status etc Dash cam power supply switch Used to insert separate microSD card Used to insert separate SD card Used...

Page 12: ...wards or it may cause a GPS and or an event malfunction With no GPS detection keeps recording in event mode Clean the windshield area where the dash cam will be installed Adjust camera lens angle to s...

Page 13: ...ont camera and rear camera with front rear connection cable After installation turn on the engine first and then the power switch on ACC or ON of dash cam Check normal working status in the LCD screen...

Page 14: ...power supply may differ depending on the vehicle Please connect to output side or a fire could occur Identify a fuse that has power e g emergency lamp indoor lamp tall lamp etc to connect with the ye...

Page 15: ...the LCD screen Adjust camera lens angle to display vehicle hood bonnet on approx 40 of the LCD screen as shown below Too low of a lens angle may hide traffic lights too high of a lens angle may darke...

Page 16: ...e 2 microSD card usage time event recording 16G Continuous recording Total usage time Total no of files Total usage time 30 Approx 1h 30min Approx 3h 110 Approx 55min 60 Approx 3h Approx 6h 224 Approx...

Page 17: ...Recording SD card microSD card AlwaysMovie EventMovie 30sec always event event Record when impact takes place during driving or parking Able to set G sensor sensitivity SD card MotionMovie 30sec park...

Page 18: ...older Emergency recording cannot operate during event recording and event recording does not operate during emergency recording Always is displayed in lower part of the screen when the recorded video...

Page 19: ...onment E g When parking in an alley or underground frequent movements may interfere with motion recording if set on a high sensitivity Motion detection or frame omission may occur depending on surroun...

Page 20: ...ront view rear view Reverse rear L R front rear view left right front rear view up down front rear view PIP screen rear front PIP When rear view camera is not connected only front view screen is displ...

Page 21: ...nt rear view video being recorded is displayed Configuration Setting set video basic functions LCD additional functions audio and OBD II function 3 5 6 7 Time Setting set date time of dash cam When ti...

Page 22: ...status bar will disappear automatically If you re touch the screen the status bar will appear again 1 Video Play List display play list in sequential order When you touch the video name the video wil...

Page 23: ...screen 3 Front Rear view video screen display 4 PIP screen display 5 Driving date time display 1 Home 2 6 Display Recording Voice 7 GPS reception info A GPS received V no GPS reception F GPS power is...

Page 24: ...mera 2 3 LCD set screen stand by time screen brightness screen protector and touch compensation Additional set power safety LED and initialize configuration setting 5 Audio set recording speaker hourl...

Page 25: ...screen will be displayed You can change settings by selecting the icons on each screen 1 2 3 Front Camera brightness set front view camera brightness from 1 5 stages Rear Camera brightness set rear v...

Page 26: ...speaker etc 3 Hourly Alarm set function that tells time at every hour 4 Voice Guidance Language able to choose language for guidance Korean English Russian Chinese Arabic French Spanish Japanese Thai...

Page 27: ...rightness from 1 3 stages 2 Screen Saver set screen saver to set do not use Screen saver can be set with the image that the user wants 1 Edit the image you want in 480x272 size 2 Set the edited image...

Page 28: ...ting during driving setting during parking from 1 5 stages setting by user 2 Auto conversion to parking mode set to do not use Auto conversion to parking mode 10sec 30sec 1min 2min 3min 5min 7min and...

Page 29: ...ge cut off function 2 Security LED set front rear view Security LED to set do not use 3 Use rear cam in parking mode set Use rear cam in parking mode set do not use 4 Initialize configuration setting...

Page 30: ...tting set Eco Drive according to the user environment Cut off voltage may have errors depending on vehicle model Be sure to use OBD II power supply when connecting OBD II Duplicated power supply using...

Page 31: ...sure to save important data in other storage media before you format the memory card 5 6 Card Format 1 SD Card Formatting SD Card 2 microSD Card Formatting microSD Card 3 Dual Card Formatting both of...

Page 32: ...le is installed When you change time the memory card should be formatted 1 Time Setting 5 7 Time Setting set time of the dash cam 2 GMT Setting set GPS standard time 1 2 2016 4 07 11 AM 57 Touching th...

Page 33: ...urn light 3 Brake status 4 Steering wheel turning angle steering wheel turning angle displayed with numbers 5 Eco Drive info 6 Voltage supplied to OBD II 7 RPM info 8 Accelerator displayed between 0 9...

Page 34: ...t equivalent to the g sensor s maximum sensitivity occurs for 15 seconds 2 When Main Event occurs Conditions to enter the main event The product enters a e or a e when an event occurs according to the...

Page 35: ...ected For a stable connection please remain within close proximity with your dash cam When the dash cam is connected with your smartphone the Qvia Connection icon will turn green Change your password...

Page 36: ...e captures by the Rear Camera 4 Always Video Display footage captured in Always Recording mode 5 Event Video Display footage captured in Event Recoding mode 6 Motion Detection Video Display footage ca...

Page 37: ...aptured in Always Recording mode 5 Event Video Display footage captured in Always Recording mode 6 Motion Detection Video Display footage captured in Motion Detection mode 7 Customize Order Arrange or...

Page 38: ...6 GPS Configure GPS settings 7 Additional Additional settings and functions 8 Motion Detection Configure setting for Motion Detection 9 Audio Configure audio quality and settings 10 Reset Reset all se...

Page 39: ...rom Wi Fi again 5 Upload firmware to your device Qvia Configuration Firmware Update 6 Please wait until firmware has completely been installed and device to restart Please do not manually restart your...

Page 40: ...pecifications You can download the Qvia Viewer at any time from our website www qvia1 com Name of viewer icon may vary depending on OBD II compatibility OS Windows XP SP3 Vista 32Bit WIN 8 32 64bit H...

Page 41: ...time File list GPS info File list event info Front view camera display icon Rear view camera display icon Sub video play window Front view video file name Rear view video file name GPS map informatio...

Page 42: ...ngs User can change device settings i e recording configuration system configuration additional functions and time etc to their preferences through Device Settings on the Viewer program menu z970 42 D...

Page 43: ...Mileage Only with GPS or OBD II Dash Cam Supply Voltage Recording Mode Vehicle Number able to input max 8 digits Product Model Image Quality video saving data speed sec S Best quality 1 2 3 4 5 6 7 8...

Page 44: ...CD resolution Size Video Compression Gravity Sensor GPS Storage Media Player Program Audio Power Current consumption Low Voltage Cut off Operating Storage Temperature Size Weight H 264 AVI format Code...

Page 45: ...side of the stand to separate 5 Device is removed safely from mounting bracket 1 Disconnect device from power cable Note that if device is attempted to be removed from bracket by force damage can be...

Page 46: ...evice from power cable 1 2 Press the left handle of the mounting bracket 2 3 4 3 Pull out the left side toward the stand 4 Device is removed safely from mounting bracket If you do not press the left h...

Page 47: ...BD II connector location may differ depending on vehicle Install the LK 750 OBD II firmly into the vehicle s OBD II connector arrayed holes Push LK 750 OBD II to OBD II connector to its end and fix it...

Page 48: ...user manual acts as warranty and will not be re issued Take extra care keeping the manual safe 3 Be sure to bring warranty when you request repair service Certified company info 1 Certified company Q...

Reviews: