background image

QLS-4100 Xe 

8-11 

Print & Peel Setup 

This section describes how to set up Print & Peel. 

To set up Print & Peel: 

1


Ensure the printer power switch is in the On position. Move the Print & 
Peel Base power switch to the On position. The printer and base will be 
powered up. 

Note:

 Ensure that compressed air is connected. For more information, 

refer to 

Chapter 2: Physical Setup

2


Move the Rewind Enable/Disable switch to the down position. This will 
disable the rewind motor for the setup process. 

3


Fully seat an empty cardboard takeup core on the rewind mandrel on 
the Print & Peel Base. 

4


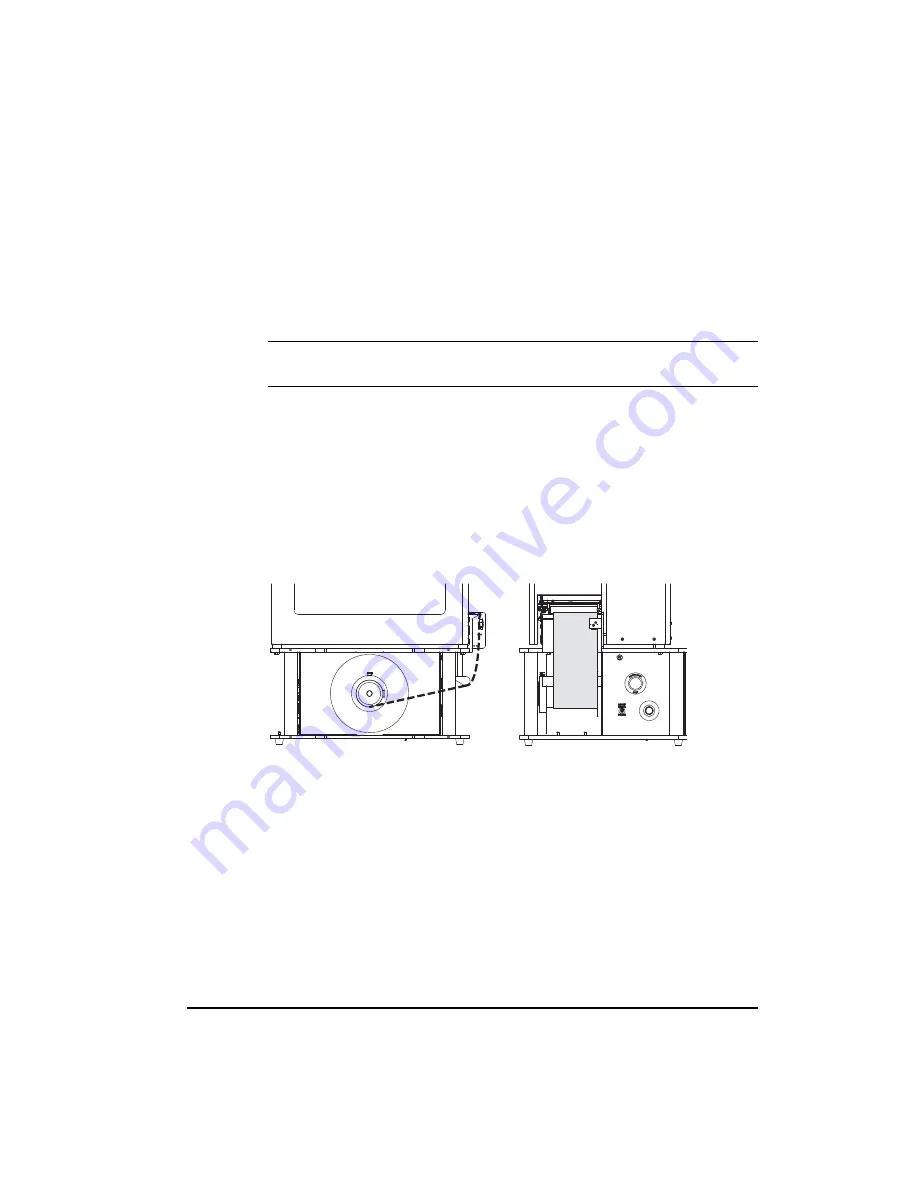
Press the FORM FEED/ADVANCE key until you have enough media to 
reach the takeup core on the Print & Peel Base. Remove the labels from 
this section to expose the liner. Refer to the following illustrations. 


Thread the liner as indicated. Ensure the liner passes beneath the sensor 
on the right side of the liner guide. 

Wrap the end of the liner under the takeup core and secure the end with 
a small piece of adhesive tape. 

Summary of Contents for QLS-4100

Page 1: ...otice ___________________________________________ QuickLabel An AstroNova Division World Headquarters 600 East Greenwich Ave West Warwick RI 02893 Tel 877 757 7978 Fax 401 822 2430 E mail info QuickLa...

Page 2: ...a period of one year from the date of original purchase This warranty excludes printhead and print platen which are separately warranted If the customer discovers a defect this defect must be reporte...

Page 3: ...7 757 7310 QuickLabel An AstroNova Division is not responsible for products lost or damaged in transit Contact Information for Factory Sales and Service Centers QuickLabel USA and World Headquarters 6...

Page 4: ...uclide ZA la Clef de St Pierre 10A Rue Blaise Pascal 78990 ELANCOURT Tel 33 1 34 82 09 00 Fax 33 1 34 82 05 71 Web Site www QuickLabel fr Sales E mail info QuickLabel fr Technical Support E mail suppo...

Page 5: ...ot installed and used in accordance with the instructions may cause harmful interference However there is no guarantee that interference will not occur If this equipment does cause interference to rad...

Page 6: ...are that the QLS 4100 Xe complies with The European RoHS Directive 2002 95 EC Restriction of the Use of Certain Hazardous Substances in Electrical and Electronic Equipment as of 6 6 2007 This declarat...

Page 7: ...sions du Conseil Anwendbar fur die Richtlinien Applicazione delle Direttive del Comitato 2004 108 EC 2006 95 EC I the undersigned hereby declare that the equipment specified above conforms to the abov...

Page 8: ......

Page 9: ...int Servers 2 12 Utility Port Connection 2 13 Compressed Air Connection 2 14 Preparing the Air Regulator 2 14 Connecting the Air Supply 2 14 Chapter 3 Loading Media and Calibration 3 1 Loading Thermal...

Page 10: ...4 27 Variable Maximum Gap 4 29 Cutter Baseline 4 30 Operation Menu 4 31 Pull Back 4 31 Label Reprint 4 34 Synchronize Labels 4 35 Ribbon Menu 4 37 Ribbon Type 4 37 Drop Lift Adjust 4 38 Ribbon Sensor...

Page 11: ...n 5 3 Printer Indicators 5 4 Error Messages 5 5 Color Alignment 5 9 Common Adjustments and Tasks 5 11 Test Patterns 5 11 Print Line Adjustment 5 11 Cross Web Adjustment 5 11 Advancing the Media 5 11 P...

Page 12: ...nt Safety Features 8 4 Print Peel Installation 8 5 Refitting an Existing QLS 4100 Xe 8 6 Installing the Print Peel System 8 8 Print Peel Setup 8 11 Enabling Disabling Print Peel 8 13 Printing and Peel...

Page 13: ...he use of ribbons making it even more cost effective for long and short label runs QuickLabel s Easiest Printer to Use featuring a virtually adjustment free platform that ensures consistent smooth ope...

Page 14: ...There is no minimum spending requirement no frequency requirement no advance payment and you may add new items at any time Freeze Your Costs Your one year commitment to purchase your ribbons and labe...

Page 15: ...may have been previously completed Page 2 2 Unpack the printer Page 2 7 Install the media unwind mandrel Page 2 8 Connect the AC power cord Page 2 9 Connect the host computer interface Page 2 14 Conn...

Page 16: ...1 4 Quick start...

Page 17: ...e various connections that need to be made to the printer before it can be operated This chapter provides the following information Instructions on unpacking and orienting the printer An overview of t...

Page 18: ...red no visible signs of damage during shipment 3 Verify that the following items have been included in the packing carton AC Power Cord Media Retainer Memory Card Warranty Registration Card Operation...

Page 19: ...QLS 4100 Xe 2 3 Printer Orientation The illustration below is provided to orient you to the QLS 4100 Xe printer The keypad and display is the printer s user interface...

Page 20: ...print station 4 5 Thermal Transfer Ribbon Rewind print station 3 6 Thermal Transfer Ribbon Supply print station 3 7 Thermal Transfer Ribbon Rewind print station 2 8 Thermal Transfer Ribbon Supply pri...

Page 21: ...QLS 4100 Xe 2 5 Side view...

Page 22: ...Panel View Facing the rear panel of the printer you will observe the air intake regulator power connection and other interface connections as shown in the illustration below Note Interface options var...

Page 23: ...is easily installed by following the procedure outlined below Tools Needed 1 8 Allen Wrench 1 Slide the media unwind mandrel onto the shaft until the back plate flange is seated firmly against the col...

Page 24: ...in this chapter Warning Do not use any type of receptacle adapter or AC Power Cord that has not been supplied with the unit Doing so can result in damage to the printer Note The printer has been set...

Page 25: ...the parallel cable supplied with the printer connect the larger connector to the parallel port on the printer Note Only the supplied parallel or high speed IEEE 1284 parallel cable should be used to e...

Page 26: ...nect the opposite end of the serial cable to the host computer Be sure to note which port COM1 COM2 etc you have connected the printer to as this will later be needed for software setup Pin Assignment...

Page 27: ...on the network contains a unique ethernet address known as the MAC address This address is programmed at the factory and cannot be modified Additionally each device contains a TCP IP layer identified...

Page 28: ...printer without corrupting or modifying the data stream Any printer language emulations such as PostScript or PCL should be disabled QuickLabel can supply a compatible print server to be used in PC ba...

Page 29: ...nter Standard Mode Pin Signal Notes 1 N C 2 Ground 3 Cutter On Off Output 1 on 0 off 4 5 VDC 1A max 5 Cutter Error Input 1 error 0 no error 6 Cutter Pulse 4 6 ms pulse output 7 N C 8 Pause Input 1 pri...

Page 30: ...connections 2 Attach an appropriate threaded fitting to the Air Intake Regulator using Teflon tape on the threads to seal the fitting 3 Attach your in house air source to the Air Intake Regulator 4 Tu...

Page 31: ...he printer you are ready to load label or tag stock thermal transfer ribbon and calibrate the printer in preparation for printing This chapter provides the following information Instructions on loadin...

Page 32: ...s each of the print stations prints a dot pattern of a primary color Cyan Magenta Yellow or Black These primary colors overlap each other on the label to produce a wide range of colors Process Color r...

Page 33: ...ted closest to the Rewind Mandrel then downward towards the print station 5 Thread the ribbon around the lower print station ribbon guide roller and under the print station 6 Continue to thread the ri...

Page 34: ...us media without notches or reflective marks can be used and the length of the printed image is dictated by software When using the transmissive method of sensing the media should have at least a 0 12...

Page 35: ...ly seated against the back plate an unprinted vertical area or void will appear on the printed label 6 Ensure that the Media Retainer is firmly against the media roll and hand tighten the nylon retain...

Page 36: ...its from the front of the printer 14 Ensure that the media rests against each of the four Media Guide Rollers located just behind the print stations on center plate 15 Flip each Print Station Lift Lev...

Page 37: ...sor is positioned above the media on a movable shaft which can be adjusted out up to 2 5 64 mm from the inside edge of the media The Reflective Sensor is positioned below the media in a position fixed...

Page 38: ...r stores the last calibration in non volatile memory The printer s internal label queue is reset during the calibration process Any labels pending in the queue are terminated Use the procedures on the...

Page 39: ...the FORM FEED ADVANCE key until the next label is inside the Gap sensor 11 Press the SELECT key The display will show the following prompt 12 Press and hold the FORM FEED ADVANCE key until the next g...

Page 40: ...t re initiate the calibration procedure 14 After successful calibration press the PRINT PAUSE key to return the printer to a Ready state Note The QLS 4100 Xe is capable of sensing media with a maximum...

Page 41: ...mark from the bottom 3 Engage the drive roller by turning the Drive Roll Lift Lever counterclockwise 4 Press the PRINT PAUSE key until the printer is in a paused state 5 Press the NEXT or PREVIOUS ke...

Page 42: ...is positioned behind the Media Sensor Assembly and in close proximity to the guide arrow indicated on the center plate 13 Press the SELECT key If calibration was successful the following message will...

Page 43: ...ill show the following prompt 6 Press the PRINT PAUSE key to return the printer to a Ready state Calibrating Inverted Gap Media Some examples of inverted gap media include clear labels with an opaque...

Page 44: ...3 14 Loading media and calibration...

Page 45: ...cators and a multi function keypad The control panel permits the user to change settings and make adjustments on the fly without the need for a host computer This chapter provides the following inform...

Page 46: ...When the printer is in a Pause state feeds the media by one calibrated label length each time the key is pressed or continually advances the media when the key is held CANCEL Cancels the current label...

Page 47: ...nter is in the Pause state as described in the following sections Form Feed Advance The FORM FEED ADVANCE key serves two functions If the key is pressed momentarily and released the printer will advan...

Page 48: ...u structure refer to Appendix G Menu structure Ready State Adjust Menu Options are available in a Ready or Pause state Intensity Adjusts the printhead intensity Possible values range from 1 32 Speed A...

Page 49: ...Print Prints test patterns Possible values are Test Pattern 1 2 3 4 5 Block Pattern All Proc Block CMYK Proc Block KCMY Horiz Line Pattern Large Blocks 1 2 3 4 5 Vertical Baseline Synchronizes the ve...

Page 50: ...heads 1 4 Possible values are 0 to 40 mm Ribbon Sensor Used by QuickLabel technicians when performing factory diagnostics Possible values are Enabled and Disabled but in general use the sensor should...

Page 51: ...Panel Lock Unlock Locks Unlocks the front panel with a password Time Sets up the time on the built in real time clock Date Sets up the date on the built in real time clock Factory Reset Returns the p...

Page 52: ...puter No Air Warning Enables disables the No Air warning that appears at startup if air is not connected to the printer Image Normalization Prevents variations in print intensity that occur with some...

Page 53: ...rint speed The printer has 32 discrete heat settings A setting of 1 is the coolest setting resulting in the lightest print A setting of 32 is the hottest setting resulting in the darkest print The app...

Page 54: ...station you want to adjust is displayed Note Head 1 is the station closest to the media exit Heads 2 3 and 4 are positioned sequentially behind head 1 3 With the desired print station appearing on th...

Page 55: ...2 Press the NEXT or PREVIOUS key until the Speed menu is displayed 3 Press the or key until the desired print speed is displayed Available print speeds are 2 3 4 5 6 or 7 inches per second 4 Press the...

Page 56: ...a block test pattern To perform a print line adjustment 1 Select the slowest print speed for the adjustment process to conserve media and ribbon For more information on changing print speed refer to t...

Page 57: ...ions 1 2 and 3 are properly aligned with the bars for station 4 Note An efficient way to shift the print line for a given print station is to measure the variation from the reference bar in the test p...

Page 58: ...amically while the QLS 4100 Xe is printing a block test pattern To perform a cross web adjustment 1 Select the slowest print speed for the adjustment process to conserve media and ribbon For more info...

Page 59: ...tive to the center of the printhead The total range is 32 dots with 16 dots to the left and right of the printhead center 6 When you are satisfied with the position press the SELECT key to confirm you...

Page 60: ...st the print stations individually refer to the section on print line adjustments To set the vertical offset via the front panel 1 If the printer is in a Ready state proceed to the next step If the pr...

Page 61: ...he print registration in fine increments to move the printed image Adjusting the horizontal offset affects each of the four print stations at the same time To adjust the print stations individually re...

Page 62: ...constrained by the label width 4 Press the SELECT key to confirm your choice Partially printed labels under the printheads will finish printing using the previous offset to ensure color alignment Duri...

Page 63: ...printing labels To set up the counter 1 If the printer is in a Ready state proceed to the next step If the printer is in a Pause state press the NEXT or PREVIOUS key until the System menu is displayed...

Page 64: ...US key until the Adjust menu is displayed Then press the SELECT key 2 Press the NEXT or PREVIOUS key until the Cut Offset menu is displayed 3 Press the or key until the desired cut offset setting is d...

Page 65: ...hen press the SELECT key 2 Press the NEXT or PREVIOUS key until the Label Reprint menu is displayed 3 Press the or key to specify the number of the last labels you wish to reprint You can reprint up t...

Page 66: ...al After you remove a label the printer will wait for a specified amount of time before performing the next action pulling media back advancing another label etc You can adjust this time if necessary...

Page 67: ...ng Media advances but no image is printed Printer will report a Media Out error Image placement is incorrect or the printed image is clipped Custom QuickLabel software reports an error The calibration...

Page 68: ...The following test patterns are available Test Pattern 1 to 5 Prints a crosshatch pattern to check print quality Block Pattern All Prints a spot color block pattern used for color alignment Proc Bloc...

Page 69: ...1 If the printer is in a Ready state press the PRINT PAUSE key to pause the printer 2 Press the NEXT or PREVIOUS key until the Cal Setup menu is displayed Then press the SELECT key 3 Press the NEXT or...

Page 70: ...baseline 1 If the printer is in a Ready state press the PRINT PAUSE key to pause the printer 2 Press the NEXT or PREVIOUS key until the Cal Setup menu is displayed Then press the SELECT key 3 Press th...

Page 71: ...to pause the printer 2 Press the NEXT or PREVIOUS key until the Cal Setup menu is displayed Then press the SELECT key 3 Press the NEXT or PREVIOUS key until the Printer Settings menu is displayed 4 Pr...

Page 72: ...o format errors have occurred since power up QLS 4100 Xe Settings SPEED 2 INCHES SEC INTENSITY 1 2 3 4 15 15 15 15 OFFSET V 0 0 H 0 0 C 0 PRINT LINE ADJ 1 2 3 23 9 8 CROSS WEB ADJ 1 2 3 4 0 0 7 8 DROP...

Page 73: ...ll not go undetected To adjust the maximum gap 1 If the printer is in a Ready state press the PRINT PAUSE key to pause the printer 2 Press the NEXT or PREVIOUS key until the Cal Setup menu is displaye...

Page 74: ...20 dots To adjust the cutter baseline 1 If the printer is in a Ready state press the PRINT PAUSE key to pause the printer 2 Press the NEXT or PREVIOUS key until the Cal Setup menu is displayed Then pr...

Page 75: ...ll be used for printing This feature requires a compressed air connection and special hardware It should only be used in applications that have been pre qualified by QuickLabel Contact QuickLabel for...

Page 76: ...ss the SELECT key A message will be displayed to confirm Pull Back operation 5 Press the SELECT key The printer will begin rewinding media until the last unprinted label is positioned just behind the...

Page 77: ...r or the media has been moved in any way i e Form Feed Calibrate Test Print etc the following error message will be displayed Note The FORM FEED key will activate the pull back feature only when the p...

Page 78: ...int labels 1 If the printer is in a Ready state proceed to the next step If the printer is in a Pause state press the NEXT or PREVIOUS key until the Operation menu is displayed Then press the SELECT k...

Page 79: ...s been replaced After running the test pattern After performing a media calibration After performing a form feed After performing a media advance Note You should never perform calibration form feed me...

Page 80: ...f the following message appears the front panel pause is enabled and the synchronize function will not operate The printer must be in the Applicator Paused or Print Peel Paused state to perform the sy...

Page 81: ...s To change the ribbon type 1 If the printer is in a Ready state press the PRINT PAUSE key to pause the printer 2 Press the NEXT or PREVIOUS key until the Ribbon menu is displayed Then press the SELEC...

Page 82: ...epends on the size of the label The following diagram illustrates sample drop lift points and the resulting ribbon savings for a particular print station The Drop Lift Adjust function enables you to f...

Page 83: ...the Drop Lift Adjust menu for the desired printhead is displayed 4 Press the or key until the desired drop setting is displayed Drop settings range from 0 to 40 mm The default value is 6 Increasing th...

Page 84: ...ess the SELECT key 3 Press the NEXT or PREVIOUS key until the Ribbon Sensor menu is displayed 4 Press the or key until the desired sensor setting is displayed Available options are Enabled or Disabled...

Page 85: ...used as the data port the others are used as status ports However a data port can also be used as a status port if the channel is bi directional which means it can transmit and receive data You can c...

Page 86: ...ed Capabilities Port connection If it cannot communicate via this method it will automatically switch to standard mode which uses a common Centronics method of communication The supplied parallel or h...

Page 87: ...AUSE key to pause the printer 2 Press the NEXT or PREVIOUS key until the Communications menu is displayed Then press the SELECT key 3 Press the NEXT or PREVIOUS key until the RS232 Baud Rate menu is d...

Page 88: ...key to pause the printer 2 Press the NEXT or PREVIOUS key until the Communications menu is displayed Then press the SELECT key 3 Press the NEXT or PREVIOUS key until the RS232 Handshaking menu is dis...

Page 89: ...RINT PAUSE key to pause the printer 2 Press the NEXT or PREVIOUS key until the Communications menu is displayed Then press the SELECT key 3 Press the NEXT or PREVIOUS key until the TCP IP Address menu...

Page 90: ...s the NEXT or PREVIOUS key until the Communications menu is displayed Then press the SELECT key 3 Press the NEXT or PREVIOUS key until the TCP IP Subnet Mask menu is displayed 4 Press the or key to in...

Page 91: ...T or PREVIOUS key until the Communications menu is displayed Then press the SELECT key 3 Press the NEXT or PREVIOUS key until the TCP IP Gateway menu is displayed 4 Press the or key to increase or dec...

Page 92: ...set the TCP IP connections option 1 If the printer is in a Ready state press the PRINT PAUSE key to pause the printer 2 Press the NEXT or PREVIOUS key until the Communications menu is displayed Then...

Page 93: ...To set up the counter 1 If the printer is in a Ready state proceed to the next step If the printer is in a Pause state press the NEXT or PREVIOUS key until the System menu is displayed Then press the...

Page 94: ...owever write protection will not protect the memory card data if the card is used with a PC reader To write protect the memory card 1 If the printer is in a Ready state press the PRINT PAUSE key to pa...

Page 95: ...he only available features are PRINT PAUSE FORM FEED ADVANCE Printer Settings and Front Panel Unlock An X character will appear on the Ready and Pause displays to indicate the front panel is locked To...

Page 96: ...ECT key Press the or key to increase or decrease the fourth number in the password then press the SELECT key 5 Press the SELECT key to lock the front panel using the specified password To unlock the f...

Page 97: ...decrease the second number in the password then press the SELECT key Press the or key to increase or decrease the third number in the password then press the SELECT key Press the or key to increase o...

Page 98: ...emory card 1 If the printer is in a Ready state press the PRINT PAUSE key to pause the printer 2 Press the NEXT or PREVIOUS key until the System menu is displayed Then press the SELECT key 3 Press the...

Page 99: ...the NEXT or PREVIOUS key until the System menu is displayed Then press the SELECT key 3 Press the NEXT or PREVIOUS key until the Time menu is displayed 4 Press the or key until the desired hour settin...

Page 100: ...to pause the printer 2 Press the NEXT or PREVIOUS key until the System menu is displayed Then press the SELECT key 3 Press the NEXT or PREVIOUS key until the Date menu is displayed 4 Press the or key...

Page 101: ...eway 0 0 0 0 Data port Parallel Parallel mode Auto Baud rate 19200 RS232 handshaking DTR DSR Calibrate Continuous Speed 3 in sec Intensity heads 1 4 16 Vertical offset 0 Horizontal offset 0 Counter Of...

Page 102: ...menu is displayed Then press the SELECT key 3 Press the NEXT or PREVIOUS key until the Factory Reset menu is displayed 4 Press the SELECT key to reset parameters to the factory default values Note It...

Page 103: ...face such as glass This mode mirrors the printed image horizontally To enable or disable mirror mode 1 If the printer is in a Ready state press the PRINT PAUSE key to pause the printer 2 Press the NEX...

Page 104: ...state press the PRINT PAUSE key to pause the printer 2 Press the NEXT or PREVIOUS key until the Options menu is displayed Then press the SELECT key 3 Press the NEXT or PREVIOUS key until the Cutter me...

Page 105: ...g is approximately 10 mm longer than the printed tag length This extra length will allow you to quickly identify separate batches With the flag enabled the minimum tag length is 38 mm To enable or dis...

Page 106: ...via the front panel Note The flag is counted as a batch of two tags the long and the short tag If the batch counter is enabled the flag will appear as a batch of two labels printing if the total coun...

Page 107: ...ll back operation after a queue is finished printing This option requires a compressed air connection and special hardware Contact QuickLabel for more information about the pull back function Note The...

Page 108: ...pull back mode to enable Available options are Disabled Enabled Manual and Enabled Auto 5 Press the SELECT key to confirm your choice Note Media pull back can also be activated via host command Consul...

Page 109: ...displayed The following options are available Enabled 1 Select this option to enable applicator mode 1 In this mode if RibbonRation is enabled printheads will be lifted after each label is delivered E...

Page 110: ...y these variations To enable or disable image normalization 1 If the printer is in a Ready state press the PRINT PAUSE key to pause the printer 2 Press the NEXT or PREVIOUS key until the Options menu...

Page 111: ...bling the No Air warning will speed up the startup process To enable or disable the No Air warning 1 If the printer is in a Ready state press the PRINT PAUSE key to pause the printer 2 Press the NEXT...

Page 112: ...r is in a Ready state press the PRINT PAUSE key to pause the printer 2 Press the NEXT or PREVIOUS key until the Options menu is displayed Then press the SELECT key 3 Press the NEXT or PREVIOUS key unt...

Page 113: ...blanks will be advanced to allow the partially printed labels under the heads to be completed and advanced past the drive roller Custom 2 In Custom 2 mode the maximum print speed will change from 7 i...

Page 114: ...tion to enable Available options are Standard Custom 1 and Custom 2 5 Press the SELECT key to confirm your choice Print Peel You will use the Print Peel option to enable or disable Print Peel mode Thi...

Page 115: ...lled a software application from which you will print You have installed the QLS Windows Printer Driver as needed Once you have completed and verified the above you are ready to begin printing with yo...

Page 116: ...QuickLabel website to check for updated firmware Under normal conditions the printer will display a Ready message at the end of the power up sequence indicating that the printer is ready to accept and...

Page 117: ...o the printer this message will disappear and the printer will go to a Ready state Memory Card Detection The status of the memory card is checked during the power up sequence If the card is working pr...

Page 118: ...lluminate It will remain illuminated to remind you that the printer is in the PAUSE state until you either resume printing cancel the print request or power off the printer This light will also illumi...

Page 119: ...nter requires media recalibration The label or tag media has been consumed Reload a new roll of media The media is not making positive contact with the Media Travel Roller or the media travel roller i...

Page 120: ...veloping which could result in print quality or media slip issues Indicates that the drive roller is in the up position or the air was shut off disconnected The printer cannot resume printing until th...

Page 121: ...wered on Pressing select will disable this head until the printer power has been cycled The following message is displayed after a printhead is disabled Displayed after the self test when the printer...

Page 122: ...then powering it back on may resolve the issue If this does not resolve the issue contact QuickLabel Technical Support Displayed if the printhead exceeds a safe operating temperature The printer will...

Page 123: ...position on the media Cross Web adjustment refers to the horizontal adjustment of a color s print position on the media To examine the color alignment you can print the process Proc Block test patter...

Page 124: ...If any color appears horizontally misaligned the cross web values require adjustment if any color appears vertically misaligned the print line adjustment values require adjustment When the black box p...

Page 125: ...of the four print stations to obtain accurate color registration across the width of the label Refer to the Ready State Adjust Menu section of Chapter 4 for more information on print line adjustments...

Page 126: ...Press the or key to scroll through the test patterns and select Test Pattern x in at a width that is appropriate for the width of your media Print widths for the Test Pattern are 1 2 3 4 or 5 inches 5...

Page 127: ...that can be changed are Intensity for each printhead Speed Print line adjustment Cross web adjustment Vertical offset Horizontal offset 8 As each parameter is displayed press the or key to adjust the...

Page 128: ...the printer on The display will show the following prompt 4 Press the SELECT key RibbonRation is now disabled To enable disable RibbonRation from Custom QuickLabel 1 Open Custom QuickLabel Create or...

Page 129: ...ication The QLS 4100 Xe will begin printing the label 4 Use the printer menus to change any parameters may need adjustment Note It is recommended that settings be changed in Custom QuickLabel software...

Page 130: ...5 16 Operation...

Page 131: ...e to the platen roll to optimize ribbon transfer for different material types or thicknesses Adjust the angularity of the printheads with respect to each other so that color alignment is consistent ac...

Page 132: ...n the frame plate just to the right of the endplate 3 Loosen the screw on the main plate located inline with the hole 4 Print a block image the width of the label with a saturated color fill of the pr...

Page 133: ...t 4 A 1 4 drive ratchet and 3 8 socket are required to loosen two nuts on the printhead bracket Access to these nuts is through the large 3 4 holes in the black cover brackets over each printstation D...

Page 134: ...ribbon to wrinkle The ribbon should also not be narrower than the label or tag because it may cause unnecessary wear to the printhead Normally a manual ribbon tension adjustment is not required Howeve...

Page 135: ...ing the eccentric at the end of the ribbon guide shaft located at the lower rear section of the print station Loosen the screw securing the shaft and using a wrench turn the eccentric until wrinkles h...

Page 136: ...er This will prolong the life of the printhead and platen while providing a more even application of downward pressure onto the media where it is needed Tools Needed Slip Joint Pliers Using a pair of...

Page 137: ...If the printer is in a Ready state press the PRINT PAUSE key to pause the printer 2 Press the NEXT or PREVIOUS key until the Cal Setup menu is displayed Then press the SELECT key 3 Press the NEXT or...

Page 138: ...eline 1 If the printer is in a Ready state press the PRINT PAUSE key to pause the printer 2 Press the NEXT or PREVIOUS key until the Cal Setup menu is displayed Then press the SELECT key 3 Press the N...

Page 139: ...l performance some periodic maintenance is required This chapter provides the following information List of recommended tools for performing maintenance and repairs Procedure for cleaning the print st...

Page 140: ...4 X 15 16 Phillips Screwdriver 2 1 4 X 8 Phillips Screwdriver 1 3 16 X 3 Phillips Screwdriver Nut Driver Set containing 1 4 3 16 5 16 3 8 and 11 32 Ball End Allen Wrench Set containing 050 1 16 3 32 5...

Page 141: ...ular cleaning QuickLabel recommend that these surfaces be cleaned when changing a roll of media or ribbon The illustration below indicates the locations for regular cleaning It is recommended that the...

Page 142: ...power cord Caution Always power off and unplug the printer before cleaning the printheads 3 Clean the printhead with a soft cloth or lint free wipe soaked with Isopropyl Alcohol Harsh chemicals and so...

Page 143: ...thead Caution Printheads can be damaged by static electricity Always use standard anti static procedures when replacing printheads 1 While the printer is on lift the printhead that will be changed The...

Page 144: ...r of the printhead 8 Reconnect the three harness connectors to the replacement printhead and push the head back under the bracket There are locating pins under the bracket Position the printhead over...

Page 145: ...aten roller that will be replaced The following message will display Press the SELECT button The indicated print station will be disabled and the following message will display 2 Turn the printer off...

Page 146: ...Add the collar over the shaft behind the side plate 8 Line up the new roller under the printer with the shaft Be sure the roller end with the 1 8 bearing surface is against the main plate on the insi...

Page 147: ...te and shaft assembly away from the frame plate A 3 4 cup washer will drop down as this assembly is pulled away from the side plate 6 Turn the drive roller until the cap screw located on the inside of...

Page 148: ...station gas spring Grip a pair of adjustable pliers onto the top of the gas spring Push down and away from the main plate to separate it from the ball joint on the main plate 6 Remove the collar direc...

Page 149: ...rewdriver between the AC Power Input and the red Fuse Holder module 5 Gently twist the screwdriver until the Fuse Holder begins to slide out Grasp the Fuse holder and slide it completely out of the AC...

Page 150: ...hin your application Before beginning the upgrade process please verify the following The printer is powered on and is displaying Ready A CompactFlash card is installed in the printer The CompactFlash...

Page 151: ...f necessary change the setup as required Remember to also configure the printer if necessary 4 Choose the Next button The following screen will appear The flash utility will query the printer to deter...

Page 152: ...the file transfer All of the necessary files will be transmitted to the printer 6 When the file transfer is complete choose the Done or Cancel button on the display to exit the upgrade utility Upon r...

Page 153: ...urn the power on and hold in the SELECT key on the front panel This sequence will place the printer into a forced upgrade mode The following menus will appear Insert the CompactFlash card that contain...

Page 154: ...7 16 Maintenance and repair...

Page 155: ...om the liner and presenting them for removal in special applications This chapter provides the following information A general overview of the Print Peel system Information about media compatibility S...

Page 156: ...hen you remove the label the next label in the batch is advanced for removal A rewinder located in the Print Peel Base winds the liner onto a core during the printing process and provides the continuo...

Page 157: ...trigger the peel sensor In these cases a remote input may be wired to trigger printing of the next label For remote input or other wiring information contact QuickLabel Technical Support For some smal...

Page 158: ...button can be used to terminate power to both the QLS 4100 Xe and the Print Peel Base Using this button shuts down both systems immediately 2 Rewind Switch The rewind switch enables disables the rewin...

Page 159: ...LS 4100 Xe are necessary Refer to Installing the Print Peel System for installation instructions Print Peel Refit The Print Peel Base is available separately for installation on existing QLS 4100 Xe p...

Page 160: ...t Peel System which contains a QLS 4100 Xe with the required hardware pre installed To refit an existing QLS 4100 Xe 1 Turn the printer off and unplug the AC power cord 2 Replace the gear box that cor...

Page 161: ...uggested that at least two people lift it 4 Remove the two 6 binder head screws 10658610 from the spring clip on the media supply mandrel Replace the spring clip 00058 DA with spring clip 14589000 5 R...

Page 162: ...a sturdy surface This surface must be able to support the combined weight of the QLS 4100 Xe and Print Peel Base 300 lbs 3 Carefully place the QLS 4100 Xe on top of the Print Peel Base The printer is...

Page 163: ...n connector on the Print Peel Base Note If your QLS 4100 Xe was manufactured prior to October 2008 you will need to install a utility port adapter 26732101 in the QLS 4100 Xe utility port Install the...

Page 164: ...ded AC receptacle Warning Do not use any type of receptacle adapter or AC Power Cord that has not been supplied with the unit Doing so can result in damage to the printer Note It is recommended that a...

Page 165: ...switch to the down position This will disable the rewind motor for the setup process 3 Fully seat an empty cardboard takeup core on the rewind mandrel on the Print Peel Base 4 Press the FORM FEED ADVA...

Page 166: ...p position to enable the rewind motor 6 Enable Print Peel as described in the Enabling Disabling Print Peel section later in this chapter Note The Pull Back option should be disabled in both the print...

Page 167: ...and media constructions are designed so printheads stop on unprinted areas or quiet zones no artifacts will occur Single Label In this mode one label is printed and advanced until the Print Peel sens...

Page 168: ...single label mode 5 Press the SELECT key to confirm your choice Note Before printing labels in Multiple Label mode use the Synchronize Labels command from the Operation menu to synchronize the printe...

Page 169: ...will begin printing the label As the label is printed the liner will rewind onto the core in the Print Peel Base 4 If necessary adjust the torque If the label peels cleanly at the peel edge skip this...

Page 170: ...on will vary according to the media width Required Tools 5 32 Allen wrench Ensure the media is tracking correctly through the QLS 4100 Xe before adjusting the liner guide To adjust the liner guide 1 L...

Page 171: ...result Once the optimum setting is found tighten the outer left side set screw 5 Print a batch of labels in Single Label Mode and observe the liner tracking Adjustments to the liner guide may be neces...

Page 172: ...t station four rear most print station media guide The position of the media at this guide will determine if an adjustment is needed or not If drift is greater than 5mm across the peel edge image plac...

Page 173: ...ngle label mode To adjust the form stop position 1 If the printer is in a Ready state proceed to the next step If the printer is in a Pause state press the NEXT or PREVIOUS key until the Adjust menu i...

Page 174: ...ilable only in Print Peel modes To adjust the peel delay 1 If the printer is in a Ready state proceed to the next step If the printer is in a Pause state press the NEXT or PREVIOUS key until the Adjus...

Page 175: ...QLS 4100 Xe A 1 Appendix A Physical Data...

Page 176: ...A 2 Physical data QLS 4100 Xe Dimensions all dimensions are in inches...

Page 177: ...QLS 4100 Xe A 3 QLS 4100 Xe Dimensions all dimensions are in inches...

Page 178: ...A 4 Physical data...

Page 179: ...QLS 4100 Xe B 1 Appendix B Specifications...

Page 180: ...76 cm with Custom QuickLabel Fonts 7 TrueType fonts resident other TrueType fonts can be downloaded from your PC Resident Barcodes All Standard symbologies including 2 Dimensional Control Panel Ergono...

Page 181: ...ed Air 1 cfm 70 psi required to operate RibbonRation Use Male NPT Plug with 3 8 body size not supplied with printer Thermal Transfer Ribbon 4 rolls each 3 281 ft long 1000m Spot or CMYK rolls Label Ta...

Page 182: ...h 1 85inches Width Width base only 18 5 inches Width base printer 18 5 inches Additional width needed left side to open printer door for loading of consumables and access to rewind mandrel for threadi...

Page 183: ...QLS 4100 Xe C 1 Appendix C Replacement Parts...

Page 184: ...0 A 220VAC 13832 000 Cleaning Pads case of 50 14050 400 Platen Shaft 4 14050 050 Drive Shaft 14050 500 Drive Shaft Stub RN1716 Drive Snap Ring 2 14109 020 Collar 9 14046 200 Shaft End Plate 5 10609 0...

Page 185: ...r 26599 400 Harness Assy Thermal Transfer Ribbon Sensors 26599 500 Harness Assy Head Up Sensors 42679 001 Controller Assy PCB 14166 000 Power Supply Assy PCB w Microstepper Assy PCB IM483 25995 000 Mi...

Page 186: ...C 4 Replacement parts...

Page 187: ...QLS 4100 Xe D 1 Appendix D Custom QuickLabel setup...

Page 188: ...QuickLabel for an upgrade To configure Custom QuickLabel from Create and Print Note Skip to step 4 if you are configuring the Print application Steps 1 3 are for configuring a new or existing label f...

Page 189: ...he RAM Card Size pull down list This option is used only when set up for unidirectional communication Note If none is selected all images will be sent to an internal 4 Mb dedicated to images All fonts...

Page 190: ...ter The printer status cannot be transmitted back to the host when using this communication method Network Used to communicate with a printer in a networked environment This is the optimal setting for...

Page 191: ...nection TCP IP Select this option for an ethernet connection 11 Select the appropriate Parallel Port Serial Port and TCP IP settings as necessary Note Custom QuickLabel supports parallel ports LPT1 an...

Page 192: ...D 6 Custom QuickLabel setup...

Page 193: ...QLS 4100 Xe E 1 Appendix E Windows Printer Driver Setup...

Page 194: ...4100 Xe printer option and choose Properties The QLS 4100 Xe Properties window will open Device Options Ribbon Ration Check this option to enable the automatic ribbon saving feature of the printer Cut...

Page 195: ...option to enter your own custom label size in the Width and Length fields Diskette Select this option to print a label that will fit on a diskette The appropriate Width and Length values will be enter...

Page 196: ...owing options Portrait Select this option if you want to print the label in a portrait orientation on the label roll Landscape Select this option if you want to print the label in a landscape orientat...

Page 197: ...e color Medium Choose Medium for best all around halftoning This is the default setting Coarse Choose Coarse for best color representation or when certain combinations of ribbon and media types cause...

Page 198: ...ness Allows you to change the overall sharpness of the printed photographic image 100 sharpness will yield sharpest quality with some chance of pattern artifacts in large regions of solid color Lower...

Page 199: ...consumed Refer to the user documentation for your printer for information about disabling a printhead CMYK Select this option to print in CMYK cyan magenta yellow and black Red Green and Blue Use the...

Page 200: ...s of the entire label A setting of 100 is the default brightness Contrast Use the Contrast slider to adjust the intensity of colors around the Contrast Threshold Colors above the threshold are adjuste...

Page 201: ...If no checkbox is displayed the associated print station is always enabled Color Box A color box is associated with each print station It displays the current color set up on the print station You ca...

Page 202: ...s applied to the printhead and the rate at which the stock passes below the printhead The first factor is controlled by the print intensity printhead temperature you select while the second factor is...

Page 203: ...b In general the lower the speed the higher the print quality For large batches where quality is less important high speed will produce labels quickly Cutter Options Cutter Interval and Offset Use the...

Page 204: ...E 12 Windows printer driver setup...

Page 205: ...QLS 4100 Xe F 1 Appendix F Format error codes...

Page 206: ...are 10 to 2000 for TrueType fonts and 1 to 10 for bitmap fonts 6 Alphanumeric character width error The range for width values is the same as for height values 7 Bar code field type error The barcode...

Page 207: ...error The structure of one or more label format commands is faulty Some examples would be misplaced or missing delimiter invalid characters in the command string e g STX FQ missing or faulty line ter...

Page 208: ...nochrome not a pcx file File not present may have stored to RAM and attempted to recall from card 80 PCX Bitmap scale error Valid scale factors for PCX graphics fields are 1 to 10 81 Code 49 start cha...

Page 209: ...that extends off the label Bar code field strings contain characters not supported by the chosen symbology 86 Print disable command error Print disable command contains invalid parameters STX PD 87 F...

Page 210: ...F 6 Format error codes...

Page 211: ...QLS 4100 Xe G 1 Appendix G Menu Structure...

Page 212: ...G 2 Menu Structure...

Page 213: ...Intensity Head 2 16 Ready Intensity Head 3 16 Ready Intensity Head 4 16 Ready Prnt Line Adj Head 2 0 Ready Prnt Line Adj Head 3 0 Ready Cross Web Adj Head 2 2 Ready Cross Web Adj Head 3 2 Ready Cross...

Page 214: ...equirements Contract 1 2 Media Sensor Adjustment 3 7 Media Unwind Mandrel Installing 2 7 Memory Card Detection 5 3 Formatting 4 54 Write Protection 4 50 Menu Cal Setup Menu 4 23 Communications Menu 4...

Page 215: ...S 232 Serial Port 2 10 Baud Rate 4 43 Handshaking 4 44 Specifications B 2 B 4 Synchronize Labels 4 35 TCP IP Connections 4 48 Gateway 4 47 IP Address 4 45 Subnet Mask 4 46 Test Print 4 24 Thermal Tran...

Reviews: