background image

7

6.Product Installation and Connection

6. 1 Soldering Station

6.1.1 Usage of Soldering Iron and Cleaning Sponge

1) Wet the cleaning sponge first and then squeeze it dry.

2) Place the cleaning sponge into the groove of the base of the soldering iron stan

d.

3) In the process of use, if the cleaning sponge gets dry, you should add water app

ropriately.

6.1.2 Soldering Iron Connection

1) Insert the connection plug of the soldering iron handle line into the five-core soc

ket on the front of the host, and pay attention to the convex inside the plug and th

e groove of the socket.

2) Place the soldering iron in the iron holder.

6.2 Hot Air Station

When the machine is used for the first time, the hot air handle holder must be installed, as

shown in the figure below.

1) Remove the two screws on the left side of the machine that fixes the holder.

2) Align the mounting hole of the hot air handle holder with the two screw holes on the

machine, and tighten the two screws that were removed.

Summary of Contents for 709D+

Page 1: ...QUICK 709D Rework System Instruction Manual Thank you for purchasing our products Please keep the instruction manual properly for future reference...

Page 2: ...4 5 1Dimensions 4 5 2 Part descriptions 4 5 3 Button descriptions 5 5 3 Main menu 6 6 Product Installation and Connection 7 6 1 Soldering Station 7 6 1 1 Usage of soldering iron and cleaning sponge 7...

Page 3: ...ibration 12 12 Tip Maintenance 13 13 Soldering Station Heater Replacement 13 13 1 Steps of removing the heater 14 13 2 Steps of replacing the heater 14 14 Hot Air Heater Replacement 15 14 1 Steps of r...

Page 4: ...he product WARNING Products should be used away from magnetic field Do not place the product where the surface is vibrated or subject to shocks Do not install the product where it maybe wet Do not use...

Page 5: ...ents suitable for maintenance and R D electronic engineers 3 Product Features LCD display Integrates temperature control and air flow control Supports digital temperature calibration which enables eas...

Page 6: ...ring station temperature range 100 480 Hot air temperature range 100 500 Hot air temperature stability 5 Still air no load Soldering iron temperature stability 2 Still air no load Hot air range 1 100...

Page 7: ...4 5 Display and Function Descriptions 5 1Dimensions Unit mm 5 2 Part Descriptions No Part Name 1 Hot air handle 2 Handle holder 3 LCD 4 Soldering iron handle 5 Iron stand 6 Air volume control knob...

Page 8: ...nter the hot air temperature calibration mode and Press and hold it at the same time to enter the soldering temperature calibration mode and 1 Press and hold at the same time in the main interface to...

Page 9: ...s The soldering station heating state The soldering station thermostat status Fan rotation Work Fan stop No work The soldering station cooling state 1 Airflow level display 1 100 level The hot air gun...

Page 10: ...the connection plug of the soldering iron handle line into the five core soc ket on the front of the host and pay attention to the convex inside the plug and th e groove of the socket 2 Place the sol...

Page 11: ...Connect the power supply to the system turn on it and start working 7 Temperature Setup Temperature of the soldering station regulation Click or button temperature increases or decreases by 1 Long pr...

Page 12: ...the display will pop up on the interface 3 After entering the correct password go to parameter setting Enter the initial password 1 The window shows and the leftmost digit flashes at this time the di...

Page 13: ...u can be entered as shown in the following figure 2 Click or button After selecting 1 parameter menu return to the main interface directly after selecting 2 parameter menu press and button at the same...

Page 14: ...r is the same the window will show OK which means the password setting is successful and return to parameter setting Shutdown restart and password will take effect 11 Temperature Calibration 11 1 Sold...

Page 15: ...ode 3 When the temperature is stable use the hot air temperature tester to measure the hot air temperature press or Change the hot air temperature press and hold and to confirm and return to the main...

Page 16: ...tip Using a dry cleaning sponge will damage the tip and cause no tinning 5 After the tip is improperly oxidized by use do not clean the surface plating by grinding Please use metal wire or resurrecti...

Page 17: ...teps are performed with the power disconnected and the handle cooled 13 2 Steps of replacing the Heater 1 Plug the three wires into the Heater pins 2 Install the Spring and the Grounding spring and sn...

Page 18: ...eplacements Note All operating steps are performed with the power disconnected and the handle cooled 14 2 Steps of replacing the Heater 1 Mount the Heater to the Handle components and the square post...

Page 19: ...No Error Fault Descriptions 1 S E The sensor is error If the sensor or other parts of the sensor circuit fails the S E mark is displayed and the current to the soldering iron is cut off 2 H E The heat...

Page 20: ...17 16 Tips...

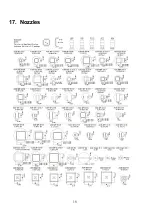
Page 21: ...18 17 Nozzles...

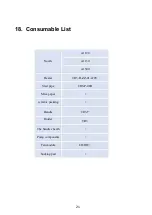
Page 22: ...18 Consumable List Nozzle A1124 A1130 A1300 Heater TR3 H ZZ 01 220V Steel pipe TR3 P 08H Mica paper ceramic packing Handle TR3 T Holder TR3 The handle sheath Pump components Fan module 863DW Sucking p...

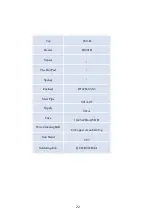
Page 23: ...p 960 B Heater H1901R Sensor The Hot Pad Sponge Encloser RF02H 03 03 Steel Pipe 901A 05 Nipple 901A Fuse 10A 5x20mm VDE Wire Cleaning Ball 65 Copper clean ball 13g Iron Stand 927 Soldering Iron QUICK9...

Page 24: ......

Reviews: