background image

Configuration and Operation 

31 

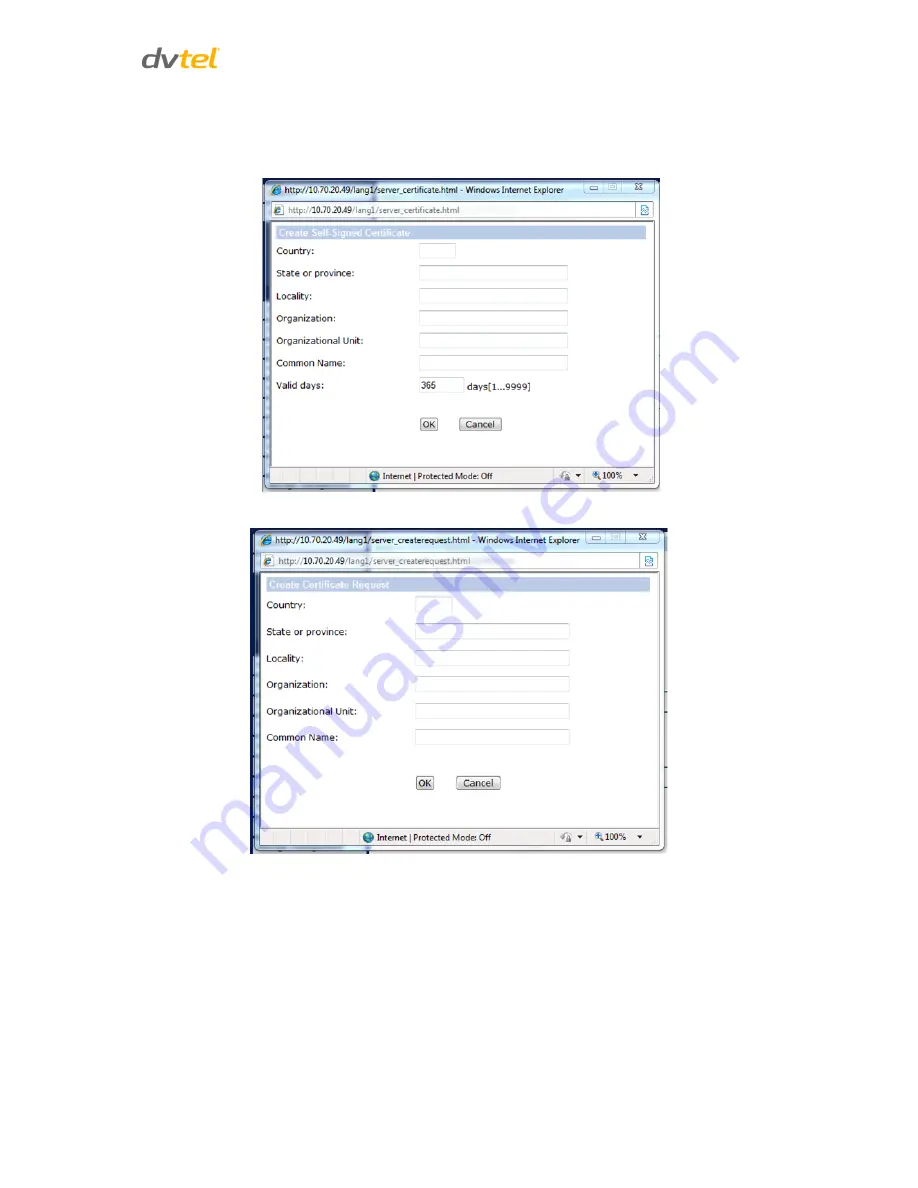
To provide the certificateiInformation: 

To create a self-signed HTTPS certificate or a Certificate Request to CA, enter the information in the 

Create a Self-signed Certificate

 screen.  A definition of each of the requested fields follows.  


Figure 31: Example of Self-Signed Certificate 


Figure 32: Self-Signed Certificate – Details


Summary of Contents for CF-4251

Page 1: ...Quasar CF 4251 Fixed IP Camera User and Installation Guide Rev C Dec 2013...

Page 2: ...5 4 Initial Camera Configuration 9 5 5 Mounting Instructions 10 6 Using the DNA Utility to Search and Access the Camera 13 6 1 Introduction 13 6 2 Quick Start 13 6 3 Main Screen 14 6 4 Navigation Bar...

Page 3: ...e 64 7 3 20 Maintenance 67 7 4 Video and Audio Streaming Settings 68 7 4 1 Video Format 68 7 4 2 Video Compression 75 7 4 3 Video OCX Protocol 76 7 4 4 Video Frame Rate 77 7 4 5 Video Mask 78 7 4 6 Au...

Page 4: ...tings of a Quasar Camera 96 A 3 Internet Security Settings 100 A 4 Install UPnP Components 102 A 5 Deleting the Existing DCViewer 104 A 6 Deleting Temporary Internet Files 105 A 7 Back Focus Adjustmen...

Page 5: ...ccount Authority 28 Figure 27 HTTPS Screen 28 Figure 28 HTTPS Screen Create Self Signed Certificate 29 Figure 29 HTTPS Screen Install Signed Certificate 30 Figure 30 HTTPS Screen Upload Signed Certifi...

Page 6: ...Settings Screen Exposure 81 Figure 81 Camera Settings Screen White Balance 84 Figure 82 Camera Settings Screen Picture Adjustment 85 Figure 83 Camera Settings Screen Backlight 86 Figure 84 Camera Set...

Page 7: ...Quasar CF 4251 User and Installation Guide vi...

Page 8: ...vered subject to the following restrictions and conditions This document contains proprietary information belonging to DVTEL Inc This information is supplied solely for the purpose of assisting explic...

Page 9: ...manual A Warning is a precautionary message that indicates a procedure or condition where there are potential hazards of personal injury or death A Caution is a precautionary message that indicates a...

Page 10: ...three prongs one of which is a ground contact an electrician to install the appropriate outlet NEVER remove or otherwise attempt to bypass the ground pin of the power cord Do not operate the unit in...

Page 11: ...nd electrical cords should be routed in a manner that prevents safety hazards such as from tripping wire fraying overheating etc Ensure that nothing rests on the unit s cables or power cords Ample Air...

Page 12: ...terest masking Privacy masks WDR and ATW 3DNR image noise reduction Day Night IR Cut Filter Micro SD recording support BNC analog output ONVIF support Analog video output Supports PoE 12VDC 24VAC Edge...

Page 13: ...start guide CD Bundled software and documentation Figure 1 Package Contents 2 3 Typical CF 4251 Camera The figure below shows a typical CF 4251 camera Figure 2 CF 4251 Camera Front View Table 1 CF 42...

Page 14: ...251 Camera Dimensions Camera Connectors Appendix A 1 Technical Specifications 3 1 CF 4251 Camera Dimensions The mechanical dimensions of a CF 4251 Fixed IP Camera are shown below Figure 3 CF 4251 Came...

Page 15: ...alog video For video output 5 SD microSD card slot For video and snapshots storage card not included 6 DC 12V AC 24V 1 Power 2 Reserved 3 GND 12V DC Power supply connection indication green LED 1 Powe...

Page 16: ...ements described below Table 3 System Requirements 1 Item 2 Minimum System Requirement Personal Computer Intel Pentium M 2 16 GHz or Intel CoreTM 2 Duo 2 0 GHz 2GB RAM or more Operating System Windows...

Page 17: ...Quasar CF 4251 User and Installation Guide 6...

Page 18: ...ting and Framing Up the Camera View 5 2 Power and Ethernet Cable Connection Power Connection Make sure the camera s power cable is properly connected Refer to Table 1 CF 4251 Camera Connector Designat...

Page 19: ...d of view The trade off is in the amount of detail and depth of view vs the width of view For example a 2 8 or 4 mm lens might be sufficient for indoor warehouse and office and an 8mm might be better...

Page 20: ...e Ethernet port of the camera and the RJ45 connector at other end to the Power Sourcing Equipment PSE device such as a switch 4 Verify that the RJ45 connector LEDs illuminate green indicating a stable...

Page 21: ...ation via an Ethernet cross cable Note The camera default IP Address and the subnet mask IP Address are automatically supplied by the DHCP server Tip A camera setup adapter such as Veracity Pinpoint c...

Page 22: ...r unlatch the camera housing lid open the housing and loosen the plastic cable glands cable fittings d Thread the cables through the cable glands into the camera housing Figure 8 Cable Gland e Attach...

Page 23: ...51 User and Installation Guide 12 Note For outdoor installation the camera must be installed in a protective housing such as a DVTEL CF X201 00 camera housing See Figure 9 Figure 9 DVTEL CF X201 00 Ca...

Page 24: ...h Either of these programs may be used To install DVTEL Web Player DCViewer software online Upon initial connection to the camera a prompt to install the DVTEL Web Player DCViewer appears If the web b...

Page 25: ...operation and to add a device manually 3 Discover List Occupies the center of the screen Displays a list of discovered devices with partial device information 4 Status Bar Located at the bottom of the...

Page 26: ...uration The Assign IP tab or context menu option is grayed if a device has not been selected Selecting this tab or option opens the Assign IP window which displays a list of devices which need to be u...

Page 27: ...he discovered IP devices will be listed in the page as shown in the figure below The camera s default IP Address is automatically supplied by the DHCP server Figure 13 Discovered IP Devices 7 Right cl...

Page 28: ...es and for and Latitude users In the IP Address Gateway and Netmask enter the respective LAN VLAN optional DNS values ii Click Update and wait for OK status to be displayed 9 Right click and select Br...

Page 29: ...ick Install Figure 17 Security Window 11 If the wizard appears for installing the component application DCViewer follow the instructions to complete the installation Note If the password is changed an...

Page 30: ...ose to install the DVTEL Web Player DCViewer Tip To view greater image detail for more accurate high definition focusing on the web interface Home page click the Full Screen button and use the full sc...

Page 31: ...etighten the tension bolt on the wall bracket Pan Tilt assembly 3 On the camera adjust the zoom ring and focus ring on the lens for your scene If you have a manual Iris also adjust the iris ring on yo...

Page 32: ...il Additionally if DVTEL s Latitude VMS is used many of the configurations and features of DVTEL s VMS provide configuration and automation of the camera This section includes the following informatio...

Page 33: ...posure White Balance Picture Backlight Digital Zoom IR Function WDR Function Noise Reduction and TV System Further details are discussed in Camera Related Settings o Logout Click on the tab to re logi...

Page 34: ...out and drag the mouse into any direction Double click on the screen to exit Full Screen mode and return to the Home page o Talk The Talk button allows the local site to talk to the remote site Click...

Page 35: ...from the Live View in the location specified on the local hard drive which can be configured in the File Location screen The default storage location for the web recording is C Refer to File Location...

Page 36: ...rom the drop down menu Enable Daylight Saving Time To enable DST check the box and then specify time offset and DST duration The format for time offset is hh mm ss For example if the amount of time of...

Page 37: ...e System screen opens a drop down menu with the tabs User HTTPS IP Filter and IEE 802 1X Figure 23 Security Screen Tabs Related Links User HTTPS IP Filter IEEE 802 1X 7 3 2 1 User Click the User tab i...

Page 38: ...boxes to give the user Camera Control Talk and Listen permissions I O access Basic functions that enable you to view video when accessing to the camera Camera control Allows you to change camera param...

Page 39: ...certificate as described below Note The self signed certificate does not provide the same level of security as a CA issued certificate HTTPS allows secure connections between the camera and web browse...

Page 40: ...n this section for details Figure 28 HTTPS Screen Create Self Signed Certificate To create a certificate request 1 Click the Create Certificate Request button to create and submit a certificate reques...

Page 41: ...ion Guide 30 Figure 29 HTTPS Screen Install Signed Certificate 4 When the signed certificate is returned from the CA install it by uploading the signed certificate as seen in Figure 30 Figure 30 HTTPS...

Page 42: ...ate a self signed HTTPS certificate or a Certificate Request to CA enter the information in the Create a Self signed Certificate screen A definition of each of the requested fields follows Figure 31 E...

Page 43: ...izational unit to which the entity identified in the Common Name field belongs Common Name Indicate the name of the person or other entity that the certificate identifies often used to identify the we...

Page 44: ...IP addresses Up to 256 IP address entries may be specified 3 To remove an IP address from the list select the IP address and then click Delete 7 3 2 4 IEEE 802 1X The camera is allowed to access a ne...

Page 45: ...en Related Links Basic QoS Quality of Service SNMP Settings UPnP 7 3 3 1 Basic You can connect to the camera with either fixed or dynamic DHCP IP address The camera also provides PPPoE Point to Point...

Page 46: ...and password into the respective fields 3 Click Save to confirm the settings 2 Advanced Enter the following advanced parameters in the Advanced section of the screen Web Server port The default web s...

Page 47: ...assified and marked with DSCP DiffServ Code point values and as a result receive the corresponding forwarding treatment from DiffServ capable routers Figure 36 QoS Screen DSCP Settings The DSCP value...

Page 48: ...xcept read only objects The default value is private SNMP v3 SNMPv3 provides important security features including Confidentiality Encryption of packets to prevent snooping by an unauthorized source I...

Page 49: ...er o Trap community Enter the community to use when sending a trap message to the management system The default value is public Trap Option o Warm start A warm start SNMP trap signifies that the SNMP...

Page 50: ...s enabled the camera is allowed to open the web server port on the router automatically Note To enable this function make sure that your router supports UPnP and that it is activated Friendly name Set...

Page 51: ...il The Administrator can send an e mail via Simple Mail Transfer Protocol SMTP when an alarm is triggered SMTP is a protocol for sending e mail messages between servers SMTP is a relatively simple tex...

Page 52: ...e or two File Transfer Protocol FTP sites when motion is detected Settings include first and second server server port user name password and remote folder Enter the details in the appropriate fields...

Page 53: ...m Triggered and Motion Detection can be set up and sent to the specified HTTP servers Enter the HTTP details including server user name and password in the appropriate fields Click Save when finished...

Page 54: ...generated Figure 44 Application Screen The alarm input and output connectors are shown in the table below Table 5 Input Output Alarm Connections Pin No Designation Terminal Block Alarm Connections 1...

Page 55: ...recording to your microSD SDHC card Enter the number of seconds for the pre trigger buffer Select the first radial button if you wish to upload for a specified length of time and enter the number of s...

Page 56: ...elect the number of frames per second from the drop down menu next to Image frequency Upload Image by E Mail Select this box in order to assign an e mail address and configure various parameters as sh...

Page 57: ...his section Select one that meets your requirements o Add date time suffix File name imageYYMMDD_HHNNSS_XX jpg Y Year M Month D Day H Hour N Minute S Second X Sequence Number o Add sequence number suf...

Page 58: ...w which is used for defining the motion detection area To change the size of the Motion Detection window move the mouse cursor to the edge of the frame and drag it outward inward Moving the mouse to t...

Page 59: ...with Schedule Drop Down Menu Motion Detection Windows Up to 10 Motion Detection windows can be set Press the add button under the Live View pane to add a Motion Detection window To cancel a Motion Det...

Page 60: ...tampering is detected Record stream to sd card Select this box to store the motion detection alarm recording in a microSD SDHC card when tampering is detected Enter the number of seconds for the pre...

Page 61: ...ct the number of frames per second from the drop down menu next to Image frequency Note Make sure that SMTP or FTP configuration has been completed See Mail and FTP for further details Send HTTP notif...

Page 62: ...rk failure detection refer to Schedule Detection Type In the text box enter the IP address to ping and the time interval in minutes between pings Triggered Action The Administrator can specify various...

Page 63: ...ra deal with tampering such as deliberate redirection blocking paint spraying and obscuring the lens etc Using video analysis the camera can react to such events by sending out notifications or upload...

Page 64: ...ables you to assign an FTP site and configure various parameters as shown in Figure 46 Application Upload Image by FTP When tampering is detected event images will be uploaded to the designated FTP si...

Page 65: ...agement You can locally record up to 32GB on a microSD SDHC card The Storage Management page shows the capacity information of the card and a recording list of all the recording files saved on the mem...

Page 66: ...enabled by events triggered the system immediately saves a recorded event on the memory card once an event occurs Then the camera will return to the regular recording mode after events recording Figur...

Page 67: ...ile Window 7 3 13 Recording In the Recording screen specify the recording schedule Select one of three options Disable Disable this function Always Always use this function Only during time frame Reco...

Page 68: ...nction Note This option works only if the microSD SDHC card is installed in the camera 7 3 14 Schedule The Schedule screen is used by the network failure detection tampering and motion detection funct...

Page 69: ...elating to the days of the week Sun Mon Tue Wed Thu Fri and Sat to create a schedule Tuesday Tue is checked in the example 2 Set Start time for example 09 00 and Duration for example 4 00 hours 3 Clic...

Page 70: ...ecify a storage location for snapshots and web recordings The default setting is C After confirming the setting click Save to save the snapshots and recordings in the designated location Note Make sur...

Page 71: ...u with tabs Log File User Information and Parameters Figure 59 System Log Screen Related Links Log File User Information View Parameters 7 3 16 1 View Log File Click on Log file to view the system log...

Page 72: ...ation and privileges in the User information screen shown below View User Login Information Click get user information to see each user s details For example Admin 1234 This indicates that the user s...

Page 73: ...privileges Figure 61 User Information Privileges Screen In Figure 61 the user Admin is granted privileges of I O access Camera control Talk and Listen Note The example above shows the maximum privile...

Page 74: ...w the entire list of parameters 7 3 17 Factory Default The Factory default page is shown below Follow the instructions to reset the camera to factory default settings if needed Figure 63 Factory Defau...

Page 75: ...settings The system restarts in 30 seconds Figure 64 Partial Restore Screen Reboot Clicking Reboot restarts the system without changing current settings 7 3 18 Software Version The current version of...

Page 76: ...aded for example uImage userland img Note Do not change the upgrade file name or the system will fail to find the file 2 From the drop down menu of binary files in Step 2 select the file to upgrade In...

Page 77: ...eo browser 5 From the Windows Start menu select the Control Panel 6 Select Uninstall a Program 7 In the Currently installed programs list select DCViewer 8 Click Uninstall to delete the existing DCVie...

Page 78: ...ation file bin to a specified location for future use Press Export and the popup window File Download appears as shown below Figure 69 File Download Screen Click Save and specify a location to save th...

Page 79: ...mission mode etc Further details of these settings are specified in the following sections The following video resolutions are supported H 264 H 264 MJPEG H 264 MJPEG only H 264 only Related Links Vid...

Page 80: ...20 30fps 1024 x 768 30fps 800 x 600 30fps 1280 x 1024 30fps 1280 x 1024 30fps 1280 x 720 30fps 1024 x 768 30fps 800 x 600 30fps 720 x 480 30fps 640 x 480 30fps 352 x 240 30fps 1024 x 768 30fps 1024 x...

Page 81: ...20 30fps 1024 x 768 30fps 800 x 600 30fps 720 x 480 30fps 640 x 480 30fps 352 x 240 30fps 1024 x 768 30fps 1024 x 768 30fps 800 x 600 30fps 720 x 480 30fps 640 x 480 30fps 352 x 240 30fps 800 x 600 30...

Page 82: ...ps 800 x 600 25fps 1920 x 1080 25fps 720 x 576 25fps 640 x 480 25fps 352 x 288 25fps 1280 x 1024 25fps 1280 x 1024 25fps 1280 x 720 25fps 1024 x 768 25fps 800 x 600 25fps 720 x 576 25fps 640 x 480 25f...

Page 83: ...1280 x 720 25fps 1024 x 768 25fps 800 x 600 25fps 720 x 576 25fps 640 x 480 25fps 352 x 288 25fps 1024 x 768 25fps 1024 x 768 25fps 800 x 600 25fps 720 x 576 25fps 640 x 480 25fps 352 x 288 25fps 800...

Page 84: ...uding date time text on the Live Video pane The maximum length of the string is 20 alphanumeric characters Click Save to confirm the Text Overlay setting 7 4 1 4 Video Rotate Type You can change video...

Page 85: ...mage rotates 90 counter clockwise to the left Click Save to confirm the setting 7 4 1 5 GOV Settings You can set the GOV length to determine the frame structure I frames and P frames in a video stream...

Page 86: ...rage size and video latency Click Save to confirm the settings 7 4 2 Video Compression From the Video Compression page you can specify MJPEG H 264 compression settings Figure 74 Video Compression Scre...

Page 87: ...Protocol page you can select various protocols for streaming media over the network In the case of multicast networking select Multicast mode Figure 75 Video OCX Protocol Screen Video OCX protocol set...

Page 88: ...H 264 2 Frame Rate Setting The default setting of the MJPEG Frame Rate is 30 fps in NTSC and 25 fps in PAL The setting range for the H 264 1 Frame Rate is from 1 to 30 in NTSC and 1 to 25 in PAL The...

Page 89: ...ox is blocked out or obscured from view To enable a mask 1 Check a Video Mask checkbox A red frame is displayed in the Live Video pane on the right side 2 Use the mouse to drag and drop adjust the mas...

Page 90: ...cal remote site can only talk to the other site Simplex Listen only In the Listen only Simplex mode the local remote site can only listen to the other site Disable Select this option to turn off the a...

Page 91: ...e option has been selected or if the Schedule option has been set Click Save to confirm the settings 7 5 Camera Related Settings From the Camera tab the administrator can adjust any of the camera sett...

Page 92: ...osure In Manual Mode the administrator can choose fixed shutter speeds from a drop down menu The smaller the number the higher the shutter speed that the administrator selects the lower the exposure l...

Page 93: ...luminance The shutter speed range is from 1 to 1 500 sec NTSC and 1 1 5 to 1 425 sec PAL See following table which shows all the options Auto Shutter Min Shutter Speed PAL NTSC 1 425 1 500 1 300 1 350...

Page 94: ...0 1 215 1 250 1 150 1 180 1 120 1 120 1 100 1 100 1 75 1 90 1 50 1 60 1 25 1 30 1 12 1 15 1 6 1 8 1 3 1 4 1 1 5 1 2 1 Gain A nominal video signal level is usually 1 volt peak to peak for composite vid...

Page 95: ...500 Household Lighting 2 500 to 3 000 75 watt Bulb 2 820 Candle Flame 1 200 to 1 500 Three White Balance modes are available Auto The Auto Balance White mode computes the white balance value output u...

Page 96: ...rpness Increasing the sharpness level can make the image look sharper especially enhancing the object s edge Select from the range between 0 to 15 Press to confirm the new setting 7 5 3 3 Contrast Cam...

Page 97: ...Guide 86 Figure 83 Camera Settings Screen Backlight 7 5 5 Digital Zoom The camera s digital zoom is adjustable from x2 to x8 Select the desired zoom or Off Press to confirm the new setting Figure 84...

Page 98: ...monochrome automatically at nighttime or in low light conditions When there is sufficient light the camera converts automatically from Night mode to Day mode On Activates IR mode puts camera into mon...

Page 99: ...DNR include Low Mid and High A higher level of 3DNR generates relatively enhanced noise reduction The proprietary Smart Picture Quality SPQ video processing method can drastically minimize motion blur...

Page 100: ...confirm the new setting Figure 88 Camera Settings Screen TV System Note After changing the video format the camera restarts automatically 7 6 Logout Selecting the Logout tab in the navigation bar clos...

Page 101: ...ions Device Search Software Internet Security Settings Install UPnP Components Deleting the Existing DCViewer Deleting Temporary Internet Files Back Focus Adjustment Connecting Wires to a Spring Clamp...

Page 102: ...6 Lens Lens Type Motorized Varifocal 3 6 9mm F1 8 Auto Iris Day Night Field of View 36 90 Lens Mounting C CS mount Video Video Compression Fully compliant multi stream H 264 main profile MJPEG Video R...

Page 103: ...web interfaces are supported in the streaming video output Note In the Latitude interface the Privacy Mask is independent of the camera s on screen display and is not embedded Day Night Removable IR C...

Page 104: ...duration on event notification recording to SD card and more are supported as events in Latitude Network Interface 10 100Mbps Ethernet RJ45 Network Protocols IPv4 v6 TCP IP UDP RTP RTSP HTTP HTTPS ICM...

Page 105: ...Environmental Operating Temperature 10o to 50o C 14 to 122 F Humidity 10 90 non condensing General Regulatory US FCC Part 15 Subpart B Class A UL Europe CE marked EN55022 1998 Class A EN55024 RoHS War...

Page 106: ...he Unified Configurator by selecting Applications Device Configuration Tool and then on the Unified Configurator screen click DVTEL HD Series 5 In the Device Search application click Device Search and...

Page 107: ...era do either of the following and search and configure the camera s network settings via Device Search In Latitude the Device Configuration Tool Unified Configurator can be accessed from the Applicat...

Page 108: ...etup The Network Setup dialog is displayed Tip Record the camera s MAC address for future reference 6 To access Device Search do one of the following a For DHCP not supported by Latitude i Select DHCP...

Page 109: ...nd password 1234 Note ID and password are case sensitive Note It is strongly advised that administrator s password be altered for security reasons b If the Information Bar just below the URL bar promp...

Page 110: ...and DVTEL Latitude AdminCenter Discovery feature is in use deselect all other proprietary types Select DVTEL HD Series so that the new password can be configured in the Discovery tab settings Addition...

Page 111: ...lbar select Tools and select Internet Options from the menu that appears Figure 96 Command Bar Toolbar Select Internet Options 3 In the Internet Options window that appears select the Security tab 4 S...

Page 112: ...n the dialog that appears under ActiveX controls and plug ins set ALL the following options listed below to Enable or Prompt Automatic prompting for ActiveX controls Binary and script behaviors Downlo...

Page 113: ...enable UPnP so that the camera can be discovered and displayed in Network locations under Other Devices To enable UPnP discovery in Windows 7 and Windows 8 1 Click Start and select Control Panel 2 Cl...

Page 114: ...e through Windows Firewall and that other firewalls are not interfering with network discovery To check that the UPnP Device Host services are running 1 Click Start and type in the Search programs and...

Page 115: ...should first delete the existing DCViewer from the PC before accessing the camera To delete a legacy DCViewer 1 Click Start and select Control Panel 2 In the Control Panel click Uninstall a program 3...

Page 116: ...as follows To delete temporary Internet files 1 In Internet Explorer IE from the Command Bar toolbar click Tools and select Internet Options from the menu that appears 2 In the General tab in the Inte...

Page 117: ...as follows a In the Viewer select the Camera tab b From the Exposure menu select Auto Shutter mode See section 7 5 1 Exposure c Click the icon to save changes Tip It is preferable do the adjustment d...

Page 118: ...n a close object e g 1 3m f Repeat steps a through e until focus is optimal throughout the zoom range g Tighten the back focus ring retaining screw to secure the ring in place h Return the camera s Ex...

Page 119: ...l Block To connect a wire to the spring clamp terminal block 1 Strip the insulation from the end of each wire that is to be connected to the terminal block Approximately 1 cm 2 54 of wire should be ex...

Page 120: ...Camera Housing Equipped with Heater Fan 24VAC 20W Aluminum with Sunshield 30 to 50C 22 to 122F 140mm x 112mm x 340mm W x H x L 1 51Kg 3 4 LB CF X200 POLE Pole Mount Option for CF X200 01 Housing Lense...

Page 121: ...8235 9255 info anz dvtel com EMEA DVTEL UK Ltd 7 Lancaster Court Coronation Road High Wycombe HP12 3TD England Tel 44 0 1494 430240 Fax 44 0 1494 446928 info uk dvtel com INDIA AND SAARC GULF REGION D...

Reviews: