April 18, 2018
7080-166B
21
TREKKER
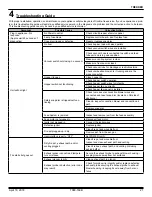
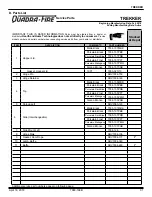
With proper installation, operation, and maintenance your appliance will provide years of trouble-free service. If you do experience a prob
-
lem, this troubleshooting guide will assist a qualified service person in the diagnosis of a problem and the corrective action to be taken.
This troubleshooting guide can only be used by a qualified service technician.
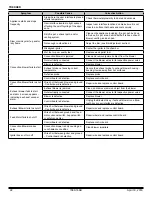
Symptom
Possible Cause
Corrective Action
Plug in appliance - No
response
(Approx wait 45 seconds of
diagnostics)
No Power to outlet.
Check circuit breaker at service panel.
5 amp fuse blown
Replace control board - don’t replace fuse
Snap disc tripped or defective.
Reset or replace snap disc.
Unit will not light
No Fuel
Check hopper; load with wood pellets
Vacuum switch not closing; no vacuum
Check vacuum switch wires are installed
Check vacuum hose is connected to switch and feed
tube port and is in good condition
Make sure venting system is clean
Make sure front door is closed
Check vacuum tube for blockage or restrictions/kink
Check combustion blower; is it running and are the
wires connected.
Hopper lid open
Close hopper lid
Hopper switch not functioning
Check hopper switch operation
Check hopper switch wires for integrity
Check hopper lid on correctly
Check hopper lid magnet is installed
Safety snap disc is tripped/not func
-
tioning
Check to make sure convection blower wires are
connected and reset snap disc (located on RH side of
appliance)
Clean & inspect convection blower and convection air
path.
Replace snap disc
Check convection blower wires
Feed System is jammed
Inspect and remove jam from the feed assembly
Feed motor not plugged in
Reconnect feed motor
Igniter not plugged in
Connect the igniter wires
Defective igniter
Replace igniter
Fire pot plugged-up / dirty
Clean fire pot and movable floor
Remove ash from the ash pan
User interface is set to “OFF”
Set POWER to ON.
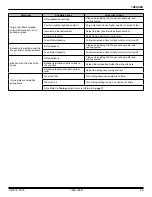
Fire starts but goes out
Dirty fire pot, exhaust path, and/or
venting plugged
Clean fire pot and movable floor
Inspect and clean exhaust path and venting
Clean firebox, exhaust path, and venting (including
behind baffle)
Exhaust sensor cannot read tempera
-
ture or is loose
Secure the exhaust probe to exhaust blower housing –
keeping its wire away from hot surfaces
Exhaust plenum is dirty
Clean exhaust path to plenum
Exhaust probe is defective (error code
may result)
Check for probe wire integrity and/or replace defective
exhaust probe securing the exhaust probe to exhaust
blower housing – keeping its wire away from hot sur
-
faces
4
Troubleshooting Guide

