background image

 2 


                       7080-166B 


   April 18, 2018

TREKKER

9.50

HOT WHILE IN OPERATION 

DO NOT TOUCH, KEEP 

CHILDREN, CLOTHING AND FURNITURE AWAY. 

CONTACT MAY CAUSE SKIN BURNS.  SEE NAMEPLATE 

AND INSTRUCTIONS.  

CAUTION:

CHAUD LORS DE 

L'OPÉRATION. NE PAS 

TOUCHER. GARDEZ LES ENFANTS ET LES 

VÊTEMENTS LOIN DE L'ESPACE DÉSIGNÉ DE 

L'INSTALLATION. LE CONTACT PEUT CAUSER DES 

BRÛLURES À LA PEAU.  VOIR L'ÉTIQUETTE ET LES 

INSTRUCTIONS.  

ATTENTION:

Mt Vernon E2-C / Trekker

Pellet Stove

R

Listed Solid Fuel Room Heater/Pellet Type.  Also suitable for Mobile Home 

Installation.  This appliance has been tested and listed for use in Manufactured 

Homes in accordance with OAR 814-23-9000 through 814-23-909.

Appareil de chauffage de combustible solide/de type de boulettes.  Accepté dans 

l'installation dans les maisons mobiles.  Cet appareil a été testé et enregistré pour 

l'usage dans les Maisons Mobiles en accord avec OAR 814-23-9000 jusqu'à 

814-23-909.

PREVENT HOUSE FIRES / 

PRÉVENTION DES FEUX DE MAISON

Install and use only in accordance with manufacturer's installation and operating 

instructions.  Contact local building or fire officials about restrictions and inspection in 

your area.

WARNING - FOR MOBILE HOMES:  Do not install appliance in a sleeping room.  An 

outside combustion air inlet must be provided.  The structural integrity of the mobile 

home floor, ceiling and walls must be maintained.  Refer to manufacturer's 

instructions and local codes for precautions required for passing chimney through a 

combustible wall or ceiling.  Inspect and clean vent system frequently in accordance 

with manufacturer's instructions.  DO NOT CONNECT THIS UNIT TO A CHIMNEY 

SERVING ANOTHER APPLIANCE.  Use a 3" or 4" diameter type "L" or "PL" venting 

system.

Installez et utilisez en accord avec les instructions d'installation et d'opération du 

fabricant. Contactez le bureau de la construction ou le bureau des incendies au sujet 

des restrictions et des inspections d'installation dans votre voisinage. Ne pas obstruez 

l'espace en dessous de l'appareil.

AVIS - Pour Les Maisons Mobiles:  Ne pas installer dans une chambre à coucher. Un 

tuyau extérieur de combustion d'air doit être installé et ne doit pas être obstrué 

lorsque l'appareil est en usage. La structure intégrale du plancher, du plafond et des 

murs de la maison mobile doit être maintenue intacte.  Référez vous aux instructions 

du fabricant et des codes locaux pour les précautions requises pour passer une 

cheminée à travers un mur ou un plafond combustibles, et les compensations 

maximums.  Inspectez et nettoyez la cheminée fréquemment. Ne pas connecter cet 

appareil à une cheminée servant un autre appareil.  Utilisez systèm de ventilation "L" 

ou "PL" diamètre 76mm ou 102mm

Conforms to ASTM Std E1509-12. Certified to ULC S627-00. Room Heating Pellet 

BurningType,  (UM) 84-HUD FOR USE ONLY WITH PELLETIZED WOOD  FUEL. Do 

not use any other type of fuel.  
Input Rating: 55,000 Btu's/hr.  Electrical Rating:115 VAC, 60 Hz, Start 2.9 Amps, Run 

2.45 Amps.  Route power cord away from unit.  Do not route cord under or in front of 

appliance.  Do not obstruct the space beneath the heater.

DANGER

:  Risk of electrical shock.  Disconnect power supply before servicing.  

Replace glass only with 5mm ceramic.  To start, turn dial control to desired setting and 

set thermostat above room temperature, the stove will light automatically.  To 

shutdown, turn dial control to OFF or set thermostat below room temperature.  For 

further instruction refer to owner's manual.  Keep viewing doors tightly closed during 

operation.  Keep viewing and ash removal doors tightly closed during operation.
Conforme à la norme ASTM E1509-12 Std. Certifié à la norme ULC S627-00. Room 

Heating Pellet Burning Type, (UM) 84-HUD POUR USAGE AVEC LES BOULETTES 

DE BOIS.  N’utiliser aucun autre genre de combustible.  
Puissance de Rendement: 55,000 Btu's/hr.  Puissance Électrique: 115 VAC, 60 Hz, 

Début 2.9 Amps, Courir 2.45 Amps, Éloignez le fil électrique de l'appareil. Ne pas faire 

passer le fil électrique au dessus ou en dessous de l'appareil.  Ne pas bloquer 

l’espace au dessous de l’appareil

.  

DANGER:

 Il y a risque de décharge électrique.  Déconnectez le fil électrique de la 

prise de contact avant le service.  Remplacez la vitre seulement avec une vitre 

céramique de 5 mm disponible chez votre fournisseur.  Pour commencer, tournez la 

molette de réglage à la température désirée et réglez le thermostat au-dessus de la 

température ambiante, le poêle s'allumera automatiquement. Pour éteindre, tournez la 

molette de réglage sur OFF ou réglez le thermostat dessous de la température 

ambiante.  Pour des instructions supplémentaires, référez vous au manuel du 

propriétaire.  Gardez la porte d'ouverture et la porte des cendres fermées 

hermétiquement durant l'opération.

A

B

C

D

D

MINIMUM CLEARANCES TO COMBUSTIBLE MATERIALS

ESPACES LIBRES MINIMUM DES MATÉRIAUX

Back Wall / Mur Arrière 

2 in [51 mm]  

Side Wall / Mur De Côté 

6 in [152 mm]

“L” or “PL” Pipe to Back Wall / “L” ou “PL” Un Tuyau Mur Arrière 

1 in [25 mm]  

Side Wall / Mur De Côté 

2 in [51 mm]  

FLOOR PROTECTION / PROTECTION DU SOL

Floor protector must be non-combustible 

material, extending beneath heater and to 

the front/sides/rear as indicated.  

Measure 

front distance (I) from the surface of the 

glass door.

Le poêle doit être placé sur une assise non 

combustible s’étendant tout autour de lui, 

comme les schémas l’indiquent.  Mesurez la 

distance du devant (I) de la surface de la 

porte vitrée.

*Non-combustible floor protection must extend 2 inches 

(51mm) beneath the flue pipe when installed with horizontal 

venting or under the Top Vent Adapter with vertical installation.  

RECOMMENDED IN USA; REQUIRED IN CANADA.

*Un protecteur incombustible de plancher doit s'étendre 2 

inches (51mm) sous le conduit de cheminée pour une 

installation de ventilation horizontale ou sous un adapteur de 

ventilation de dessus pour une installation verticale.  

RECOMMANDÉ AUX ÉTATS-UNIS; NÉCESSAIRE AU 

CANADA.

USA

G  =  2 in

H* =  2 in

I  =  6 in

CANADA

G  =  200 mm

H* =  200 mm

I  =  450 mm

G

H

I

G

7080-164C

U.S. ENVIRONMENTAL PROTECTION AGENCY

Certified to comply with 2020 particulate standards at 

0.74 G/HR. Tested under ASTM E2515, ASTM E2779, 

and CSA B415.1-10

DO NOT REMOVE THIS LABEL / NE PAS ENLEVER L'ÉTIQUETTE

Made in U.S.A. of US and imported parts.

Fabriqué aux États-Unis-d’Amérique par des pièces d’origine américaine et pièces importées.

2018

2019

2020

JAN

FEB

MAR

APR

MAY

JUN

JUL

AUG

SEP

OCT

NOV

DEC

This wood heater needs periodic inspection and repair 

for proper operation. Consult the owner’s manual for 

further information. It is against federal regulations to 

operate this wood heater in a manner inconsistent 

with the operating instructions in the owner’s manual

352 Mountain House Road, Halifax, PA 17032

www.quadrafire.com

Manufactured by:Fabriqué par

Safety and Emissions 

Respectively

Report #: 061-S-83-2

Report #: 0061Ps094E

Serial No. / N° de série

HF

BARCODE LABEL

MTV-E2-C

TREKKER

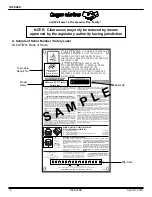
A. Sample of Serial Number / Safety Label

LOCATION:  Back of Stove

Serial No.

Model 

Name

Test Lab & 

Report No.

Mfg. Date

S A

M P

L E

NOTE:  Clearances may only be reduced by means 

approved by the regulatory authority having jurisdiction

and Welcome to the Quadra-Fire Family

!

Summary of Contents for TREKKER-CSB

Page 1: ...not store or use gasoline or other flam mable vapors and liquids in the vicinity of this or any other appliance Do NOT burn garbage or flammable fluids such as gasoline naphtha or engine oil in room...

Page 2: ...doors tightly closed during operation Keep viewing and ash removal doors tightly closed during operation Conforme la norme ASTM E1509 12 Std Certifi la norme ULC S627 00 Room Heating Pellet Burning Ty...

Page 3: ...oved 7 2 Operating Instructions 8 A Fire Safety 8 B Non Combustible Materials 8 C Combustible Materials 8 D Fuel Material and Fuel Storage 8 E Before Your First Fire 9 F Filling the Hopper 9 G User In...

Page 4: ...struction warranty coverage begins on the date of first occupancy of the dwelling or six months after the sale of the product by an independent authorized HHT dealer distributor whichever occurs earli...

Page 5: ...t cover the following Changes in surface finishes as a result of normal use As a heating appliance some changes in color of interior and exterior surface finishes may occur This is not a flaw and is n...

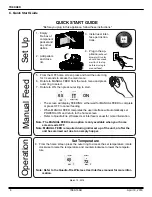
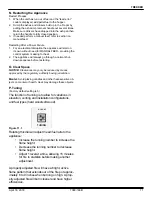
Page 6: ...xhaust blower will run for about 45 seconds wait for it to stop before moving to manual feed 65 72 HEATING 5 From the OFF home screen press and hold the outer ring for 3 seconds to access the main men...

Page 7: ...liance Installation other than as instructed by Hearth Home Technologies Installation and or use of any component part not approved by Hearth Home Technologies Operating appliance without fully assemb...

Page 8: ...ate We recommend that you buy fuel in multi ton lots whenever possible However we do recommend trying various brands before purchasing multi ton lots to ensure your satisfaction Fuel Material Made fro...

Page 9: ...gin cycling on and off When the pellets are warming on the verge of igniting it is not uncommon for the firebox to fill with smoke Once ignition happens the smoke should quickly disap pear During this...

Page 10: ...eased during initial operation Curing of high temperature paint Open windows for air circulation Odors may be irritating to sensitive individuals CAUTION WARNING HOT SURFACES Glass and other surfaces...

Page 11: ...Space NOTICE Clearances may only be reduced by means ap proved by the regulatory authority having jurisdiction Mantel Avoid placing candles and other heat sensitive ob jects on mantel or hearth Heat m...

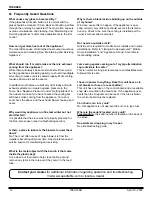
Page 12: ...blowers is from the impellers becoming dirty over time See maintenance and service section for maintaining and servicing What is the metal object with the bend in it that came inside the plastic bag I...

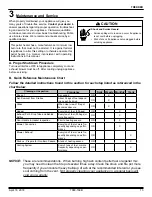
Page 13: ...maintained your appliance will give you many years of trouble free service Contact your dealer to answer questions regarding proper operation troubleshoot ing and service for your appliance Visit www...

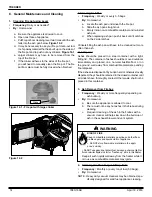
Page 14: ...ainer with a tight fitting lid The container of ashes should be moved outdoors immediately and placed on a non combustible floor or on the ground well away from combustible materials pending final dis...

Page 15: ...t flat head screwdriver bottle brush ID hose 1 It is necessary to remove the baffle to gain access to the heat exchanger figure 15 2 Follow instruc tions for baffle removal on page 20 figure 20 2 2 Va...

Page 16: ...Frequency Monthly or after burning 50 bags By Homeowner a Be sure the appliance is allowed to cool b Open the front cast door and cycle the ash removal handle these should be inspected for functional...

Page 17: ...vacuum thor oughly c To minimize corrosion paint all exposed steel including cast iron Use the Touch Up paint sup plied with the appliance or purchase paint from your local dealer You must use a high...

Page 18: ...the top of the latch up to lock latch into place WARNING Cast iron is a very heavy material The baffle is made of cast iron and therefore is heavy and awkward at times to maneuver Clear and prepare y...

Page 19: ...blower slightly and lift up The blower will pass out the left side of the appliance Note You may need to loosen the surround to move it out of the way 7 Install replacement blower by placing the bott...

Page 20: ...stion blower You only need to remove the motor and impeller 4 Disconnect the wire from the control board connection and hall effect switch housing 5 Using an 7mm socket wrench or nut driver loosen the...

Page 21: ...itch operation Check hopper switch wires for integrity Check hopper lid on correctly Check hopper lid magnet is installed Safety snap disc is tripped not func tioning Check to make sure convection blo...

Page 22: ...re the exhaust probe to exhaust blower housing keeping its wire away from hot surfaces Defective probe Replace probe Control board is defective Replace control board Convection Blower fails to shut of...

Page 23: ...Excessive fuel spilling over the fire pot and or excessive flame Dirty Appliance Clean unit including the fire pot exhaust path and venting system Feed Motor locked on Follow corrective action for fee...

Page 24: ...lid must be closed vacuum switch must be closed snap disc closed and feed motor must be plugged in Clear jam in feed tube Dirty appliance Clean unit including the fire pot exhaust path and venting sy...

Page 25: ...USB extension cable not plugged in Bluetooth key not plugged in Replace Bluetooth Key Replace USB extension cable not plugged in Replace control board Bluetooth Key and user interface not paired Pair...

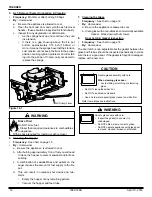
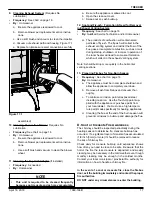
Page 26: ...appliance The convection blower pushes heated air through the heat exchange system into the room 4 Feed System The feed system is located on the right side of the appliance and can be removed as an e...

Page 27: ...April 18 2018 7080 166B 27 TREKKER B Maintenance Log Date of Service Performed By Description of Service...

Page 28: ...28 7080 166B April 18 2018 TREKKER Date of Service Performed By Description of Service...

Page 29: ...April 18 2018 7080 166B 29 TREKKER Date of Service Performed By Description of Service...

Page 30: ...e Feb 2018 Ending Manufacturing Date Active Pellet Stove TREKKER CSB TREKKER MBK TREKKER PBK TREKKER PDB TREKKER PFT TREKKER PMH Part number list on following page 1 18 2 1 3 4 5 6 7 8 9 10 11 12 13 1...

Page 31: ...34 157PFT Porcelain Mahogany 7034 157PMH Sienna Bronze 7034 157CSB Gasket Hopper Lid 10 FT 7000 320 10 2 Hinge Pin SRV7034 159 3 Hinge Retainer SRV7034 163 4 Top Matte Black 7034 155MBK Porcelain Blac...

Page 32: ...BER 12 Door Assembly SRV7080 022 12 1 Glass Retainer 7034 136 Y 12 2 Glass Assembly w Gasket 7034 007 Y Gasket Channel 1 8 x 1 1 4 x 10 7000 377 10 12 3 Hinge Female SRV450 2910 12 4 Door Latch Assemb...

Page 33: ...an Assembly SRV7034 069 Twin Ball Catch SRV7000 532 Y 17 Intake Shield 7034 224 Y 18 Firepot Riser Assembly SRV7080 082 18 1 Firepot Assembly SRV7080 083 Y 18 2 Gasket Firepot SRV7034 190 Y 18 3 Sprin...

Page 34: ...uum Switch SRV7000 531 Y Vacuum Hose 3 Ft cut to t SRV7000 373 Y 25 Control Board SRV7080 052 Y Wire Harness SRV7080 129 Y 26 Side Mount Right 7034 126 27 Shroud Right SRV7080 168 Y 28 Combustion Blow...

Page 35: ...0 071 Porcelain Mahogany SRV7080 068 Sienna Bronze SRV7080 067 Cleanout Tool 414 1140 Y Leveling Assembly 7000 000 Paint Touch Up Matte Black 812 0910 Porcelain Black 1 00 0022 Porcelain Dark Blue 1 0...

Page 36: ...purchased installed _________________________________________________________________________ Serial Number ____________________________________ Location on appliance ___________________________ Deal...

Reviews: