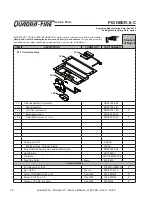
Figure 4.39 Exploded View of Entire Assembly for Point of Refer-
ence only
Item
Description
Qty
1
Screw 8-32 x 1/2 PPH BK
1
2
Washer #10 SAE ZN
1
3
Extension Spring
1
4
Timer Mechanical 12 HR
1
5
Slide Assembly
1
6
Timer Arm Assembly
1
7
Timer Door Assembly
1
8
Air Channel Bottom
1
9
Timer Bracket
1
10
Timer Base
1
11
Timer Handle
1
12
Timer Door Retainer
2
13
Air Channel Gasket
1
14
Screw 8 x 12 PPH BK
10
15
Spacer #8 1/4D 7/32L ZN
1
16
HHSS #10 x 1/4D 1/4 L BK
2
13.
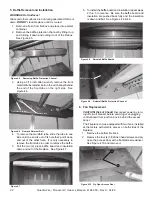
Install the washer and the hairpin clip back on the
rod. See Figure 4.36.
Black Knob
Hairpin Clip and Washer
Figure 4.36 Reinstalling Hairpin Clip and Washer
14.
Reinstall the air chamber cover. See Figure 4.37.
Screws
Figure 4.37 Air Chamber Cover
15. Reinstall the bottom front access panel.
16.
Screw the knob back on the rod.
9. Fan Snap Disc Replacement
1. Remove the bottom front access panel by lifting it
up and off.
2.
Locate the snap disc to the left of the timer assembly.
3. Remove the wires from the snap disc.
4.
Remove the 1/4” bolt using a 3/8” socket along with
the bracket.
5. Pull the snap disc out of the bracket.
6.
Install the new snap disc in the bracket and reinstall
in the fireplace. See Figure 4.38.
NOTE: Remember to reattach the wires.
Bolt
Wires
Figure 4.38 Snap Disc Replacement
27
Quadra-Fire • Pioneer-II-C Owner’s Manual • 4184-900 • Rev C • 02/20


