8. Timer Removal & Replacement
1. Remove the bottom front access panel by lifting it
up and off.
2.
Remove the two (2) screws in the cover. See Figure
4.26 and pull it down and off. See Figure 4.27.
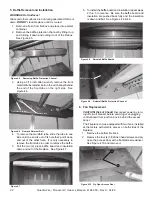
9. Install the timer/linkage by inserting the timer in first
and slipping the linkage over the rod. See Figure
4.23.
Figure 4.23 Inserting Timer Assembly
10.
Screw the timer to the air chamber. See Figure 4.24.
Screws
Figure 4.24 Screwing Timer to Air Chamber
11.
Install the washer and hairpin clip back on the rod.
See Figure 4.25.
Black Knob
Hairpin Clip and Washer
Figure 4.25 Reinstalling Hairpin Clip and Washer
3.
Unscrew and remove the black knob. See Figure
4.28.
4. Pull off and remove the hairpin clip and the washer
on the rod. See Figure 4.28.
Screws
Figure 4.26 Air Chamber Cover
Figure 4.27 Removal of Air Chamber Cover
Black Knob
Hairpin Clip and Washer
Figure 4.28 Removal of Handle
5.
While holding on to the timer assembly, remove the
two (2) screws, Figure 4.29 and slide the linkage arm
off of the rod and pull the assembly out of the front.
Screws
Figure 4.29 Removal of Screws
12.
Reinstall air chamber cover. See Figure 4.26.
13. Reinstall the bottom front access panel.
14.
Screw the black knob back on.
25
Quadra-Fire • Pioneer-II-C Owner’s Manual • 4184-900 • Rev C • 02/20


