background image

Front 

Stack

Back 

Stack

Air Gap Between 

Stacks

Figure 3.23  Stacking Wood

Front 

Stack

Back 

Stack

Air Gap Between 

Stacks

Figure 3.24 Stacking Wood 

Medium/Low Burn

• 

 Open  the  door  and  load  the  wood  the  same  as  the 

high burn.  Then partially close the door leaving it open 

around 4-8 inches for up to 5 minutes or until the wood 

is burning good then close the door. Let it burn for up 

to 20 minutes before setting the combustion air control 

to the desired setting.

COMBUSTION AIR CONTROL SETTINGS

• 

LOW - all the way to the left.

• 

MEDIUM - from the low setting go up to 1/2 inch to the 

right.

• 

HIGH - all the way to the right until resistance is felt.

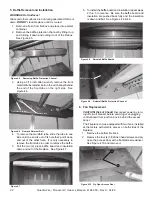
Figure 3.25  Door Open 2-4 Inches

Figure 3.26  Door Latched Lightly

Figure 3.27  Door Fully Closed

NOTE:  The ACC should only need to be activated when 

starting from a cold start or if a lively coal bed isn’t pres-

ent when reloading.

15

Quadra-Fire • Pioneer-II-C Owner’s Manual • 4184-900 • Rev C • 02/20

Summary of Contents for Pioneer-II-C

Page 1: ...r explosion may result causing property damage personal injury or death WARNING HOT SURFACES Glass and other surfaces are hot during operation AND cool down Hot glass will cause burns DO NOT touch glass until it is cooled NEVER allow children to touch glass Keep children away CAREFULLY SUPERVISE children in same room as fireplace Alert children and adults to hazards of high temperatures High tempe...

Page 2: ...an Replacement 22 7 Timer Assembly Replacement 23 8 Timer Removal and Replacement 25 9 Fan Snap Disc 27 5 Troubleshooting A FAQs 28 B Troubleshooting Table 30 6 Reference Materials A Service Parts 31 B Contact Information 36 1 Welcome A Congratulations 3 B LIMITED LIFETIME WARRANTY 4 2 Product Specific Information A Appliance Certification 6 B BTU Efficiency Specifications 6 C Mobile Home Approved...

Page 3: ...VENT DURA PLUS SYSTEM TERMINATION CAP HEARTH EXTENSION AND REQUIRED ACCESSORY CHIMNEY AIR KIT PART CAK4A DO NOT CONNECT THIS UNIT TO A CHIMNEY SERVING ANOTHER APPLIANCE DANGER RISK OF ELECTRICAL SHOCK DISCONNECT POWER SUPPLY BEFORE SERVICING ELECTRICAL RATING 115 VAC 3 0 AMPS 60 HZ MUST PROVIDE A SOURCE OF AIR TO PREVENT AIR STARVATION FROM COMBUSTION WHICH COULD RESULT IN HIGH LEVELS OF CARBON MO...

Page 4: ...later than 24 months following the date of product shipment from HHT regardless of the installaƟon or occupancy date The warranty period for parts and labor for covered components is produced in the following table The term Limited LifeƟme in the table below is de ned as 20 years from the beginning date of warranty coverage for gas appliances and 10 years from the beginning date of warranty covera...

Page 5: ... nued opera on with damaged corroded or failed components accident or improperly incorrectly performed repairs 5 environmental condi ons inadequate ven la on nega ve pressure or dra ing caused by ghtly sealed construc ons insufficient make up air supply or handling devices such as exhaust fans or forced air furnaces or other such causes 6 use of fuels other than those speci ed in the opera on instru...

Page 6: ...r your dealer Quadra Fire is a registered trademark of Hearth Home Technologies WARNING Fire Risk Hearth Home Technologies disclaims any responsibility for and the warranty will be voided by the following actions B BTU Efficiency Specifications D Glass Specifications This fireplace is equipped with 5mm ceramic glass Replace glass only with 5mm ceramic glass Please con tact your dealer for replacem...

Page 7: ...the hearth extension Room furnishings such as drapes curtains chairs or other combustibles must be at least 4 ft 1219 mm from the open front of the fireplace Combustible materials are materials made of or sur faced with any of the following materials Wood Compressed paper Plant fibers Plastic Plywood OSB Drywall Any material that can ignite and burn flame proofed or not plastered or un plastered W...

Page 8: ... chimney fire call the fire department and evacuate your house Contact your local chimney professional and have your fireplace and chimney inspected for any damage Symptoms of over firing may include one or more of the following chimney connector or fireplace glowing roaring rumbling noises loud cracking or banging sounds metal warping chimney fire What to do if your fireplace is over firing Do no...

Page 9: ...LLY SUPERVISE children in same room as fireplace Alert children and adults to hazards of high temperatures High temperatures may ignite clothing or other flammable materials Keep clothing furniture draperies and other flammable materials away HOT SURFACES Glass and other surfaces are hot during operation AND cool down Figure 3 3 General Operating Parts Bottom Access Panel The outside air control i...

Page 10: ...e setting the ACC may not be required Burn dry well seasoned wood NOTICE To establish your settings always begin with the air control all the way to the left to CLOSED and then move it to the right for your desired setting IMPORTANT As you move the combustion air control to the RIGHT you will feel resistance about three fourths of the way You must move past that resistance approximately 1 in 25mm ...

Page 11: ...d burn is established then turned on medium or high rate Low Burn Setting The fan tends to cool off the fireplace Leave fan off until the burn is well established then if you wish turn the fan on at a low rate Override Switch Speed Control High Low Figure 3 7 Override Switch and Fan Speed Control C Fuel WARNING For use with solid wood fuel only Other fuels may overfire and generate poisonous gases...

Page 12: ...d can be as much water as it is wood having a moisture content of around 50 Imag ine a wooden bucket that weighs about 8 pounds Fill it with a gallon of water put it in the firebox and try to burn it This sounds ridiculous but that is exactly what you are doing if you burn unseasoned wood Dead wood lying on the forest floor should be considered wet and requires full seasoning time Standing dead wo...

Page 13: ... The chimney shall be inspected at least annually be fore lighting or once every two months during heating season When creosote has accumulated it shall be removed to reduce the risk of a chimney fire 6 Dirty Glass A portion of the combustion air entering the firebox is deflected down over the inside of the door glass This air flow washes the glass helping to keep smoke from adhering to its surfac...

Page 14: ...box Add 7 to 9 pounds of start up wood 1 3 inch diameter pieces of cord wood by stacking them in a crisscross pattern This will allow for proper air flow Leave door slightly open 2 4 inches see Figure 3 25 for 1 3 minutes or until a good flame is present Then close the door latching it lightly See Figure 3 26 After the flame gets established approximately 3 5 minutes shut and latch the door See Fi...

Page 15: ... it burn for up to 20 minutes before setting the combustion air control to the desired setting COMBUSTION AIR CONTROL SETTINGS LOW all the way to the left MEDIUM from the low setting go up to 1 2 inch to the right HIGH all the way to the right until resistance is felt Figure 3 25 Door Open 2 4 Inches Figure 3 26 Door Latched Lightly Figure 3 27 Door Fully Closed NOTE The ACC should only need to be...

Page 16: ...information regarding operation and troubleshooting Visit www quadrafire com to find a dealer WARNING Fire Risk DO NOT BURN GARBAGE OR FLAMMABLE FLUIDS SUCH AS GASOLINE NAPTHA OR ENGINE OIL Do NOT burn treated wood or wood with salt driftwood May generate carbon monoxide if burn material other than wood May result in illness or possible death Fire Risk Keep combustible materials gasoline and other...

Page 17: ... chimney top Have the chimney and adjacent structure inspected by qualified professionals Hearth Home Technologies recommends that NFI or CSIAcertified professionals or technicians under the direction of certified professionals conduct an inspection of the chimney per the criteria in NFPA 211 WARNING Risk of Asphyxiation and Fire Annual inspection by qualified technician recommended Check conditio...

Page 18: ...eplace to cool completely Remove baffle and ceramic blanket from fireplace before cleaning chimney refer to Section 4 B 5 Baffle Removal and Installation Close the door tightly Remove the top of the termination cap as shown in Figure 4 1 to clean the cap and chimney The creosote or soot should be removed from the chimney with a brush specifically designed for the size of chimney in use Reinstall t...

Page 19: ...eplace if this condition is present Inspect glass gasket Confirm glass does not move around in glass frame WARNING Risk of Fire DO NOT remove ashes until the fire is out and the fireplace is cold Ashes should be placed in metal container with tight fitting lid The closed container of ashes should be placed on a noncombustible floor or on the ground well away from all combustible materials pending ...

Page 20: ... in penetrating oil for easy removal Remove the glass and discard Position the new glass with edges evenly overlapping the opening in the front door Replace the glass frames Start screws to secure glass frames to door keeping them loose for adjusting the glass Then continue to tighten each screw alternately a few turns at a time until the glass panel is tightened snugly DO NOT OVERTIGHTEN OR CROSS...

Page 21: ... brick until it is flush with the side of the unit Lay bottom bricks in unit Figure 4 4 Fire Brick Configurations Brick Size Qty in Set 1 Brick Wrap 8 2 Firebrick 13 25 x 3 25 2 3 Firebrick 13 25 x 4 50 x 1 25 10 4 Firebrick 12 25 x 4 50 4 5 Firebrick 12 25 x 3 25 2 Figure 4 3 3 Door Handle Assembly Slide door handle through door Install washer s as shown in Figure 4 3 Install key groove Align gro...

Page 22: ...ner Bolt 1 Remove the bottom firebrick 2 Remove the four 4 5 32 Allen head screws and pry open the access door with a flat blade screwdriver See Figure 4 10 and remove it Figure 4 10 Pry Open Access Door 3 Using a 3 16 inch Allen wrench remove the front manifold tube retainer bolt on the air channel behind the end of the front tube on the right side See Figure 4 6 Front manifold tube Remove bolt 4...

Page 23: ...andle remove the four 4 screws at each corner of the combustion cover and fish it up and out of the bottom of the fireplace See Figures 4 11 4 12 Handle Figure 4 11 Removal of Combustion Cover Screws 4 Unplug the wire harness from the fans and remove the wing nut holding the fan in place See Figure 4 13 Wire harness Wing nut 5 Lift the fan up and off of the locating pins and remove up through the ...

Page 24: ...wo 2 1 4 20 bolts at each end of it Then pull it down and out the front See Figures 4 19 4 20 1 4 20 Bolts Figure 4 19 Location of Bolts Figure 4 20 Removal of Bolts 2 7 On the new timer assembly Figure 4 21 remove the front hairpin clip and washer then two 2 screws disconnecting the air chamber before installation See Figure 4 22 Hairpin Clip and Washer Air Chamber Figure 4 22 Removal of Hairpin ...

Page 25: ...airpin Clip and Washer Figure 4 25 Reinstalling Hairpin Clip and Washer 3 Unscrew and remove the black knob See Figure 4 28 4 Pull off and remove the hairpin clip and the washer on the rod See Figure 4 28 Screws Figure 4 26 Air Chamber Cover Figure 4 27 Removal of Air Chamber Cover Black Knob Hairpin Clip and Washer Figure 4 28 Removal of Handle 5 While holding on to the timer assembly remove the ...

Page 26: ... of the timer shaft is facing the opposite side of the linkage timer arm See Figure 4 32 Figure 4 32 D Cut on Shaft 9 Place linkage control arm over timer shaft and tighten set screw Figure 4 33 10 Rotate linkage control arm into final position Note that the D cut is now facing the linkage timer arm Re attach the linkage timer arm and spring See Figure 4 34 Figure 4 34 Reattach the Linkage Timer A...

Page 27: ...in Clip and Washer Figure 4 36 Reinstalling Hairpin Clip and Washer 14 Reinstall the air chamber cover See Figure 4 37 Screws Figure 4 37 Air Chamber Cover 15 Reinstall the bottom front access panel 16 Screw the knob back on the rod 9 Fan Snap Disc Replacement 1 Remove the bottom front access panel by lifting it up and off 2 Locate the snap disc to the left of the timer assembly 3 Remove the wires...

Page 28: ...nry chimney Try holding a burning rolled up newspaper as close to the flue outlet as pos sible for a few minutes then light the paper under the kindling The heat generated from the burning rolled up newspaper should help get the draft established Still other factors can affect how well your flue system performs Neighboring structures high winds tall trees even hillsides can affect air currents aro...

Page 29: ...Outside air closed Overhead fan operating Overhanging tree Bird s nest or leaves in termination cap Structural changes in chimney area Creosote buildup in flue Strong win d s a r o u nd chimney termination Unsealed can lights Combustion air control Figure 5 1 Factory built Fireplaces Troubleshooting 29 Quadra Fire Pioneer II C Owner s Manual 4184 900 Rev C 02 20 ...

Page 30: ...ation Check and clean chimney if needed Check door rope for seal Open air controls ACC Smoke in the house during refueling Open air controls ACC to establish a lively coal bed Open doors SLOWLY Add progressively larger wood to establish a hot fire Fuel burns too fast ACC not working properly Wood too dry mix in less seasoned wood after the fire is established User larger diameter wood Check baffle...

Page 31: ...R II C R Beginning Manufacturing Date Dec 2019 Ending Manufacturing Date Active Woodburning Fireplace Part number list on following page 02 20 1 3 4 5 2 10 12 11 9 6 8 7 13 1 13 14 16 15 13 2 13 3 31 Quadra Fire Pioneer II C Owner s Manual 4184 900 Rev C 02 20 ...

Page 32: ...rick Assembly SRV4184 016 Y 9 1 Brick Wrap Qty 8 req SRV4182 101 9 2 Firebrick 13 25 x 3 25 Qty 2 req SRV4182 203 9 3 Firebrick 13 25 x 4 5 x 1 25 Qty 10 req SRV4182 301 9 4 Firebrick 12 25 x 4 5 Qty 4 req SRV4184 201 9 5 Firebrick 12 25 x 3 25 Qty 2 req SRV4184 203 10 Door Assembly See following pages 11 Slide Knob Pkg of 2 32284 2 Y 12 Timer Assembly See following pages 13 Front Assembly Complet...

Page 33: ... SRV4087 314 10 Door Assembly SRV4181 020 10 1 Hing Male Qty 2 req SRV4181 302 Hinge Retainer SRV4181 122 10 2 Door Handle Assembly SRV4181 022 Y a Door Handle SRV4181 301 b Washer 3 8 SAE Black Qty 3 req 832 0990 Y c Cam Latch SRV430 1141 d Latch Cam Key SRV430 1151 e Nut 3 8 16 Lock Pkg of 24 Qty 2 req 226 0100 24 Y 10 3 Handle Fiber SRV433 1380 Y 10 4 Glass Assembly SRV4181 021 Rope 1 2 Wire Ja...

Page 34: ...lide Assembly SRV4184 041 12 2 Air Channel Gasket SRV4184 189 Y 12 3 Extension Spring SRV433 3950 12 4 Timer Mechanical 12 Hour SRV480 1940 Y Chimney Air Kit CAK4A Fastener Pack Chimney Air Kit 13580 Face Board Assembly Non combustible board SRV4184 064 Hearth Strip SRV18320 Template HHT TEMPLATE C Touch Up Paint Black 812 0910 Fastener Packs AVK Repair Kit 1 4 20 RIVNUT REPAIR Y Nut 1 4 20 Pkg of...

Page 35: ...This page intentionally left blank 35 Quadra Fire Pioneer II C Owner s Manual 4184 900 Rev C 02 20 ...

Page 36: ...ual with party responsible for use and operation Important operating and maintenance instructions included Read understand and follow these instructions for safe installation and operation This product may be covered by one or more of the following patents United States 5613487 5647340 5890485 5941237 6006743 6019099 6053165 6145502 6374822 6484712 6601579 6769426 6863064 7077122 7098269 7258116 7...

Reviews: