


24
7080-162B
October 12, 2017
MT VERNON E2-C
7014-262B January 29, 2016 Page 2 of 2
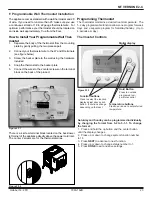
Program Schedule Override (temporary)
Press or to immediately adjust the temperature. This
will temporarily override the temperature setting for the
current time period.
The new temperature will be maintained only until the next
programmed time period begins. For example, if you want
to turn up the heat early in the morning, it will automatically
be lowered later, when you leave for the day.
To cancel the temporary setting at any time, press
RUN
SCHEDULE.
►
►
Program Schedule Override (permanent)
Press
HOLD
to permanently adjust the temperature. This
will override the temperature settings for all time periods.
The “Hold” feature turns off the program schedule and al-
lows you to adjust the thermostat manually, as needed.
Whatever temperature you set will be maintained 24 hours
a day, until you manually change it, or press
RUN SCHED-
ULE
to cancel “Hold” and resume the prgrammed sched-
ule.
To Adjust Program Schedules
1. Press
SET CLOCK/DAY/SCHEDULE, then SET
SCHEDULE.
2. Press / to set your weekday wake time (Mon-
Fri), then press
NEXT.
3. Press / to set the temperature for this
time period, then press
NEXT.
4. Set time and temperature for the next time period
(Leave). Repeat steps 2 and 3 for each weekday
time period.
5. Press
NEXT
to set weekend time periods (Sat-
Sun), then press
DONE
to save & exit.
NOTE:
You can press
CANCEL PERIOD
to eliminate
unwanted time periods (except Wake).
►
►
►
►
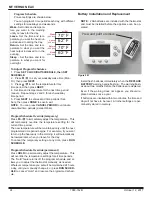
Program Schedule
Pre-set settings are shown below.
You can program 4 time periods each day, with different
settings for weekdays and weekends.
Wake
- Set to time and tempera-
ture you want in the morning
until you leave for the day.
Leave
- Set the time and tem-
perature you want the heat out-
put reduced to during the day.
Return
- Set the time and tem-
perature to what you want the
heat output increased to in the
evening.
Sleep
– Set the time and tem-
perature to what you want for
overnight.
Install fresh batteries immediately when the
REPLACE
BATTERY
warning begins fl ashing. The warning fl ash-
es about two months before the batteries are depleted.
Even if the warning does not appear, you should re-
place batteries once a year.
If batteries are inserted within two minutes, the time and
day will not have to be reset. All other settings are per-
manently stored in memory.
NOTE:
2 AA batteries are included with the thermostat
and must be installed before the appliance can be op-
erated.
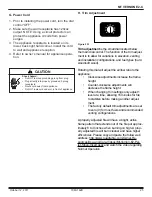
Battery Installation and Replacement
Press and pull to remove.
Heat
Heat
Wake
(6:00 am)
(6:00 am)
Leave
(8:00 am)
(8:00 am)
Return
(6:00 pm)
(6:00 pm)
Sleep
(10:00 pm)
(10:00 pm)
70° F
62° F
70° F
62°
F
Figure 24.1


