


10
7027-802C
June 4, 2019
CB1200 Free Standing
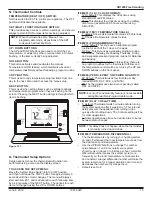
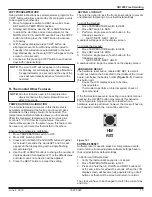
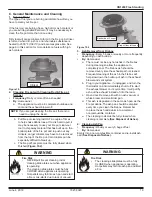
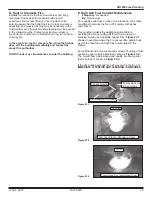
Figure 10.1
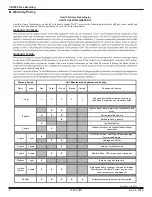
Heat
Output
Fan
Speed
Reset Button Call Light
HIGH
HIGH
MED
LOW
LOW
NOTE:
UNIT CAN USE 1:1 PELLET/CORN MIXTURE.
We recommend the use of a 1:1 pellet/corn
mixture. The only change in operation is that the
feed rate may require a slight adjustment.
Moisture
Always burn dry fuel. Burning fuel with high moisture
content takes heat from the fuel and tends to cool the
appliance, robbing heat from your home. Damp pellet fuel
can clog the feed system.
Size
•
Pellets are either 1/4 inch or 5/16 inch (6-8mm)
in diameter.
•
Length should be no more that 1-1/2 inches (38mm).
• Pellet lengths can vary from lot to lot from the
same manufacturer.
•
Due to length variations, the flame height (feed rate)
may need adjusting occasionally.
Performance
•
Higher ash content requires the ash drawer to be
emptied more frequently.
•
Hardwoods require more air to burn properly.
• Premium wood pellets produce the highest heat output.
•
Burning pellets longer than 1-1/2 inches (38mm)
can cause an inconsistent fuel feed rate and/or
missed ignitions.
E. Before Your First Fire
1.
First, make sure your appliance has been properly
installed and that all safety requirements have been
met. Pay particular attention to the fire protection
and venting.
2.
Double check that the ash drawer and firebox are
empty and the fire pot floor is fully closed.
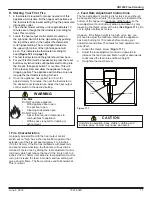
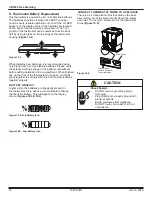
3. Check the position of the thermocouple, located
above the fire pot, and make sure that it protrudes
approximately 3/4 inch (19mm) into the fire pot.
4. Close and latch the door.
F. Filling the Hopper
Open the hopper lid by lifting the handle. Fill the hopper
with fuel. Close the hopper lid. The unit will not feed with
the hopper lid open and the fire will go out.
G. General Operating Information
1. Thermostat Calls For Heat
The appliance is like most modern furnaces; when
the thermostat calls for heat, your appliance will
automatically light and deliver heat. When the room
is up to temperature and the thermostat is satisfied,
the red call light will go off and the appliance will
shut down
(Figure 10.1)
.
2. Heat Output Controls
This appliance is equipped with a heat output control
switch that has three settings or burn rates; low,
medium and high. The appliance will turn on and off
as the thermostat demands. When the thermostat
calls for heat, the appliance will start up on the high
setting for the first 4 minutes and 15 seconds, then
automatically switch to the burn rate for which it is set.
If the appliance is set at one of the lower settings, it
will run quieter but take longer to heat up an area than
if it were set at a higher burn rate. Regardless of the
burn rate, when the area is warm enough to satisfy the
thermostat, the appliance will shut off.
3. Fan Speed Switch
This switch will adjust the speed of the room
distribution air fan or convection blower on all three
settings. This means you have six different blower
speeds available as there is a high and low on
each setting.
Changing to Different Fuel Type
• Empty the hopper of the previous fuel.
•
Thoroughly vacuum hopper before filling with the
new fuel.
The burn rate, BTU content and heat output will all vary
depending on the fuel selected.
Storage
•
Wood pellets should be left in their original sealed bag
until using to prevent moisture absorption.
• Do not store any pellet fuel within the clearance
requirements or in an area that would hinder routine
cleaning and maintenance.
Tested and approved for wood pellets, shelled field corn,
wheat and black oil sunflower seeds. Burning of any other
type of fuel voids your warranty.
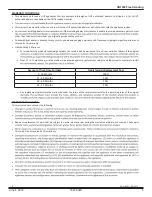
CAUTION
CAUTION
Tip of thermocouple must be in contact with the inside
end of the thermocouple cover.
Missed ignitions can occur.


