background image


26

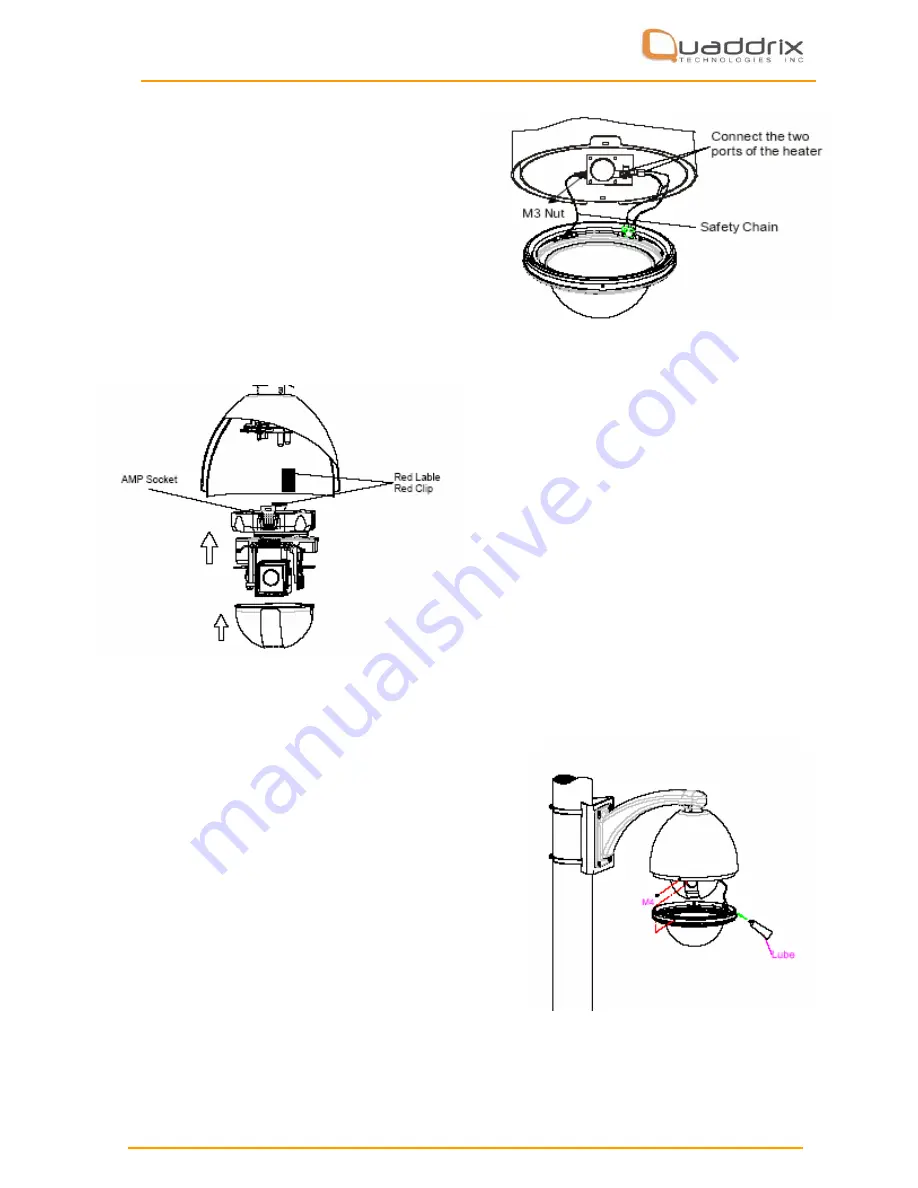
7. Down cover preliminary 
installation.


Attach the safety chain with a M3 nut as 

shown in the picture.  
 
The safety chain prevents the down cover 
from dropping down. 


NOTE

: Connect the heater plug into the 

socket in the case of the outdoor dome. 


8. Install black liner and Pan/Tilt 
Module. 

Install the pan/tilt module with two 
clips, red to red, black to black and 

match the holes in pan/ 
tilt module and the guild poles.  
 
Gently push the module upward until 
you hear two “click” sounds.  

 
Finally, check if it is tightly installed. 
Push the black liner into the two tabs. 

 
NOTE: 

Do not forget to take off the 

lens cover. 


9. Install Down Cover.


Unscrew the two M4 screws on the down cover 
ring. Push up the down cover into the housing 
and then fasten the down cover with two M4 
screws. 


NOTE: 

Apply lubricant to the O-ring to make 

down cover easier to slip in. 


Summary of Contents for QT-220EX

Page 1: ...1 QT 220EX 26X Day Night PTZ Dome USER S MANUAL Document Version 1 1 October 06 2005...

Page 2: ...NSTRUCTION 32 3 2 MENU TREE 34 3 3 MENU OPERATION 35 3 3 1 Selecting item 35 3 3 2 Changing values 35 3 3 3 Editing titles 36 3 4 SYSTEM INFO 37 3 4 1 SITE INFORMATION 37 3 4 2 DISPLAY CONFIGURATION 3...

Page 3: ...II Wire Diameter Transmission 62 Appendix III RS485 Bus Basic Knowledge 63 Appendix IV Lighting Proof Surge Signal Proof 66 Appendix V The Cleaning of the Clear Down Cover 68 Appendix VI Trouble Shoot...

Page 4: ...rence in which case the user will be required to correct the interference at own expense Modifications not expressly approved by the manufacturer could void the user s authority to operate the equipme...

Page 5: ...in an outdoor environment 3 This speed dome runs on 24v AC DO NOT connect higher or lower voltage to it 4 DO NOT turn power on before completing installation 5 DO NOT disassemble any part of the items...

Page 6: ...2 Cables Video Coaxial Cable The video coaxial cable should be 1 75 ohm impedance 2 Solid copper wire 3 95 braided copper shield Check the max transmission distance referring to the chart below RS485...

Page 7: ...jumpers settings Refer to Appendix I to configure the following Protocol and Baud rate Dome address Video cable type Resistor jumper Alarm output method WIRING DIAGRAM FOR ALARM VIDEO RS485 AND POWER...

Page 8: ...Mount 4 Pendant Mount NOTE Installation site should be able to withstand at least 4 times the weight of the dome Bracket mount dome has an Indoor type and an Outdoor type Comparing to the indoor type...

Page 9: ...9 Surface Mount Bracket Mount 1 Wall Mount 2 Corner Mount 3 Pole Mount 4 Pendant Mount...

Page 10: ...t of the speed dome 3 Upper space should be at least 20cm high 1 Draw a circle on ceiling Take the paper circle accessory as a template to draw a circle on the ceiling The paper circle s diameter is 2...

Page 11: ...water proof connector and the top of housing Finally turn the connector into the top hole of the housing 5 Connect cables Insert the cables into the corresponding sockets on the circuit board When fin...

Page 12: ...Push housing into ceiling and let the clips stretch out Finally screw the three clips to tighten the housing NOTE Use even strength to adjust the three clips or it may distort the shape of the housing...

Page 13: ...ou hear two click sounds NOTE DO NOT forget to take off the lens cover 10 Install Down Cover Fix the safety chain on housing The safety chain prevents the down cover dropping down Match the clasps and...

Page 14: ...Installation requirement 1 The ceiling should be hard and solid 2 The ceiling should be able to bear 4x of the weight of the speed dome 1 Detach down housing Turn down housing anticlockwise and pull d...

Page 15: ...base 3 Mark fastener positions Using the surface mount base as a template markthe fastener positions on the ceiling and then drill the holes 4 Install surface mount base Place the Power RS485 Video ca...

Page 16: ...ng 3 tapping screws 6 Connect cables Insert the cables into the corresponding sockets on the circuit board When finished tighten the circuit board back and turn On the power The red LED will light Tur...

Page 17: ...the AMP sockets Gently push the module upward until you hear two click sounds Finally check if it is tightly installed NOTE Be sure the AMP sockets are clean without dust DO NOT forget to take off the...

Page 18: ...the speed dome 1 Mark screw positions Take the bracket base as the template to mark the screw positions on the wall Drill the holes and put extension screws inside 2 Install Bracket Put the Power RS4...

Page 19: ...sten the connection with a M4 screw Apply water proof tape to the housing thread NOTE Apply silica gel to the gap between bracket and wall in the case of outdoor dome 5 Connect Cables Plug the cables...

Page 20: ...wn cover from dropping down NOTE Connect the heater plug into the socket in the case of outdoor dome 8 Install black liner and Pan Tilt Module Install the pan tilt module with two clips red to red bla...

Page 21: ...base as the template to mark the screw positions on the wall Drill the holes and put expansion screws inside 2 Install base Put the Power RS485 Video cables through the hole of the corner base and us...

Page 22: ...e housing thread NOTE Apply silica gel to the gap between bracket and the base in the case of outdoor dome 6 Connect cables Plug cables into corresponding sockets on the circuit board When finished ti...

Page 23: ...th two clips red to red black to black and match the holes in pan tilt module and the guild poles Gently push the module upward until you hear two click sounds Finally check if it is tightly installed...

Page 24: ...Base Put the Power RS485 Video cables through the central hole of the bracket base and then fix it around the pole 2 Install Bracket Put the cables through the cavity of bracket and fasten it on base...

Page 25: ...ply silica gel to the gap between bracket and the base in the case of outdoor dome 5 Connect cables Plug the cables into the corresponding sockets board When finished tighten the circuit and turn the...

Page 26: ...two clips red to red black to black and match the holes in pan tilt module and the guild poles Gently push the module upward until you hear two click sounds Finally check if it is tightly installed Pu...

Page 27: ...dome 1 Mark Screw Positions Take the bracket base as the template to mark the screw positions on the ceiling Drill the holes and put expansion screws inside 2 Install Base Put the Power RS485 Video c...

Page 28: ...an outdoor dome 4 Unfasten the circuit board Unscrew the screw to open the circuit board on connection base 5 Install Housing Put cables through the top hole of the housing and then turn the housing t...

Page 29: ...sure the power is off before doing connections 7 Set Dome ID Baud Rate and Protocol Set the Dome ID Baud Rate and Protocol via DIP switches Refer to APPENDIX I Take the two sponges off 8 Down Cover P...

Page 30: ...le upward until you hear two click sounds Finally check if it is tightly installed Push the black liner into the two tabs NOTE Do not forget to take off the lens cover 10 Install Down Cover Unscrew th...

Page 31: ...31 Chapter 3 SYSTEM CONNECTION PC MONITOR QUADDRIX CONTROLLER QUADDRIX DVR QT 220 EX DOME QT 220 EX DOME...

Page 32: ...and then the dome will conduct a self test The information will disappear after the dome receives the first effective command CAMERA S N The dome s serial number CAMERA ID The dome ID address set by D...

Page 33: ...ove the joystick left and right to choose the password digit If the input password is wrong the password input window will close Note You still can control the dome if you entered a wrong password exc...

Page 34: ...34 3 2 MENU TREE...

Page 35: ...ick left to save the setting and exit In the case of more than one changing value move left and right to select place move up and down to change value and move furthest left to save the setting and ex...

Page 36: ...rd and select BACK to return to INPUT PASSWORD Input the new password and then move the cursor to CONFIRM input the new password again 3 3 3 Editing titles In the TITLE editing area move the joystick...

Page 37: ...a 3 4 1 SITE INFORMATION Main menu SYSTEM INFO SITE INFORMATION SITE INFORMATION menu sets the dome s ID name broadcast address SITE ID The SITE ID shows the current dome s ID Each dome has its unique...

Page 38: ...des SITE NAME ON OFF To set whether or not to display site name AUTO SCAN NAME ON OFF To set whether or not to display auto scan title when the dome is auto scanning PRESET TITLE ON OFF To set whether...

Page 39: ...hether to activate the password protection or not When the password protection is set as ON the user has to input the password in order to access main menu or save presets via keyboard Note The Dome s...

Page 40: ...JOYSTICK AUTO Sets the automatic restore mode When the joystick moves the selected function will start Function options are BOTH Joystick movement triggers both the auto focus and the auto iris defau...

Page 41: ...he target is too dark or vague 8 The JOYSTICK AUTO is set to NONE or JOYSTICK AUTO is set to IRIS and AUTO or the FOCUS is set to OFF E AUTO IRIS Light goes through the iris and reaches the CCD to for...

Page 42: ...25 1 50 The smaller the value the higher the sensitivity Note Higher sensitivity will make the video appear sluggish B EXPOSURE MODE AND EXPOSURE LEVEL Exposure means the amount of light that reaches...

Page 43: ...s on an object in that distance This prevents the dome from focusing on the down cover The options are 1cm 10cm 30cm and 100cm D AWB Auto White Balance MODE White balance is normally compensated by th...

Page 44: ...light compensation can increase the brightness of the objects in the center of the picture However it can occur that the background may be too bright ON Enable auto BLC OFF Disable BLC F DAY NIGHT Thi...

Page 45: ...ling speed is much lower set SPEED MULTIPLE to accelerate the dome s movement Options are as below OFF Disables this function Default setting 001 032 Times greater than original speed C PROPORTIONAL P...

Page 46: ...menu E AUTO ADJUST MODE Overtime the dome may drift from the correct Preset position The Auto Adjust function enables the dome to correct its position This guarantees that the dome will not drift too...

Page 47: ...the point that the user saves for frequent use A Preset saves both the direction and the zoom parameter The dome will quickly and precisely go and zoom to a specific point if a Preset is called For e...

Page 48: ...to complete the title editing SETTING Select this item to set the Preset position and zoom The following menu will display when SETTING is selected Move to the desired position and zoom to a suitable...

Page 49: ...s set as 1 second but the user can set independent dwell times for each Preset in EDIT Menu EDIT To edit the Presets and corresponding dwell times in a Tour The following picture shows the edit menu I...

Page 50: ...moves with flexible curves at various speeds in a pattern mode The QT 220EX can record up to 2 patterns of up to 180 seconds each PATTERN No Indicates the current pattern number Values are 001 002 Pan...

Page 51: ...sites A B are set the dome will loop to and fro those two sites Note The dome makes horizontal movement only Tips Zoom to a desired level then run Auto Scan the camera will keep that zoom The QT 220EX...

Page 52: ...SET ZONE A Zone is an area between two parallel points The user can set a Zone and scan it automatically The SET ZONE function is similar to the AUTO SCAN except that the user can assign a title for...

Page 53: ...t in the same way as the SET LEFT LIMIT Note The Dome moves clockwise from left limit to right limit and back counter clockwise DEFAULT SPEED Sets the scanning speed camera movement speed Values range...

Page 54: ...eyboard The values includes OFF 001 255 OFF Disables this function 001 255 Auto Run is carried out after the number seconds of idle time FUNCTION Refers to the function that system will automatically...

Page 55: ...Dip switches positions are shown below Protocol and baud rate setting SW2 is for protocol and baud rate settings The first 6 1 6 bits of SW2 are for protocol settings and the last 2 7 8 bits are for...

Page 56: ...he Default setting is Factory NOTE Protocols marked with require another Protocol board Dome address setting The control commands contain the Target Dome s ID The dome only reacts to the command sent...

Page 57: ...th the Factory Protocol Broadcast ID When a command is sent to a broadcast ID all domes connected to the control bus will respond to that command Broadcast ID is definable and ranges from 1 to 255 The...

Page 58: ...58...

Page 59: ...59...

Page 60: ...d an extra adapter and the bandwidth is higher However the coaxial cable is more expensive and transmission distance is shorter When choosing the first and second pins in the JP4 and JP5 the video sig...

Page 61: ...sistor on each of the two devices furthest apart keyboard or dome on the RS485 bus The default setting is OFF When connecting the first and second pins in JP1 the 120 ohms termination resistor is conn...

Page 62: ...thest recommended for each given wire diameter when the 24Vac voltage loss ratio is below 10 for equipment powered by AC the allowed maximum voltage loss ratio is 10 For example a set of equipment wit...

Page 63: ...cal transmitting distances are as follows If the user selects thinner cables or installs the dome in an environment with a strong electromagnetic interference or connects lots of equipment to the RS48...

Page 64: ...stor is connected 4 Problems in practical connection In some circumstances the user may want to adopt a star configuration For this the termination resistors must be connected to the two equipments th...

Page 65: ...ntroller 2 The and connection in the RS485 Bus is incorrect 3 The writing is not fully seated 4 There is a breakage in the middle section of the RS485 Bus 1 Change the address and baud rate of the dom...

Page 66: ...In strong thunderstorms or high faradic zones such as a high voltage transformer substation extra strong lightning proof equipment must be installed Take the building lightning proof requirements int...

Page 67: ...67...

Page 68: ...ring only to avoid direct touch to the acrylic down cover The acid sweat mark of a fingerprint will corrode the coating of down cover and scratches on the down cover will cause vague images Use s sof...

Page 69: ...69 Appendix VI Trouble Shooting...

Reviews: