21
Assembly and installation manual
QIM/QDB Mixer Series
QIM/QDB-M01
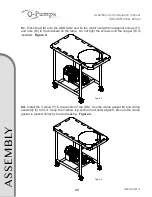
6e. Continue mounting the hopper on the tabs at the sides of the poles of the table. Use
the hexagonal screws (T3) and nuts (T4) to maintain in position the hopper but do not tight
them yet so you can lift the hopper to install the ball valve (V). Figure 5.
Figure 5.
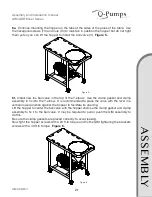
6f. Install now the ball valve in the top of the Y-elbow. Use the clamp gasket and clamp
assembly to fix it to the Y-elbow. It is recommended to place the valve with the lever in a
vertical lower position against the hopper to facilitate its opening.
Lift the hopper to center the ball valve with the hopper and use the clamp gasket and clamp
assembly to fix it to the ball valve. It may be required to pull or push the QIM assembly to
do this.
Be sure the clamp gaskets are placed correctly to avoid leaking.
Now tight the hopper screws with a 20 ft.lb torque and fix the QIM tightening the brackets
screws with a 40 ft.lb torque. Figure 6.
Figure 6
A
SS
EM
B
LY

