background image

EU 205 - EU 205/B              EU 300 - EU 300/B

s.r.l.

pompe per vuoto

14

6.2 Sostituzione olio

Per un corretto cambio d'olio si consiglia di effettuare questa operazio-
ne a pompa ancora calda.


ATTENZIONE

 :

utilizzare guanti protettivi per evitare scottature.

Con riferimento alla figura 6, svitare il tappo di carico (E) e quello di
scarico olio (G) solo dopo aver posizionato sotto il serbatoio un
contenitore adatto (per forma e dimensioni) a raccogliere tutto l'olio
della pompa; quando l'olio esausto contenuto nel serbatoio sarà
fuoriuscito rimontare entrambi i tappi ("E" e "G") e far girare la pompa
sotto vuoto per circa un minuto in modo da svuotare anche il circuito
di lubrificazione/raffreddamento dai residui d'olio esausto, quindi
togliere i tappi e scaricare la rimanenza d'olio.
Se nell'olio sono presenti grosse quantità di sostanze inquinanti o si
riscontra la presenza di acqua, procedere ad un lavaggio della pompa
facendola funzionare a vuoto massimo con circa 3 litri di olio pulito per
almeno 5 minuti. Scaricare  nuovamente l'olio.
Prima di immettere la nuova carica di lubrificante procedere alla
sostituzione del filtro olio (Pos.97) ricordandosi di bagnare con olio
pulito la guarnizione del nuovo filtro, che dovrà essere avvitato a
mano.
Procedere quindi al nuovo riempimento d'olio (Vedi "messa in servi-
zio" e "tabella olii consigliati").

6.2 Oil change

For a correct operation, it is advisable to change the oil with the pump
still warmed-up.


ATTENTION:

Use protective gauntlets to avoid burning.

Please refer to figure 6.
Unscrew the oil filling plug (E) and the discharge plug (G) only after
having placed below the pump tank a suitable container (proper size
and shape) for collecting the total quantity of oil.
Once the oil in tank has completely been discharged, re-assemble
both the plugs (“E” and “G”) and let the pump run under vacuum for
about one minute, so that the lubricating/cooling line get emptied and
any oil residual keeps inside the pump. Then remove the plugs and
discharge the rest of the oil.
If the oil is polluted or if some water is in the oil, clean the pump by
letting it run at maximum vacuum level with about 3 litres of fresh oil
for at least 5 minutes. Change again the lubricating oil.
Before filling the pump with fresh oil, replace the oil filter (pos. 97).
Please remember to wet the filter gasket with fresh oil. Then screw the
new oil filter by hand.

Fill the pump with fresh oil (please see “commissioning” and
“recommended oil table”).

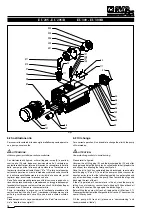
141

91

97

96

53

55

54

56

57

46

43

50

82

117

74

107
108
107
103

311

310

27

29

26

28

302

305

304

303

301

111

143

Fig.7

Summary of Contents for EU 205

Page 1: ...Pompa per vuoto Vacuum pump EU 205 EU 205 B I GB s r l pompe per vuoto Modello Type LI 1586 00 01 04 EU 300 EU 300 B MANUALE PER L USO E MANUTENZIONE OPERATING AND MAINTENANCE INSTRUCTIONS ...

Page 2: ...O PER RIPARAZIONE Pag 16 10 INCONVENIENTI E RIMEDI Pag 16 ALLEGATI Esploso ed elenco ricambi GENERAL INDEX 1 GENERAL INFORMATION Page 2 2 PRODUCT SPECIFICATIONS Page 3 2 1 Pump description Page 3 2 2 Expected use Page 4 2 3 Forbidden use Page 4 2 4 Protections Page 4 2 5 Accessories Page 4 2 6 Overall dimensions and principal parts Page 5 2 7 Technical characteristics Page 6 3 SAFETY RULES Page 7 ...

Page 3: ... abbattuto viene recuperato in modo automatico dalla pompa Uno zavorratore sempre inserito impedisce la condensazione all in terno della pompa quando si aspirano piccole quantità di vapore L attacco filettato in aspirazione è identificato con il simbolo L attacco filettato allo scarico è identificato con il simbolo 1 GENERAL INFORMATION Thismanualcontainstheinformationnecessaryforthecorrectoperati...

Page 4: ...sterno in aspirazione vacuometri vacuostati manometri pressostatipersegnalazioneintasamentoseparatoriolio raccordi di collegamento indicatore intasamento filtro olio segnalatore di livello minimo d olio 2 2 Expected use The vacuum pump described in this manual can suck only air and small quantity of water vapour They are suitable to evacuate closed systems or to operate at a constant vacuum within...

Page 5: ... Filtre huile Antivibration Einlass Luftsauslass Kühlluftseintritt Kühlluftsaustritt Öleinfüllschraube Ölschauglas Ölschauglas Ölablass schraube Maschinenschild Ölempfehlungsschild Drehungsschild Aufhebenösenschraube Gasballastventil Ölfilter Schwingungsdämpfer Aspiración Salida de aire Entrada aire refrigeración Salida aire refrigeración Tapón carga de aceite Mirilla aceite nivel Mirilla aceite n...

Page 6: ...acuum abs Vide final abs Presión final abs Enddruck abs Potenza motore Numero di giri Motor power Rotational speed Puissance moteur Numéro de révolutions Potencia motor Velocidad de giro Motorleistung Drehzahl Caratteristiche motore elettrico Electric motor characteristics Caractéristiques moteur électrique Características motor eléctrico Motoreigenschaften Livello di pressione acustica Sound pres...

Page 7: ... manutenzione possono provocare anomalie di funzionamento con rischio di surriscaldamento e incendio In caso di incendio non usare acqua per spegnere le fiamme Utilizzare estintori a polvere o CO2 od altri mezzi compatibili con la presenza di equipaggiamenti elettrici ed oli lubrificanti 3 SAFETY RULES ATTENTION Despite of the precautions taken during the planning stage there are some risk element...

Page 8: ...in posi zione orizzontale per evitare l ingresso di sporco nella pompa durante la pulizia della cartuccia filtrante Fig 2 4 TRANSPORT HANDLING 4 1 Lifting The orientation of the packed components must correspond to the instructions given by the pictograms on the external covering of the packaging For the unloading use a lifting equipment suitable for the pump weight Use the suitable lifting eyebol...

Page 9: ...e in verticale per EU in orizzontale per EU B Il campo di vuoto predefinito è quello riportato sulla targhetta d iden tificazione della pompa 5 2 Operating vacuum range changing Pumps of EU205 EU300 series are fitted with a manual selector switch for the choice of the suitable working vacuum range EU from 0 5 to 300 mbar EU B from 10 to 850 mbar In case the pump working range needs to be changed p...

Page 10: ...trebbero intasare o coprire rapidamente le superfici di raffredda mento dello scambiatore di calore 5 3 Location The pump must be installed in a protected area see safety rules It must be fastened on the support feet on a horizontal surface It must be accessible for correct and easy maintenance by respecting the minimum distances from possible obstructions see fig 4 It must be accessible to suitab...

Page 11: ...te 2 3 secondi Il senso corretto è quello indicato dal la freccia posta sulla pompa fig 5 Nel caso di rotazione contraria oc corre invertire il campo di rotazione del motore cambiando posizione a due dei tre conduttori di fase alla morsettiera di cablaggio del motore 5 4 Connection to the using machine The connection to the chamber to be pumped down must be carried out by means of pipes of the sam...

Page 12: ...la pompa a vuoto massimo per almeno trenta minuti E consigliato effettuare questa operazione prima di fermi macchina prolungati lo zavorratore consentirà di eliminare le condense dall olio lubrificante 5 7 Commissioning The pump is supplied without lubricating oil WARNING The operation without oil causes big damages to the pump Carry out the first filling up through the plug E up to the half of th...

Page 13: ...eration Intervallo di manutenzione Servicing frequency Personale abilitato Authorized personnel Per i riferimenti vedere disegno esploso As for the references please see the exploded drawing 6 MANUTENZIONE 6 1 Informazioni generali Prima di ogni intervento Isolare sempre la pompa dalla rete elettrica in modo che non possa avviarsi automaticamente Attendere il raffreddamento ad una temperatura non ...

Page 14: ...izione del nuovo filtro che dovrà essere avvitato a mano Procedere quindi al nuovo riempimento d olio Vedi messa in servi zio e tabella olii consigliati 6 2 Oil change For a correct operation it is advisable to change the oil with the pump still warmed up ATTENTION Use protective gauntlets to avoid burning Please refer to figure 6 Unscrew the oil filling plug E and the discharge plug G only after ...

Page 15: ...cosità SAE 15W 30 6 3 Coupling elastic element replacement Remove the motor assembly pos 141 unscrewing the screws pos 91 Check the elastic element pos 82 conditions If necessary replace it Re assemble by screwing the screws ATTENTION please use suitable lifting equipment Expected motor weight up to 60 Kg WARNING The operation with damaged elastic element causes an anomalous pump noise especially ...

Page 16: ...Sostituire gli anelli di tenuta pos 10 Replace oil seal rings pos 10 Verificare e pulire il circuito del recupero olio Check and clean oil recovery pipe Sostituireelementidisoleatori pos 53 vedi6 4 Replace oil separators pos 53 see 6 4 Sostituireelementidisoleatori pos 53 vedi6 4 Replace oil separators pos 53 see 6 4 Ripristinare livello olio Fill with oil to the right level Revisione macchina Pum...

Reviews: