background image


2


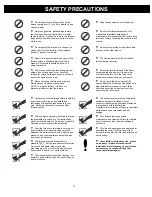
Do not operate your furnace if you smell 

smoke coming from it.  Turn it off, monitor it, and 
call your dealer. 


Keep foreign objects out of the hopper. 


Never use gasoline, gasoline-type lantern 

fuel, kerosene, charcoal lighter fluid, or similar 
liquids to start or “freshen up” a fire in this furnace. 
Keep all such liquids well away from the furnace 
while in use. 


Do not throw this manual away. This 

manual has important operating and 
maintenance instructions that you will need at a 
later time. Always follow the instructions in this 
manual. 


Do not unplug the furnace if you suspect a 

malfunction. Turn the furnace off, periodically 
inspect it, and call your dealer. 


Do not place clothing or other flammable 

items on or near the furnace. 


Never try to repair or replace any part of the 

furnace unless instructions are given in this 
manual. All other work should be done by a 
trained technician. 


The viewing panel must be closed and 

latched during operation. 


The furnace will not operate during a power 

outage. If an outage does occur, check the 
furnace for smoke spillage and open a window if 
any smoke spills into the room. 


Do not operate the furnace if the flame 

becomes dark and sooty or if the burn pot 
overfills with pellets. Turn the furnace off, 
periodically inspect it, and call your dealer. 


Disconnect power before performing any 

maintenance or repairs on the furnace. 
NOTE: Turning the furnace “off” does not 
disconnect all power from the furnace. 


Do not touch the hot surfaces of the 

heater. Educate all children of the danger of a 
high temperature furnace. Young children 
should be supervised when they are in the 
same room as the furnace. 


Contact your local building officials to obtain a 

permit and information on any installation 
restrictions or inspection requirements in your 
area. Notify your insurance company of this 
furnace as well. 


The exhaust system must be completely 

airtight and properly installed. All vent 
connector joints must be sealed and fastened 
in accordance with the pellet pipe 
manufacturer's instructions to ensure consistent 
performance and avoid smoke and ash 
spillage. 


This unit must be properly installed to prevent 

the possibility of a house fire. The instructions 
must be strictly adhered to. Do not use makeshift 
methods or compromise in the installation. 


Your furnace requires periodic 

maintenance and cleaning. Failure to maintain 
your furnace may lead to smoke spillage in 
your home. 


Allow the furnace to cool before carrying out 

any maintenance or cleaning. Ashes must be 
disposed in a metal container with a tight lid and 
placed on a non combustible surface well away 
from the home structure. 


This furnace is designed and approved for 

pelletized fuel only. Any other type of fuel 
burned in this heater will void the warranty and 
safety listing. 


This furnace must be connected to a 

standard 120 V., 60 Hz grounded electrical outlet. 
Do not use an adapter plug or sever the 
grounding plug. Do not route the electrical cord 
underneath, in front of, or over the furnace. 


Stove Builder International Inc. grants 

no warranty, implied or stated, for the 
installation or maintenance of your furnace, 
and assumes no responsibility of any 
consequential damage(s). 


The exhaust system should be checked, at a 

minimum, at least twice a year for any build up of 
soot or creosote. 


SAFETY PRECAUTIONS 

Summary of Contents for CADDY ALTERNA

Page 1: ...perating your furnace CONGRATULATIONS You have purchased one of the finest pellet or combination furnaces available on the market We are confident that your furnace will provide years of comfort and s...

Page 2: ...oung children should be supervised when they are in the same room as the furnace Contact your local building officials to obtain a permit and information on any installation restrictions or inspection...

Page 3: ...USTIBLE MATERIALS FOR THE CHIMNEY 13 2 3 3 CLEARANCES TO COMBUSTIBLE MATERIALS FOR THE PLENUM 13 2 4 PARALLEL INSTALLATION 15 2 5 VENTING 16 INSTALLATION CONFIGURATIONS 17 HORIZONTAL AND VERTICAL VENT...

Page 4: ...6 4 REFUELING 41 3 6 5 SHUT DOWN PROCEDURE 41 3 6 6 CHIMNEY FIRES 41 4 MAINTENANCE 42 4 1 MAINTENANCE OF THE EXCHANGERS AND BLOWER HOUSING 42 4 2 VENTING SYSTEM MAINTENANCE 43 4 3 ASH REMOVAL AND VACC...

Page 5: ...NACE HAS NOT BEEN SOLD OR INSTALLED BY A PROFESSIONAL REGISTER YOU WARRANTY ONLINE To receive full warranty coverage you will need to show evidence of the date you purchased your furnace Keep your sal...

Page 6: ...T USE CHEMICALS OR FLUIDS TO START THE FIRE WARNING Risk of fire Do not operate with fuel loading or ash removal doors open HOT WHILE IN OPERATION KEEP CHILDREN CLOTHING AND FURNITURE AWAY CONTACT MAY...

Page 7: ...reload the appliance and remove ashes 1 5 SOOT AND FLY ASH FORMATION AND NEED FOR REMOVAL The products of combustion will contain small particles of fly ash The fly ash will collect in the exhaust ven...

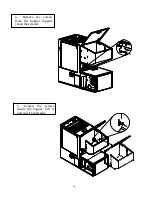
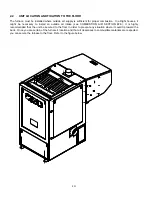
Page 8: ...to perform this important step may cause ashes to be dispersed through the ductwork 2 APPLIANCE INSTALLATION 2 1 REMOVING THE HOPPER AND BLOWER ASSEMBLY IF REQUIRED Should you need to install the fur...

Page 9: ...9 2 Remove the screws from the hopper support keep the screws 3 Loosen the screws inside the hopper Lift it and pull it backwards...

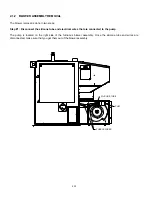
Page 10: ...onnect the silicone tube and electrical wires that are connected to the pump The pump is located on the right side of the furnace s blower assembly Once the silicone tube and wires are disconnected ma...

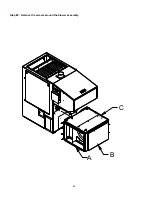
Page 11: ...11 A B C Step 2 Remove the screws around the blower assembly...

Page 12: ...ary to install an outside air intake see COMBUSTION AIR SECTION 2 6 It is highly recommended that the unit be secured to the floor in order to prevent any situation where it could tip toward the back...

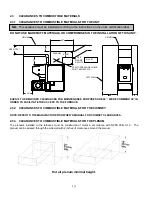
Page 13: ...FACILITATE THE ACCESS TO THE FURNACE 2 3 2 CLEARANCES TO COMBUSTIBLE MATERIALS FOR THE CHIMNEY NOTE REFER TO THE MANUFACTURER S OWNER S MANUAL FOR CHIMNEY CLEARANCES 2 3 3 CLEARANCES TO COMBUSTIBLE MA...

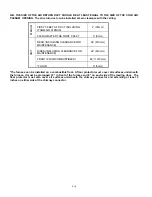
Page 14: ...NG CLEARANCE FOR MAINTENANCE 24 610mm SIDES INCLUDING CLEARANCE FOR MAINTENANCE 24 610mm FRONT FROM COMBUSTIBLES 48 1219mm FLOOR 0 0mm The furnace can be installed on a combustible floor A floor prote...

Page 15: ...y to respect minimum clearances between the ductwork and combustible material as if the wood furnace was installed as a standalone unit The ductwork and furnace should be adjusted in order to reach a...

Page 16: ...lways use a chimney type vent or a chimney Refer to the instructions provided by the vent or chimney manufacturer especially when passing through a wall ceiling or roof and the installation shall conf...

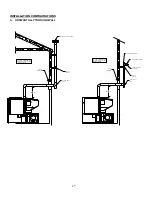
Page 17: ...45 DEGREE ELBOW CLEAN OUT TEE WALL STRAP TERMINATION COLLAR 90 DEGREE ELBOW FOLLOW CHIMNEY OR VENT MANUFACTURER S INSTRUCTIONS WALL THIMBLE MIN 2 FOLLOW CHIMNEY OR VENT MANUFACTURER S INSTRUCTIONS MIN...

Page 18: ...ent manufacturer s instructions 5 Attach enough piping to penetrate and extend at least 6 beyond exterior walls To reduce the risk of smoke spillage and in order to favor a better draft a minimum vert...

Page 19: ...urnace at the right location a 45 elbow can be used to offset the pipe from the exhaust outlet toward the appropriate location underneath the ceiling 1 Always maintain 3 clearance from combustible mat...

Page 20: ...ent can be run inside existing chimney to termination NOTE Follow the vent manufacturer s instructions 1 Have the chimney inspected by a qualified chimney sweep or installer to determine its structura...

Page 21: ...imum elevation of 3 feet on the outside wall Instead if this installation consisted of a 4 feet vertical rise a 90 degree elbow followed by a 7 feet horizontal run through the wall a clean our Tee and...

Page 22: ...oblem mentioned above The house is equipped with a tight vapour barrier and adjusted windows and or is equipped with an interior air mechanical evacuation device There is excessive condensation on the...

Page 23: ...the pipe should be insulated and its total length should be at least 10 feet Insulated pipe full length Exterior Fresh air intake Free air entry P trap 2 7 COLD AIR DUCTING SUPPORT INSTALLATION Your...

Page 24: ...rocessing unit Pellet CPU using the black wire with white stripes and the white wire with black stripes you will need to put the access panel back in place later Both black wires with white stripes mu...

Page 25: ...THE FURNACE CONNECTING TO THE LIMITING BOARD WHITE WIRE CONNECT THE TOUCHSCREEN LCD BLACK WIRES WITH WHITE STRIPES WHITE WIRES WITH BLACK STRIPES AC COMMON GROUND AC LINE Option 2 Screws already insta...

Page 26: ...secured to the support Then connect the main control board to the LCD user interface In order to do so use the white cable already connected to the main control board and pushes this cable through the...

Page 27: ...RTD support using the two screws you previously removed Using a drill and a 9 32 bit drill a hole in the plenum so that the RTD rod can pass into it Then secure the RTD in place on the plenum using th...

Page 28: ...ENT The PELLET ELECTRIC combination model uses two thermostats one thermostat controls the electric heating and the other one controls the pellet heating When the call for heat cannot be satisfied by...

Page 29: ...installations The pellet central processing unit Pellet CPU also has a manual mode MANU consult the MODES section of this manual Under the manual mode the Caddy Alterna operates as a conventional fur...

Page 30: ...nded Installation with an AC unit Note It is important to apply the sticker to the furnace and have the installer fill all fields The last step consists of installing the coil handle supplied with the...

Page 31: ...for the following Programming the different modes HEAT MANU CIRC and COOL Choosing the selections TEMP UNIT for HEAT mode and TEMP UNIT and FAN for MANU CIRC or COOL mode Connecting the RTD temperatu...

Page 32: ...ain the BEP In the case of the electrical option the blower starts as soon as that there is a request for heat from the option s thermostat In other words for security reasons the distribution blower...

Page 33: ...ion Certain check ups must be performed and certain rules must be respected in order not to damage the blower When all components are installed on the furnace and the ducting system is connected to th...

Page 34: ...order to synchronize the start of the furnace blower with the start of the air conditioning condenser A switch installed on the pellet central processing unit Pellet CPU will modify the reading of the...

Page 35: ...that your wall thermostat is well connected to the pellet central processing unit Pellet CPU Make sure that the right port has been selected based on the type of thermostat In the MODE menu select MA...

Page 36: ...heating demand will be sent by the thermostat and that the hot air plenum will have reached its kick in temperature KIP Under the CIRC mode it is the speed at which the distribution blower will run to...

Page 37: ...st flame the respective BTUs are 17 000 60 000 80 000 100 000 or 120 000 Pressing on the desired BTU setting flame will change the color of the flame to green to show its activation Indicates whether...

Page 38: ...furnace operates thermostatic or manual Selects the BTU input at which the furnace operates 60000 80000 100000 or 120000 This is a non interactive page It will help the user troubleshoot the unit if n...

Page 39: ...beginning of this section 3 5 3 FILLING UP THE AUGER When the furnace runs out of pellets it empties the auger housing In order to start the furnace again you need to fill the auger in order to bring...

Page 40: ...of 1 3 hay and 2 3 wood Make sure that any wood and hay pellets you put in your Caddy Alterna respect that mix 10 Bark pellets 100 bark pellets produce a hard crust that will be pushed into the ahs dr...

Page 41: ...status page to start the furnace 3 6 4 REFUELING We recommend that you not let the hopper go completely empty Upon reloading if the hopper lid stays for open more than 3 minutes a warning code HOPPER...

Page 42: ...nger pipes The accumulated dirt in the lateral exchangers must also be cleaned up To do so start by removing the side panel on the left side of the furnace You will have access to 3 clean out traps Us...

Page 43: ...chimney fire CAUTION CLEANOUT OF THE HEAT EXCHANGER FLUE PIPE CHIMNEY AND DRAFT INDUCER IF USED IS ESPECIALLY IMPORTANT AT THE END OF THE HEATING SEASON TO MINIMIZE CORROSION DURING THE SUMMER MONTHS...

Page 44: ...r supplied with unit in the hopper or release the clip in front of the burn pot Then remove the burn pot by pulling on it 4 5 CLEANING THE EXHAUST BLOWER HOUSING The exhaust blower should be removed f...

Page 45: ...inspection and cleaned twice a year To do so remove all wing nuts below the air intake system Vacuum thoroughly 4 7 MAINTENANCE OF THE DISTRIBUTION BLOWER The two motor bearings must be lubricated on...

Page 46: ...ecommended Filters dimensions Caddy Alterna 16 x 20 filter 4 10 DOOR GASKET MAINTENANCE It is important to maintain the door gasket in good condition After a while the gasket might sag a door adjustme...

Page 47: ...Exchanger Tubes Scrape and Vacuum Exhaust Channels through access traps Vacuum Ash Drawer Empty Vacuum Combustion Chamber Vacuum Vacuum Brush Exhaust Blower Vacuum Combustion Blower Vacuum Pressure Sw...

Page 48: ...e retainers and replace the defective glass the glass gasket should be replace at the same time To put back in place reverse the procedure Do not use abrasive cleanser Special cleansers for wood firep...

Page 49: ...49 6 GENERAL WIRING DIAGRAM...

Page 50: ...50...

Page 51: ...51...

Page 52: ...52 7 WIRING DIAGRAM WITH OPTIONAL ELECTRICAL ELEMENT CADDY ALTERNA PELLET ELECTRIC COMBINATION FURNACE...

Page 53: ...C CADDY ALTERNA G 10 1 2HP 4 1650 110 120 000 0 2 0 5 16 x 20 X 1 8 2 TECHNICAL DATA ELECTRICAL ELEMENT MODEL OUTPUT CFM TEMP VAR O F BTU HR AMPS TOTAL BREAKER REQUIRED FEEDER GAUGE VOLTAGE SINGLE PH...

Page 54: ...s and labour costs covered by this warranty are limited according to the table below The manufacturer at its discretion may decide to repair or replace any part or unit after inspection and investigat...

Reviews: