19
Important:
termination’s location: a) not less than 3 feet above any forced air inlet located within 10 feet; b) not less
than 4 feet below or horizontally from, or one foot above, any door, window or gravity air inlet into any building; c) not
less than two feet from an adjacent building and not less than 7 feet above grade when located adjacent to a public
walkway. Other restrictions may apply, such as the need to maintain a minimum distance to a gas meter. US and
Canadian Standards may vary.
Consult the vent manufacturer’s instructions
.
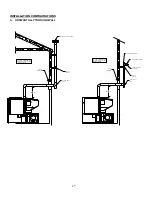
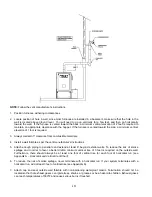
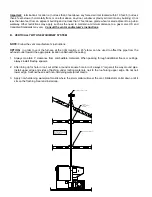
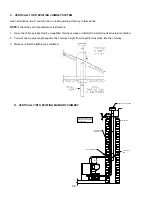
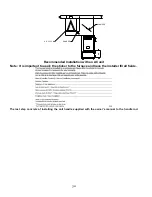
B. VERTICALLY WITH NEW CHIMNEY SYSTEM
NOTE:
Follow the vent manufacturer’s instructions.
OPTION:
In order to vent the furnace at the right location, a 45º elbow can be used to offset the pipe from the
exhaust outlet toward the appropriate location underneath the ceiling.
1. Always maintain 3” clearance from combustible materials. When passing through additional floors or ceilings,
always install firestop spacers.
2. After lining up for hole in roof, cut either a round or square hole in roof, always 3” larger all the way around pipe.
Install upper edge and sides of flashing under roofing materials, nail to the roof along upper edge. Do not nail
lower edge. Seal nail heads with non-hardening waterproof mastic.
3. Apply non-hardening, waterproof mastic where the storm collar will meet the vent. Slide storm collar down until it
sits on the flashing. Seal and install cap.
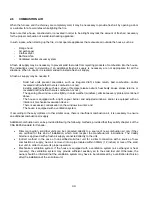
FOLLOW CHIMNEY OR
VENT MANUFACTURER'S
INSTRUCTIONS
VERTICAL ROOF VENT
ATTIC
INSULATION
SHIELD
RADIATION SHIELD
Summary of Contents for CADDY ALTERNA
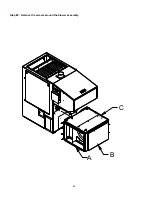
Page 11: ...11 A B C Step 2 Remove the screws around the blower assembly...
Page 49: ...49 6 GENERAL WIRING DIAGRAM...
Page 50: ...50...
Page 51: ...51...


