Lynx.GX Installation and Management
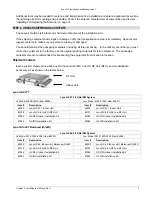
GX Installation Kits
Item Contents
Qty.
GX RFU Installation Kit
GX RFU Rack Mount Kit (see “Sub-Contents” below)(19” or 23”)
RFU Grounding Cable
1
1
GX IDU Installation Kit
GX IDU Rack Mount Kit (see “Sub-Contents” below)(19” or 23”)
IDU Grounding Cable
IDU-to-RFU Interface Cable 12”
IDU DC Power Cord with CD 3-Pin Terminal Block
Custom Cable Kit RJ-45 (see “Sub-Contents” below)
Custom Cable Kit DB9 (see “Sub-Contents” below)
Rubber Table Mount Feet
1
1
1
1
1
1
4
Documentation and
Software CD-ROM
Release Notes, Installation and Maintenance Manual, Quick Install Guide, MIBs
1
GX Quick Install Guide
printed
1
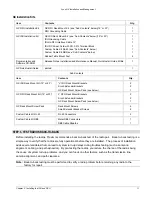
Sub-Contents
Item Contents
Qty.
GX IDU Rack Mount Kit (19” or 23”)
“L” IDU Rack Mount Brackets
2-inch Extender Brackets
GX Rack Mount Screw Pack (see below)
2
2
1
GX RFU Rack Mount Kit (19” or 23”)
L” RFU Rack Mount Brackets
2-inch Extender Brackets
GX Rack Mount Screw Pack (see below)
2
2
1
GX Rack Mount Screw Pack
Rack Mount Screws
Small Extender Bracket Screws
4
8
Custom Cable Kit RJ-45
RJ-45 Connectors
2
Custom Cable Kit DB9
Metal DB9 Connectors
DB9 Cable Sheaths
1
1
STEP 3. TEST RADIOS BACK-TO-BACK
Before installing the radios, Proxim recommends a back-to-back test of the radio pair. Back-to-back testing is a
simple way to verify that the radios are fully operational before they are installed. The process of installation
adds several variables that can lead to system turn-up delays during troubleshooting (such as antenna
alignment, cabling, and path dynamics). By pre-testing the radios, you reduce the chance of the radios being
the cause of system turn-up problems, and you can focus on other factors, such as the transmission line,
antenna alignment, and path clearance.
Note:
Back-to-back testing must be performed to verify a radio problem before returning any radio to the
factory for repair.
Chapter 2. Installing the IDU and RFU
11


