


Lynx.GX Installation and Management
4. Position the radio in the rack and align the holes in the mounting bracket with the holes in the rack. Two
screws for each bracket should be used into the rack (these screws are not included).
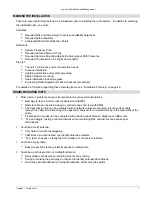
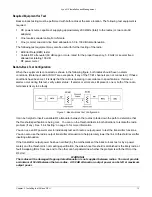
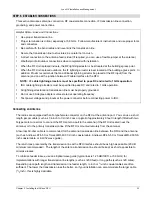
If you are installing the IDU in a 23-inch rack, you must use the 2-inch extender brackets and attach them to
the rack mounting brackets (with the screws provided in the GX Rack Mount Screw Pack), as shown in the
following figure:
5. Insert two screws and lock washers, appropriate for your rack, into each of the mounting brackets and
tighten.
IMPORTANT!
When the RFU is rack mounted, it must be mounted directly above the IDU and facing with the
connectors forward in the same direction as the connector panel of the IDU (as shown).
The IDU fan exhaust is used to cool the RFU in a rack mount configuration. Also, if one unit is
projection mounted, both units should be projection mounted. In either configuration, an empty rack
mount space is required above and below the configuration.
Bracket
Extenders
Rack
Mounting
Brackets
19-inch rack
Chapter 2. Installing the IDU and RFU
16


