


Contents
RLXIB-IHW
♦
802.11a, b, g
Setup Guide
RadioLinx® 802.11abg Industrial Hotspot with POE and Serial Server
ProSoft Technology, Inc.
Page 5 of 19
September 16, 2009
Contents
United States FCC & Industry Canada rules ...................................................................................... 2
Antenna spacing requirements for user safety ................................................................................... 2
RLXIB: CSA C22.2 213-M1987 and N. American Standard ANSI/ISA 12.12.01 listing ..................... 2
RLXIB: ATEX Approval ....................................................................................................................... 3
European CE certification ................................................................................................................... 3
EU Requirements................................................................................................................................ 4
RLXIB: Power over Ethernet Injector and Accessories "Warning" ..................................................... 4
Your Feedback Please........................................................................................................................ 4
ProSoft Technology
®
Product Documentation.................................................................................... 4
1
Before You Begin
7
1.1
Install the IH Browser Configuration Tool.................................................................. 8
1.2
Start IH Browser ........................................................................................................ 8
1.3
Plug In the Cables ..................................................................................................... 9
1.4
Detecting the Radio................................................................................................. 10
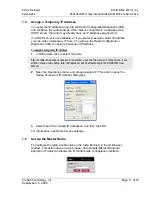
1.5
Assign a Temporary IP Address ............................................................................. 11
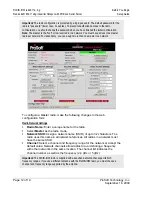
1.6
Set Up the Master Radio .........................................................................................11
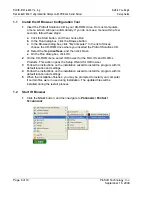
1.7
Save the Radio Configuration ................................................................................. 14
1.8
Adding and Configuring Additional Radios.............................................................. 14
2
Verify Communication
15
3
If You Encounter Problems
17
3.1
Check the Ethernet cable ........................................................................................ 17
3.2
LED display ............................................................................................................. 17
3.3
Retrieve the default password.................................................................................18
3.4
Starting Over ...........................................................................................................18
4
What’s Next?
19