ProSoft RadioLinx RLXIB-IHW Setup Manual Download Page 18

RLXIB-IHW 

 802.11a, b, g 

If You Encounter Problems 

RadioLinx® 802.11abg Industrial Hotspot with POE and Serial Server  

Setup Guide 


Page 18 of 19  

ProSoft Technology, Inc. 

September 16, 2009 


After you first plug in the power cable and Ethernet cable to the radio, the 
Power/Status LED should be green, meaning that the radio has power. If the 
Ethernet LED is green, then the Ethernet connection is working. The RF Transmit 
and RF Receive LEDs should blink. 

All three LEDs will blink just after the radio links to the Master’s signal but before 
it has been fully authenticated. Normally you will see this last only a few seconds. 
If it lasts longer or never turns solid it usually means the encryption keys are not 
correct. 

3.3 

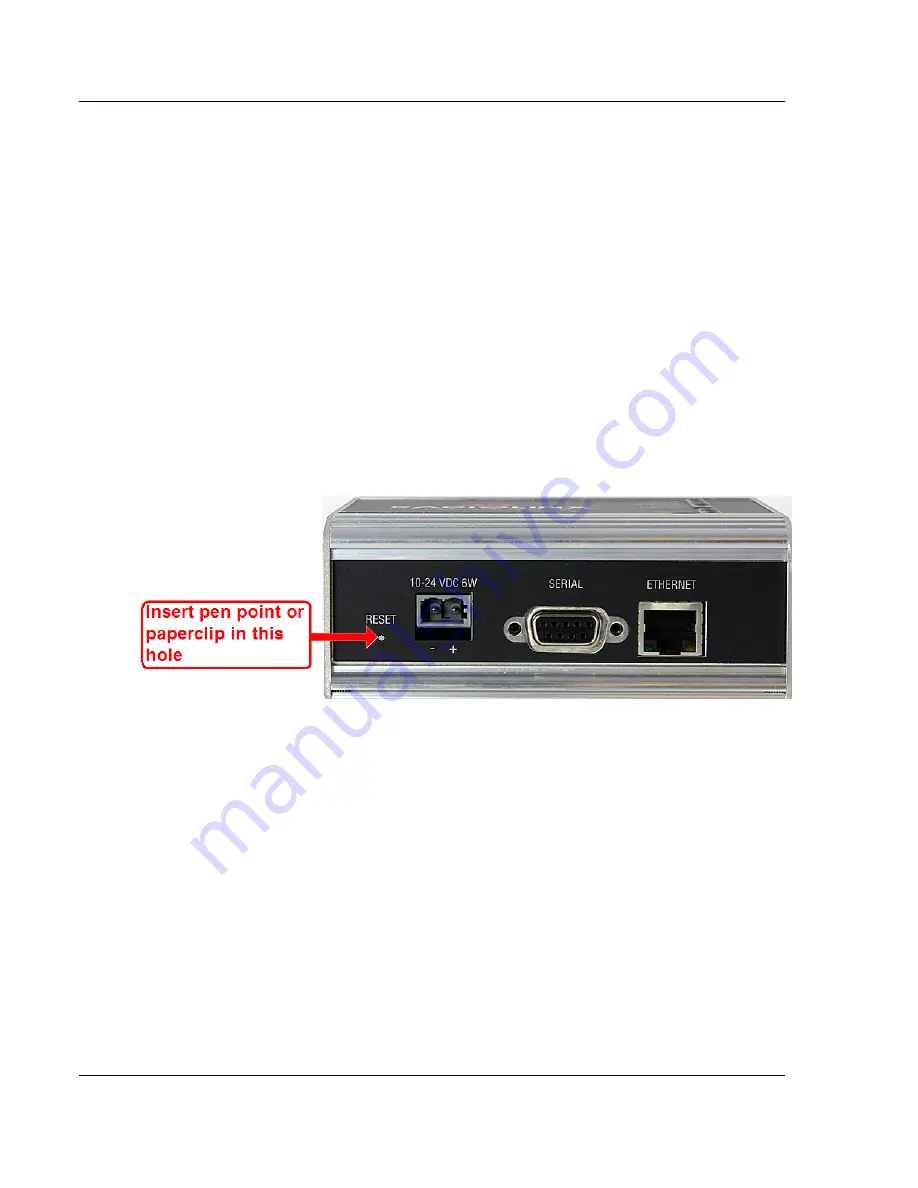
Retrieve the default password 

If you forget your password, you will be unable to change the radio settings. You 
can retrieve the default password to use the software again, but you will lose all 
the settings you programmed before. To retrieve the default password and return 
the radio to its default settings, follow these steps: 

Turn off power to the radio.  

Locate the reset button hole, located to the left of the power connector. 


Insert the end of a paperclip or similar device into the hole to press the reset 
button.  

Turn on power to the radio, and hold down the reset button for 30 seconds.  

The radio will be reset to its default settings, including the password. You 
should now be able to log in using the default password, which is "password". 
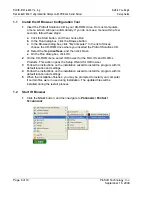
3.4 Starting 

Over 

If necessary, you can always restore the default settings that your radio was 
shipped with by opening the Radio Configuration/Diagnostic Utility, logging into 
the radio, and clicking on the Factory Defaults button. 

This will remove all 

changes you have made to the radio configuration, including addressing, 
naming, and security settings.


Summary of Contents for RadioLinx RLXIB-IHW

Page 1: ...RLXIB IHW 802 11a b g RadioLinx 802 11abg Industrial Hotspot with POE and Serial Server September 16 2009 SETUP GUIDE...

Page 2: ...a minimum distance of 1 mW cm2 power density from the user or 20 cm whichever is greater If a specific application requires proximity of less than 20 cm the application must be approved through the FC...

Page 3: ...aving jurisdiction A Warning Explosion Hazard Do not make or break connections in an explosive atmosphere B Caution Use only approved recommended power supply C Warning Power supply should be installe...

Page 4: ...jector must be Listed If the PoE injector is used instead of the supplied power adaptor all of the wiring to and from the injector must be routed installed inside building plant and never routed insta...

Page 5: ...RLXIB Power over Ethernet Injector and Accessories Warning 4 Your Feedback Please 4 ProSoft Technology Product Documentation 4 1 Before You Begin 7 1 1 Install the IH Browser Configuration Tool 8 1 2...

Page 6: ...RLXIB IHW 802 11a b g Contents RadioLinx 802 11abg Industrial Hotspot with POE and Serial Server Setup Guide Page 6 of 19 ProSoft Technology Inc September 16 2009...

Page 7: ...Radio RLXIB IHW RadioLinx 802 11abg Industrial Hotspot with POE and Serial Server 1 Cable Cable 15 RS232 6 foot RS232 null serial cable 1 Cable RL CBL025 5 foot Ethernet Straight Thru Cable 1 Antenna...

Page 8: ...rive where you inserted the ProSoft Solutions CD d Select the file prosoft exe and then click Open e On the Run dialog box click OK 2 On the CD ROM menu select IH Browser for the RLX IHx and RLXIB x P...

Page 9: ...number of the radio this number is also printed on the side of the radio If a radio listing does not appear in the window select Scan from the File menu If you still do not see a radio listing see Tro...

Page 10: ...hernet LED should also be green meaning that the Ethernet connection is working The RF Transmit and RF Receive LEDs should blink For information on making connections see Radio Power Requirements and...

Page 11: ...on Diagnostic Utility to assign a permanent IP address To assign a temporary IP Address 1 In IH Browser click to select the radio Tip If a radio listing does not appear in the window open the File men...

Page 12: ...aster radio make the following changes to the web configuration form Radio Network Settings Radio Name Enter a unique name for the radio Select Master as the radio mode Network SSID Assign a network n...

Page 13: ...ters The default pass phrase is passphrase lower case no quotes For more information on encryption see Security settings Because you must assign the same Network SSID and WPA phrase to the repeater ra...

Page 14: ...nd restart the radio Note To discard your changes and start over click Cancel Changes 1 8 Adding and Configuring Additional Radios At this point you should attach and configure any additional IHW radi...

Page 15: ...c Page 15 of 19 September 16 2009 2 Verify Communication When configured the name of each radio is preceded by an M for Master an R for Repeater or a C for Client in the IH Browser window Look at the...

Page 16: ...RLXIB IHW 802 11a b g Verify Communication RadioLinx 802 11abg Industrial Hotspot with POE and Serial Server Setup Guide Page 16 of 19 ProSoft Technology Inc September 16 2009...

Page 17: ...et of LEDs that indicate the radio s status LED Description Power This green LED indicates that the radio has power RF Transmit This yellow LED indicates RF transmission RF Receive This green LED indi...

Page 18: ...adio settings You can retrieve the default password to use the software again but you will lose all the settings you programmed before To retrieve the default password and return the radio to its defa...

Page 19: ...f 19 September 16 2009 4 What s Next Congratulations Your wireless network is up and running You now need to connect your wireless Hotspots to your network devices ProSoft Technology provides applicat...

Reviews: