


Pr
o
Minent
®
Page 32
Repairs
1
2
3
4
5
6
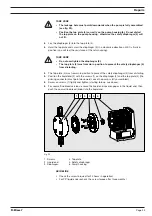
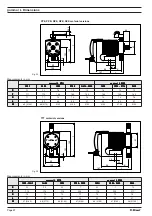
Fig. 29
1 Screws
4 Top plate
2 Liquid end
5 Safety diaphragm
3 Diaphragm
6 Pump housing
GUIDELINE
•
Check the screw torques after 24 hours in operation
•
For PP liquid ends check the screw torques again after three months.
Screw torques:
Liquid end Ø 70 mm:
2,5 to 3 Nm
Liquid end Ø 90 mm and Ø 100 mm: 4,5 to 5 Nm
Liquid ends - types 0220, 0232 and 0420
S
Remove the liquid end (2) with screws from the top plate (4) and pump housing (6) about
5 mm - the screws should still be located in the holes but not in the top plate (4).
S
Hold the housing (6) in one hand and with the other hand, clamp the diaphragm (3) between
the liquid end (2) and the top plate (4); release the diaphragm (3) from the drive spindle with
a light anti-clockwise turn of the liquid end (2) and top plate (4).
S
Remove the liquid end (2) with screws (1) from of the diaphragm and unscrew completely
from the drive spindle.
S
Remove the top plate (4) from the housing (6).
S
Screw the new diaphragm (3) onto the drive spindle gently as far as it will go - otherwise the
gamma/ L will not meter correctly!
S
Unscrew the diaphragm (3) again.
S
Replace the top (4) plate onto the housing (6).
S
Check the condition of the safety diaphragm (5) and replace if necessary.
S
Push the safety diaphragm (5) only as far onto the drive axis until it lies flat on the pump
housing (6) – no further!
S
Screw the new diaphragm (3) carefully up to the stop on the drive axis – this must be exact
to ensure correct metering!
S
If not, start the pump and set the stroke length to 100 %.
S
When the pump is running, turn the diaphragm (3) slowly in a clockwise direction until the
four holes in the diaphragm are flush with those on the pump housing (6).
S
Hold the diaphragm (3) in this position, set the stroke length to 0 % and stop the pump.
S
Screw the diaphragm (3) tight once more.
S
Position the top plate (4) on the pump housing (6).