


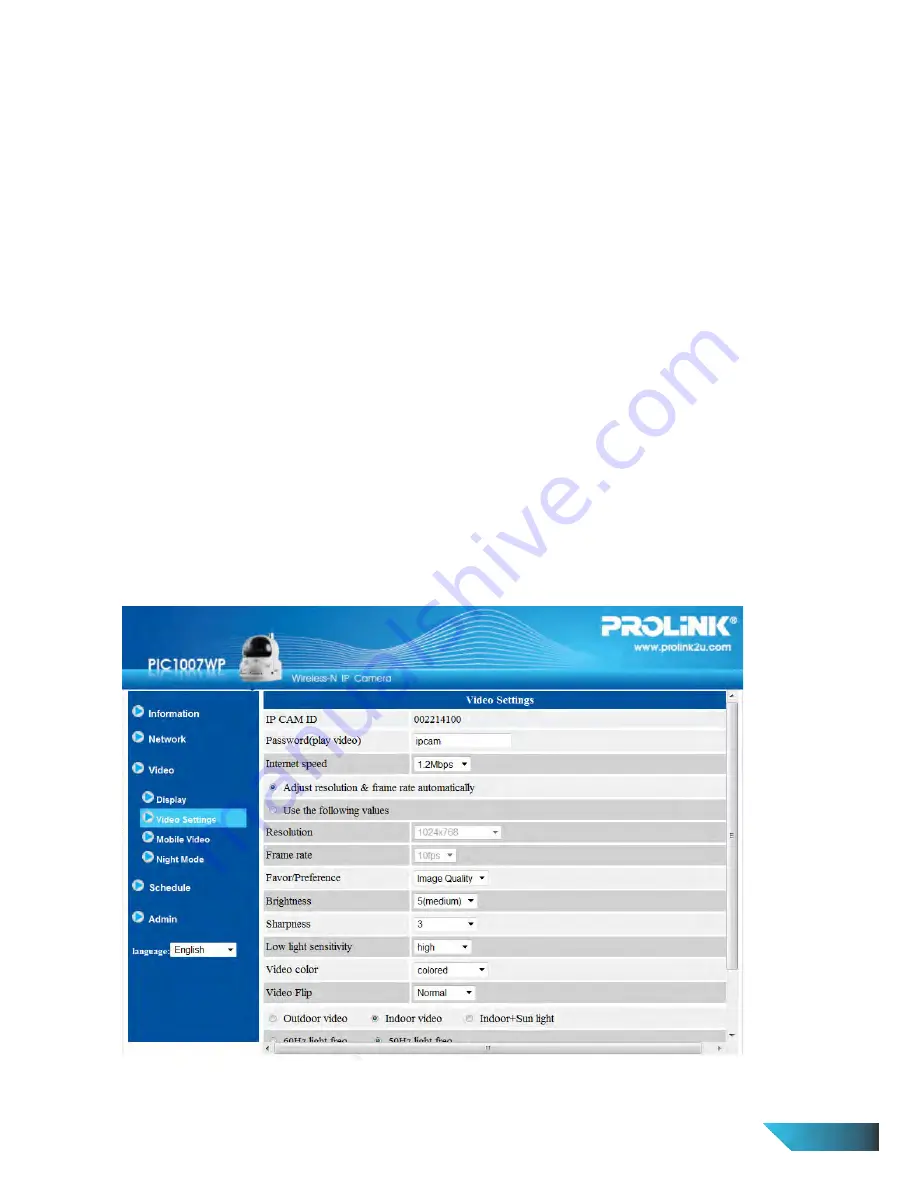
5. Frame rate – the video frame display rate. Higher value means faster movement and continuity in the video
display.
6. Favor/Preference – Video Motion/Image Quality/Better Quality/Best Quality. When the real bandwidth is
not enough for the selected “Internet speed”, the system will need to degrade the video motion or image
quality. This selection will decide if the user want to maintain the “video motion” or “image quality” when
the internet speed is not good enough.
7. Brightness – the brightness of the video, lower value means darker display.
8. Sharpness – the sharpness of the video, higher value means sharper video.
9. Low light sensitivity – The low light sensitivity could be normal, high or very high. When the low light
sensitivity is high, the system could see better video clearance under low light situation, but the moving
object will not be very clear under this low light environment. Under very dark environment, set to “very
high” will get better video clearance. The default value of this setting is “high”.
10. Video color – choose between “colored” and “black & white”.
11. Video flip – can do “normal” or “flip” video display, this is needed if the IP Camera is hung on the ceiling
or wall.
12. Outdoor/Indoor video/Sunlight – for better video display quality, modify this setting. The default
setting is “Outdoor video”, in most cases; this is also ok for indoor usage. Under some special cases, there
could be some strip lines on the video display when the IP Camera is indoor. In this situation, change the
setting to “Indoor video” will solve the problem. Please take note that in “Indoor video” setting, the video
display of outdoor view is very vague. For indoor usage, if there is strong sun light into the room, please
select the “Sunlight” choice.
13. Enable/disable audio microphone – you can enable or disable the audio microphone on the IP Camera.
If disable, there will be no audio on the LiveView video viewing and recording.
14. Enable/disable time display on video – if enabled, the date/time of the system will be displayed on the
left-upper corner of the video.
When all modification is done, press “Save & Apply”. All connected users will be disconnected to allow the
changes to take effect.
Figure 3-11: Video settings page
EN 17
Summary of Contents for PIC1007WP
Page 2: ......


