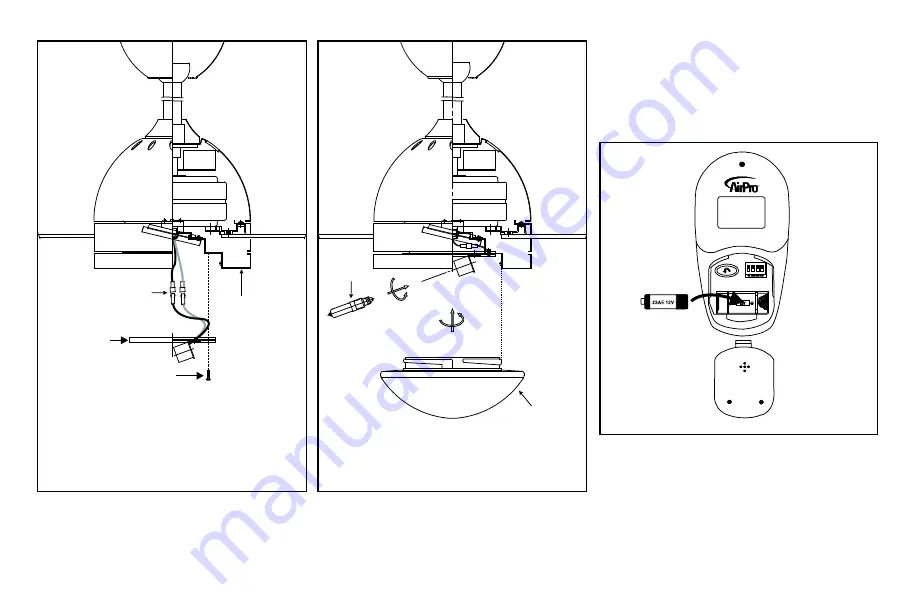
Progress Lighting P2514 Installation Manual Download Page 27

9.

Bombilla

Difusor de vidrio

Plato de montaje

Conectores

Plato de 
lampara

Tornillos

Instalación de la Bateria

Coloque 

12V  MN21/A23

  bateria  (incluidas).  Para 

evitar  estropeos  del  transmisor,  extreiga  la  bateria 
cuando  esté  no  se  usa  por  periodo  relativamente 
largo.     

Figura 17

Figura 15

Figura 16

Summary of Contents for P2514

Page 1: ...P2514 Ceiling Fan Installation Manual...

Page 2: ...AND REINSTALLATION OF FANS OR PARTS FOR REPAIR OR REPLACEMENT PROGRESS LIGHTING WILL NOT ASSUME LIABILITY OR RESPONSIBILITY FOR DAMAGES INCLUDING INCIDENTAL OR CONSEQUENTIAL CAUSED BY THE IMPROPER IN...

Page 3: ...Safety Rules Unpacking Your Fan Installing Your Fan Installing the Light Kit Your Care of Your Fan Troubleshooting Specifications Operating Transmitter 1 2 3 8 10 11 12 13 Table of Contents...

Page 4: ...hat are not packed with the fan must be UL Listed and marked suitable for use with the model fan you are installing Switches must be UL General Use Switches Refer to the Instructions packaged with the...

Page 5: ...mbly Ball downrod assembly Coupling cover 6 Mounting plate 3 1 2 8 9 4 5 6 7 10 12 13 13 Loose parts bag containing a Blade attachment hardware 10 screws 10 fiber washers b Mounting hardware Wire nuts...

Page 6: ...hen installing on a steep sloped ceiling To hang your fan where there is an existing fixture but no ceiling joist you may need an installation hanger bar as shown in Figure 4 available at your Progres...

Page 7: ...cover canopy cover canopy and then through the ball downrod Fig 7 WARNING FAILURE TO PROPERLY INSTALL LOCKING PIN AS NOTED IN STEP 7 COULD RESULT IN FAN LOOSENING AND POSSIBLY FALLING Step 8 Tighten t...

Page 8: ...from the fan to the Blue wire marked For Light from the receiver Secure wire connections with the plastic wire nuts provided Step 3 Figure 10 Receiver to House Supply Wires Electrical Connections Con...

Page 9: ...d place the key hole on the canopy over the screw on the mounting bracket turn canopy until it locks in place at the narrow section of the key holes Fig 11 Align the circular hole on canopy with the r...

Page 10: ...ed when blade levels are unequal Check this level by selecting a point on the ceiling above the tip of one of the blades Measure this distance as shown in Figure 13 Rotate the fan until the next blade...

Page 11: ...mely high temperatures and pressures they will shatter if not handled correctly I Do not operate the luminaire fitting with a missing or damaged shield J Do not place near water K Not for outdoor use...

Page 12: ...Bulb Glass shade Mounting plate Connection plugs Light plate Screws Figure 17 Installing the battery Install 12V MN21 A23 battery included to prevent damage to transmitter remove the battery if not u...

Page 13: ...the back side of the transmitter Fan reversing function used to set the fan forward or reverse press the button forward for warm weather or reverse for cool weather To operate the reverse function on...

Page 14: ...o avoid scratching the finish The plating is sealed with a lacquer to minimize discoloration or tarnishing Do not use water when cleaning This could damage the motor or the wood or possibly cause an e...

Page 15: ...UTION Make sure main power is off 4 Allow a 24 hour breaking in period Most noise associated with a new fan disappear during this time 5 If using an optional light kit make sure the screws securing th...

Page 16: ...he light kit RPM CFM N W G W C F 52 120 1 6 16 17 lbs 19 8 lbs 120 120 Fan Size Speed Volts Amps Watts Low Medium High 13 Specifications 2005 Progress Lighting Co 101 Corporate Dr Spartanburg SC 29304...

Page 17: ...TE EXPEDICI N Y REINSTALACI N DE LOS VENTILADORES O DE LAS PARTES PARA REPARAR O REEEMPLAZAR PROGRESS LIGHTING NO ASUMIR OBLIGACIONES O RESPONSABILIDAD POR DA OS INCLUYENDO INCIDENTALES O CONSIGUIENTE...

Page 18: ...ad C mo desembalar el ventilador C mo instalar el ventilador Instalaci n del kit de luz Operando su transmisor C mo cuidar del ventilador Resoluci n de problemas Especificaciones 1 2 3 8 10 11 12 13 T...

Page 19: ...pas 9 Para evitar lesiones personales o da os al ventilador y otros articulos tener cuidado al trabajar cerca del ventilador o al limpiarlo 10 No usar agua o detergentes al limpiar el ventilador o las...

Page 20: ...ra b Piezas demontaje 3 conectores pl sticos para cables el ctricos 1 Juego de aspas 3 2 Escudete superior 3 Conjunto de bola tubo de suspensi n 4 Cubridor del motor 5 Conjunto de motor del ventilador...

Page 21: ...s de diferentes maneras de montar la caja de distribuci n Figura 4 Figura 3 Figura 1 Figura 2 Caja de Distribuci n Caja de Distribuci n Caja de distribuci n Soportede Montajeen el Techo Nota Ud Puede...

Page 22: ...bierta y luego a traves de la bola varilla Fig 7 Paso 7 Alinee los agujeros de la parte inferior de la barra con los agujeros del cuello en la parte superior de la caja del motor Fig 7 Introduzca con...

Page 23: ...ptor Conecte el alambre azul del abanico a el alambre azul marcado For Light del receptor Asegure las conecci nes con los conectores de alambres proveidos Paso 3 Fig 10 Conecci nes del receptor a los...

Page 24: ...n de la cubierta sobre el tornillo del soporte de montaje gire la cubierta hasta que quede encajada en su lugar en la secci n estrecha de los agujeros de posici n Fig 11 Paso 3 Alinee el agujero circ...

Page 25: ...edici n procedimiento para cada aspa Las medi repetir el das hacer fucional deben mantenerse dentro de 1 8 pulgadas 3mm 3 Usar el juego de balanceo de aspas incluido si a n se puede notar la oscilaci...

Page 26: ...mbillas halogenas funcionan a temperaturas y presiones extremadamente elevadas Pueden estallar si no se manejan correctamente I No utilice el aparato de luz con una proteccion da ada o faltante J No i...

Page 27: ...e Conectores Plato de lampara Tornillos Instalaci n de la Bateria Coloque 12V MN21 A23 bateria incluidas Para evitar estropeos del transmisor extreiga la bateria cuando est no se usa por periodo relat...

Page 28: ...ar la comodidad del usuario Clima fr o Retroceso Un flujo de aire ascendente mueve el aire caliente alej ndolo del rea del techo c mo se muestra en la Figura 20 Esto permite fijar la unidad de calefac...

Page 29: ...sin hilas para evitar rayar el acadado El recubrimiento met lico se sella con una laca para minimizar la decoloraci n o manchado No usar agua al limpiarlo madera o posiblemente causar choque el ctric...

Page 30: ...ctora del interruptor PRECAUCI N Asegurarse de que la fuente principal de electricidad est desactivada 4 Permitir un per odo de desgaste de 24 horas La moyar a de los ruidos asociados con un ventilado...

Page 31: ...RPM CFM N W G W 52 132 cm Baja Mediana Alta 120 120 120 Estas son mediciones aproximadas No incluyen los Amperios y vatios usado por el juego de iliminaci n 2005 Progress Lighting Co 101 Corporate DR...

Reviews: