background image

6

INTRODUCTION

Description

This battery charger is designed to handle the majority of your charging and starting needs. It features:

• Automatic Multi-Phase Charging mode for easy operation.
• The ability to properly charge multiple battery types, including Flooded, AGM and Spiral Wound batteries.
• Multiple Charge Rates for various battery sizes.
• High-Amperage Engine Starting Assistance to start vehicles when the battery is weak.
• A stable power mode to maintain vehicle system voltage during on-vehicle repairs.
• Large Saw-Tooth Clamps assure good connection to top or side-mount battery terminals.
• Heavy-Duty Construction for long, trouble-free life.

How Batteries Charge

A battery charger does not force current into a battery – it makes a specific amount of current available to the 

battery and the battery draws as much of it as it needs, up to or slightly greater than the rated output current 

capability of the charger.
The closer a battery is to zero capacity (dead battery), the more charging current it will want to draw. When 

charging begins, on a dead battery, the charger will typically supply current at or very near the nominal chosen 

charging rate, and then move to a reduced rate of current as the battery becomes more fully charged. Keep in 

mind, a charger’s display shows the amount of current being drawn from the charger by the battery, not what the 

charger is capable of delivering.

Note: A slow, intermittent bubbling sound may be heard coming from the battery during the charging process. 
This is a normal condition and just another indicator the battery is being charged.

To reduce the risk of battery overcharging, it is important to thoroughly read this entire instruction manual.

How Stable Power Mode Functions

Your unit features 3 separate working modes: automatic battery charging mode, stable power mode, and engine 

start mode.
Stable Power mode is used to hold the voltage of the electrical system on a vehicle at a constant voltage for 

various service/maintenance functions. These include on-vehicle repairs of electronically controlled systems, 

diagnosis of electrical system component function or other applications where it is detrimental for the system 

voltage to drop below a specific threshold.  
In stable power mode, your unit will provide power to the vehicle’s electrical system so that system voltage 

remains at a steady level (as directed by you during stable power mode set-up) despite load changes the system 

experiences up to 60A (12V mode) 20A (24V mode) over an extended period of time.
NOTE: Stable power mode utilizes the vehicle’s battery to improve response times to load changes. As such, it 

is important to ensure the vehicle’s battery is in good condition and fully charged prior to initiating stable power 

mode.

Spark Prevention

Make sure no sparks or flames occur near the battery, especially during charging. It takes very little to ignite the 

explosive gasses produced by a lead-acid battery during the charging process. Read, understand and follow the 

safety information provided in the Safety Summary section of this manual before attempting to work with or near a 

lead-acid battery.

Summary of Contents for SOLAR PL3760

Page 1: ...tricity sparks are generated when vinyl clothing is rubbed Review all cautionary material on the SOLAR Battery Charger and in the engine compartment Always wear eye protection appropriate protective c...

Page 2: ...ction appropriate protective clothing and other safety equipment when working near lead acid batteries Do not touch eyes while working on or around lead acid batteries Always store clamps away from ea...

Page 3: ...risk of damaging power cord 11 ALWAYS unplug the battery charger from the AC outlet before attempting any cleaning or maintenance Turning the charger s control s OFF alone will not remove all electric...

Page 4: ...positioned so they will not come in contact with any moving engine parts 4 NEVER wear loose clothing or long hair around moving parts because they may get caught and cause severe injury or death WARNI...

Page 5: ...gine 6 Be extra cautious to reduce risk of dropping a metal tool onto battery It might spark or short circuit battery or other electrical part that may cause explosion 7 Remove personal metal items su...

Page 6: ...battery during the charging process This is a normal condition and just another indicator the battery is being charged To reduce the risk of battery overcharging it is important to thoroughly read th...

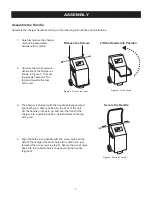
Page 7: ...partially secured and resting in a down position on the front of the unit Lift the handle on its axis up and over the front of the charger into a vertical position perpendicular to the top of the uni...

Page 8: ...er down if input voltage is too low Battery Preparation WARNING Battery explosion can injure and cause property damage Never smoke or allow a spark or flame in the vicinity of the battery or engine Se...

Page 9: ...roperly charge a wide variety of battery types Soft Start Mode and Battery Repair Mode PRO LOGIX Charger models utilize a proprietary advanced Multi Phase charging process designed to optimally charge...

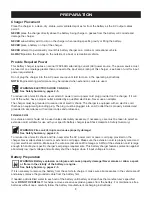
Page 10: ...ng sequence The Type button allows an operator to choose the specific battery type to be charged enabling the charger to provide the exact power profile for that battery type Selectable battery types...

Page 11: ...tional and Maintenance Free Flooded wet Cell batteries Choose STANDARD STD For AGM batteries Choose AGM For Spiral Wound Batteries Choose AGM For batteries identified as Deep Cycle or Marine batteries...

Page 12: ...battery 2 Connect the NEG black clamp from the battery charger to a heavy gauge metal part of the vehicle chassis or engine block away from the battery DO NOT connect the NEG charger clamp to the NEG...

Page 13: ...push the Battery Type button until the STD LED is lit To charge AGM and Spiral Wound batteries push the Battery Type button until the AGM LED is lit 2 Choose a battery charging rate Please see Choosi...

Page 14: ...LED is lit If an ERROR Indicator LED lights disconnect from AC stable power immediately and determine the cause of the alarm The POLARITY light indicates reverse polarity error connection while the E...

Page 15: ...tart the vehicle If the vehicle doesn t start after 3 to 4 seconds stop and wait 3 to 4 minutes Repeat until engine starts 5 After the engine start session is complete press the START button to return...

Page 16: ...ted to a grounded point on the chassis 3 If you have verified all connections are correct the problem may be that the battery is severely discharged In this case you can press and hold the START butto...

Reviews: