background image

22


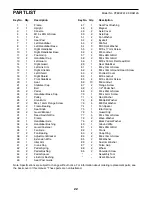
Frame


Upright


Console


M10 x 22mm Screw


Fan


Seat Post 


Left Handlebar 


Left Handlebar Base 


Right Handlebar


10 

Right Handlebar Base


11 

Foam Grip


12 

Handlebar Cap


13 

Left Guard


14 

Right Guard


15 

Left Link Arm


16 

Right Link Arm


17 

Left Shield


18 

Right Shield


19 

Front Stabilizer


20 

Seat


21 

Stabilizer Cap


22 

Belt


23 

Pedal


24 

Handlebar Base Cap


25 

Pulley


26 

Crank Arm


27 

M4 x 13mm Flange Screw


28 

Frame Bearing


29 

Seat Knob


30 

Guard Bracket


31 

Reed Switch/Wire


32 

Clamp


33 

Handlebar Axle


34 

Handlebar Bushing


35 

Guard Fastener


36 

Fan Axle


37 

Fan Bearing


38 

Adjustment Bracket


39 

Extension Wire


40 

Idler Arm


41 

Crank Cap


42 

Pedal Spring


43 

Pedal Bushing


44 

Pedal Spacer


45 

Link Arm Bushing


46 

Seat Post Guide


47 

Seat Post Bushing


48 

Magnet


49 

Axle Cover


50 

Axle Cap


51 

Fan Washer


52 

Eyebolt


53 

M6 Nut


54 

M10 Split Washer


55 

M10 x 17mm Screw


56 

M6 Locknut


57 

M6 x 38mm Bolt


58 

M8 x 74mm Bolt


59 

M10 x 18mm Flat Head Bolt


60 

Rear Stabilizer


61 

M4 x 13mm Screw


62 

M4 x 16mm Round Head Screw


63 

Footrest Cover


64 

M10 Locknut


65 

M10 x 65mm Screw


66 

10 

M8 Locknut


67 

Flange Screw


68 

1/2" Pedal Nut


69 

M4 x 25mm Screw


70 

M4 x 5mm Screw


71 

Red Washer


72 

M8 Split Washer


73 

M8 Flat Washer


74 

Fan Spacer


75 

Idler Spring


76 

Guard Clip


77 

M4 x 16mm Screw


78 

Wave Washer


79 

Black Pedal Washer


80 

Ground Wire


81 

M8 x 20mm Bolt


82 

Crank


83 

Snap Ring


84 

M8 x 16mm Screw


85 

M8 Washer


86 

Custom Washer


87 

Pulse Grip


88 

Wheel


89 

Shoulder Screw


–– 

Assembly Tool


–– 

User’’s Manual

Key No.  Qty. 

Description

Key No.  Qty. 

Description

Note: Speci

 cations are subject to change without notice. For information about ordering replacement parts, see 

the back cover of this manual. *These parts are not illustrated.

PART LIST

Model No. PFEX22912.0 R0812A

Summary of Contents for XP Whirlwind 320

Page 1: ...ual for future reference QUESTIONS If you have questions or if parts are damaged or missing DO NOT CONTACT THE STORE please contact Customer Care IMPORTANT Please register this product see the limited...

Page 2: ...UIDELINES 19 PART LIST 22 EXPLODED DRAWING 23 ORDERING REPLACEMENT PARTS Back Cover LIMITED WARRANTY Back Cover TABLE OF CONTENTS This drawing shows the location s of the warning decal s If a decal is...

Page 3: ...uding the user s movement may affect the accuracy of heart rate readings The heart rate monitor is intended only as an exercise aid in determin ing heart rate trends in general 12 When adjusting the s...

Page 4: ...enjoy this healthful exer cise in the comfort and privacy of your home For your bene t read this manual carefully before you use the exercise bike If you have questions after reading this manual pleas...

Page 5: ...65 2 M10 x 22mm Screw 4 5 PART IDENTIFICATION CHART Use the drawings below to identify the small parts needed for assembly The number in parentheses below each drawing is the key number of the part f...

Page 6: ...als until you nish all assembly steps Left parts are marked L or Left and right parts are marked R or Right To identify small parts see page 5 In addition to the included tool s assembly requires the...

Page 7: ...ach the Seat Post Guide with an M4 x 5mm Screw 70 Then retighten the Seat Knob 29 3 6 1 46 70 29 4 Attach the Seat 20 to the Seat Post 6 with four M8 Locknuts 66 and four M8 Split Washers 72 Note The...

Page 8: ...allow it to warm to room temperature before insert ing batteries Otherwise you may damage the console displays or other electronic components Remove the battery covers from the back of the Console 3...

Page 9: ...g the wires 2 77 39 Pulse Wire 9 9 Identify the Right Handlebar 9 and the Right Handlebar Base 10 Orient these parts so that the wide side of the tube on the Right Handlebar and the Right Link Arm 16...

Page 10: ...parts may be included Place a mat beneath the exercise bike to protect the floor 11 23 26 68 11 Remove the 1 2 Pedal Nut 68 from the shaft of one of the Pedals 23 See the lower drawing Make sure that...

Page 11: ...the stationary mode the link arms must be disconnected from the pedals Pull the link arms outward against the red washers until the link arms are free of the pedal bushings see drawing 2 at the left B...

Page 12: ...ed workouts Each preset workout prompts you to vary your pedaling speed as it guides you through an effective workout You can even connect your MP3 player or CD player to the console sound system and...

Page 13: ...peed settings of the workout Pulse This display mode will show your heart rate when you use the handgrip heart rate monitor see step 4 Speed This display mode will show your pedaling speed in miles pe...

Page 14: ...display If the pedals do not move for several minutes the console will turn off and the display will be reset HOW TO USE A PRESET WORKOUT 1 Turn on the console Press any button or begin pedaling to tu...

Page 15: ...o cable into the jack on the console and into a jack on your MP3 player or CD player make sure that your audio cable is fully plugged in Next press the play button on your MP3 player or CD player Adju...

Page 16: ...equipment does cause harmful interference to radio or television reception which can be determined by turning the equipment off and on try to correct the interference by one or more of the following m...

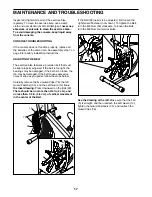
Page 17: ...tight the bearings may be damaged if the belt is too loose the fan may be damaged If the belt causes excessive noise or slips as you pedal follow the steps below Carefully remove the ve Guard Clips 76...

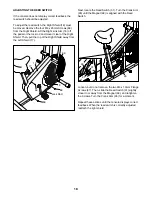
Page 18: ...the top of the Right Shield away from the Left Shield 17 Next locate the Reed Switch 31 Turn the Crank Arm 26 until the Magnet 48 is aligned with the Reed Switch Loosen but do not remove the two M4 x...

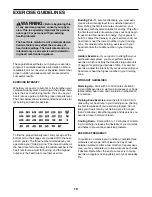
Page 19: ...c Exercise If your goal is to strengthen your cardiovascular system you must perform aerobic exercise which is activity that requires large amounts of oxygen for prolonged periods of time For aerobic...

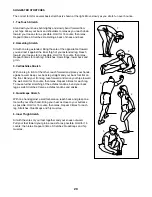
Page 20: ...lles Stretch With one leg in front of the other reach forward and place your hands against a wall Keep your back leg straight and your back foot flat on the floor Bend your front leg lean forward and...

Page 21: ...21 NOTES...
Page 22: ...49 2 Axle Cover 50 2 Axle Cap 51 2 Fan Washer 52 2 Eyebolt 53 2 M6 Nut 54 3 M10 Split Washer 55 3 M10 x 17mm Screw 56 4 M6 Locknut 57 4 M6 x 38mm Bolt 58 2 M8 x 74mm Bolt 59 1 M10 x 18mm Flat Head Bo...

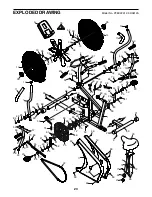
Page 23: ...40 41 67 41 42 43 44 42 43 44 45 45 46 47 48 49 78 50 50 74 51 51 52 53 52 53 54 54 55 55 56 56 63 57 57 63 58 58 59 64 66 66 65 66 68 67 68 27 69 69 69 69 69 69 77 62 70 71 71 73 73 75 78 49 55 76 79...

Page 24: ...d to freight damage to the product This warranty will automatically be voided if the product is used as a store display model if the product is purchased or transported outside the USA if all instruct...

Reviews: