background image

Page GB-16

Setup and start-up

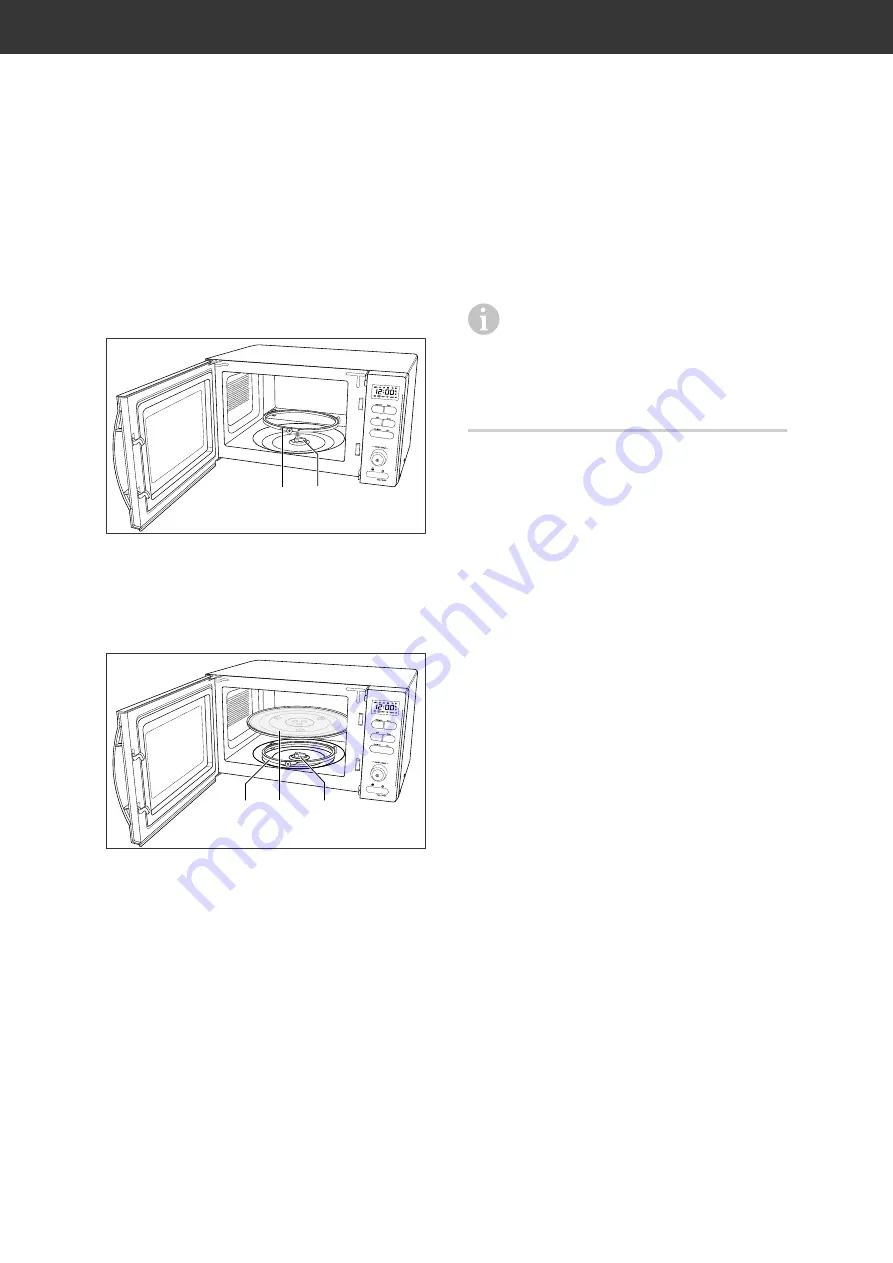
Inserting the rotary plate

1. Place the rotary plate drive (3) in the re-

cess in the middle and the roller ring (9) 
in the recess in the cooking compartment 
floor.

(9) (3)

2. Place the rotary plate (8) with the ribbed 

side facing down onto therotary plate 
drive (3) and the roller ring (9) and turn it 
until its centre clicks into place on the ro-
tary plate drive (3).

(8)

(3)

(9)

Connecting the appliance

1. Check that the connection voltage of the 

appliance corresponds to the mains volt-
age in your home (see type plate on the 
back of the appliance). 

2. Connect the microwave to a properly in-

stalled protective contact socket with suffi-
cient fuse protection.
You will hear a beep and the display will 
indicate 

1:01

.

Setting the current time

During start-up and after a power failure, you 
will have to set the time.

The microwave can be switched to 24-
hour mode or 12-hour mode.

You must manually enter the time changes 
that occur when switching to and from day-
light saving hours at the end of March and 
back again in October.

1. Press the ‘Timer’ button (11).

Kr12

’ will appear on the display.

2. Press the ‘Timer’ button again to set the 

24-hour mode.

3. To adjust the number of hours, turn the 

control knob (14).

4. Press the Timer button again.

Both of the right digit displays will start 
flashing on the display.

5. To adjust the number of minutes, turn the 

control knob.

6. Press the ‘Timer’ button once again.

The digits in the display are no longer 
flashing; the time is now set.

  Initially heating up the 
appliance

A slight odour may be produced when heat-
ing up the heating pipes for the first time. This 
is not harmful and will disappear after a short 
time. Preheat the appliance for approx. 10 
minutes in grill mode before use.

Summary of Contents for D70D17EL-XL

Page 1: ...igerät Gebrauchsanleitung D70D17EL XL E17 Anleitung Version 196178_DE_20180416 Bestell Nr 22875556 Nachdruck auch auszugsweise nicht gestattet Mikrowelle Timer Grill Auto Menü Start Stopp Löschen Kombi Gewicht Zeitwahl ...

Page 2: ...tellen DE 18 Gardauer einstellen DE 18 Garen im Grill oder Kombi Betrieb DE 19 Auftauen DE 20 Wichtige Sicherheitsanweisun gen sorgfältig lesen und für den weiteren Gebrauch aufbe wahren Bevor Sie das Gerät benutzen lesen Sie bitte zuerst die Sicherheitshin weise und die Gebrauchsanleitung auf merksam durch Nur so können Sie alle Funktionen sicher und zuverlässig nutzen Beachten Sie unbedingt auch...

Page 3: ... das Gerät einen Transportschaden aufweisen nehmen Sie bitte Kontakt mit unserem Service auf siehe Service auf Seite DE 26 WARNUNG Gerät nicht in Betrieb nehmen wenn es einen sichtbaren Schaden aufweist Verpackungstipps Sollten es Ihre räumlichen Verhältnis se zulassen empfehlen wir Ihnen die Verpackung zumindest während der Garantiezeit aufzubewahren Sollte das Gerät zur Reparatur eingeschickt we...

Page 4: ...der Uhrzeit 12 Taste für den Kombibetrieb 13 Taste zum Starten des Garvorgangs 14 Drehknopf für Gardauer und Gewicht 15 Taste zum Abbrechen eines Vorgangs sowie zum Löschen einer Einstellung 16 Taste für die Kindersicherung 17 Taste zum Starten des Schnellgarens und zum Verlängern der Gardauer 18 Taste für die Automatikprogramme 19 Taste für den Grillbetrieb 20 Taste für den Mikrowellenbetrieb 2 3...

Page 5: ...ßen Gebrauch entstanden sind Begriffserklärung Folgende Signalbegriffe finden Sie in dieser Gebrauchsanleitung WARNUNG Dieser Signalbegriff bezeichnet eine Gefährdung mit einem mittleren Risi kograd die wenn sie nicht vermieden wird den Tod oder eine schwere Verlet zung zur Folge haben kann VORSICHT Dieser Signalbegriff bezeichnet eine Gefährdung mit einem niedrigen Risi kograd die wenn sie nicht v...

Page 6: ...chutzklasse 1 und darf nur an eine Steckdose mit ordnungsgemäß installiertem Schutz leiter angeschlossen werden Der An schluss an eine Steckdosenleiste oder eine Mehrfachsteckdose ist unzuläs sig und hat Brandgefahr zur Folge Gerät nur an eine gut zugängliche Steckdose anschließen damit Sie es im Störfall schnell vom Stromnetz trennen können Netzkabel so verlegen dass es nicht zur Stolperfalle wir...

Page 7: ... von einer dafür ausgebil deten Person vorgenommen werden Es ist gefährlich für alle anderen außer für eine dafür ausgebildete Person jegliche Wartungs oder Re paraturarbeit auszuführen die die Entfernung einer Abdeckung erfor dert die den Schutz gegen Strahlen belastung durch Mikrowellenenergie sicherstellt Explosionsgefahr Unsachgemäßer Umgang mit der Mi krowelle kann zu Beschädigung oder zu Exp...

Page 8: ...cht die Flüssigkeit die Siedetemperatur ohne äußerlich sicht bar zu kochen Schon durch eine klei ne Erschütterung kann die Flüssigkeit schlagartig herausspritzen z B beim Herausnehmen aus dem Mikrowellen gerät Um Siedeverzug zu vermeiden einen Löffel in das Gefäß stellen Der Löffel muss stets einen Mindestabstand von 2 cm zu den Innenwänden der Mikro welle haben Keine hohen schmalen Gefäße mit eng...

Page 9: ...ung von Heizkissen Hausschuhen Schwämmen feuchten Putzlappen und Ähnlichem benutzen Dies kann zu Verletzungen Entzündungen oder Feu er führen Nie brennbare Gegenstände oder al koholhaltige Speisen in der Mikrowelle erhitzen Nie in der Mikrowelle frittieren oder Öl erhitzen Die Öltemperatur ist nicht kontrollierbar Bei Feuer oder Rauch im Garraum Tür nicht öffnen Die Mikrowelle ausschal ten den Net...

Page 10: ...ht vollständig im Garraum stehen kann beim Schließen der Ge rätetür die Sichtscheibe zerkratzen Schieben Sie das Kochgeschirr und den Grillrost daher immer vollständig in den Garraum ein Ausschließlich Spezialthermometer für die Mikrowelle benutzen Norma le Flüssigkeitsthermometer sind nicht geeignet Mangelhafte Sauberkeit des Koch geräts kann zu einer Zerstörung der Oberfläche führen welche die Ge...

Page 11: ...nn es zum so genannten Siedeverzug kommen Da bei erreicht die Flüssigkeit die Siedetempe ratur ohne äußerlich sichtbar zu kochen Schon durch eine kleine Erschütterung kann die Flüssigkeit schlagartig heraus spritzen z B beim Herausnehmen aus dem Mikrowellengerät Der Garraum und die Luft darin werden nicht erwärmt Das Speisegefäß erwärmt sich hauptsächlich durch die heiße Speise Jede Speise benötig...

Page 12: ...eine bedeutende Rolle Kleine flache Stü cke tauen schneller und gleichmäßiger auf als große dicke Während des Auftauens die schon angetauten Teile trennen da frei liegende Stücke schneller auftauen Anordnung der Speisen Um ein gleichmäßiges Garergebnis zu errei chen ist auf die richtige Anordnung der Spei sen besonders zu achten Speisen mit mehreren gleichen Stücken Kartoffeln Fleischbällchen Hamb...

Page 13: ...Sie leichter die richtige Funktion für die gewünschte Spei se auswählen können finden Sie hier einige Anwendungsbeispiele Mikrowelle Die Mikrowelle ohne Zusatzfunktionen ist gut geeignet für die Zubereitung von Eintöpfen Suppen Saucen Fleisch ohne Kruste gedünstetem Fisch Gemüse Beilagen Reis Salzkartoffeln einige Teig waren heißen Getränken Auftauen kleiner Portionen Grill Der Grill befindet sich...

Page 14: ...hren Für Mikrowellen und Kombi Betrieb Verwenden Sie nur mikrowellengeeignetes Geschirr Dazu gehören feuerfestes Glas Keramik Porzellan feuer und frostfeste Glaskeramik hochhitzebeständiger mikrowellengeeig neter Kunststoff z B Bratfolie die mitgelieferten Grillgestelle bzw den Drehteller Um herauszufinden ob das Geschirr mikrowellengeeignet ist folgenden Test durchführen 1 Das leere Gefäß in den ...

Page 15: ... einen Schrank stel len Der Aufstellort muss folgende Bedingungen erfüllen Sicherheitsabstände Aufstellhöhe gemessen vom Boden mindestens 85 cm Nach oben 30 cm Nach hinten 0 cm Nach links 20 cm Nach rechts 20 cm Das Gerät sollte nicht direkt neben einen Kühl oder Gefrierschrank gestellt werden Durch die Wärmeabgabe steigt deren Ener gieverbrauch unnötig Zu Radiogeräten Fernsehern etc sollte das Ge...

Page 16: ...em Stromausfall müssen Sie die Uhrzeit einstel len Die Mikrowelle kann auf einen 24 Stun den Betrieb oder einen 12 Stunden Betrieb umgestellt werden Die Umstellung zwischen Mitteleuropäischer Zeit auf Sommerzeit Ende März und zurück im Oktober müssen Sie manuell vornehmen 1 Drücken Sie die Taste 11 Timer In der Anzeige erscheint Kr 12 2 Um den 24 Stunden Betrieb einzustellen drücken Sie erneut die...

Page 17: ...ie sie aus VORSICHT Verbrühungsgefahr Beim Erhitzen von Flüssigkeit kann es zum Siedeverzug kommen Dabei kann heiße Flüssigkeit schlagartig heraus spritzen z B beim Herausnehmen aus der Mikrowelle Um Siedeverzug zu vermeiden stel len Sie einen Löffel in das Gefäß Stellen Sie sicher dass der Löffel stets einen Mindestabstand von 2 cm zu den Innenwänden der Mikrowelle hat HINWEIS Gefahr von Sachschä...

Page 18: ...gerichte wird diese Leistungsstufe empfoh len damit das Fleisch zart bleibt 40 40 280 Watt um Reis Nudeln und Klöße garzuziehen und gebackenen Eier pudding zu garen 20 20 140 Watt zum raschen Auftauen z B für Blätterteig 00 0 0 Watt zum Durchlüften Mikro wellen Leerlaufbetrieb Um die Leistungsstufe zu wählen drücken Sie die Taste 20 Mikrowelle Durch mehrfaches Drücken der Taste 20 Mikrowelle könne...

Page 19: ...ird abgebrochen und die Anzeige zeigt die Uhrzeit an Garen im Grill oder Kombi Betrieb Grill Betrieb Flache Lebensmittel z B Steaks oder Koteletts sollten auf dem Grillgestell 7 gegrillt werden 1 Drücken Sie die Taste 19 Grill 2 Drehen Sie den Drehknopf 14 im Uhrzeigersinn bis in der Anzeige die ge wünschte Gardauer erscheint 3 Drücken Sie die Taste 13 START Der Garvorgang startet Die Anzeige zähl...

Page 20: ...en Sie die Taste 13 START Das Auftauen startet In der Anzeige wird die benötigte Auftauzeit heruntergezählt Während des Auftauvorgangs ertönen Signaltöne die daran erinnern die Speise zu wenden 3 Um die Speise zu wenden öffnen Sie die Garraumtür und wenden Sie die Speise 4 Um das Auftauen fortzusetzen drücken Sie die Taste 13 START Wenn die Auftauzeit abgelaufen ist ertö nen 4 Signaltöne Automatik...

Page 21: ...Uhrzeit anzeigen Während des Garens wird die verbleibende Garzeit angezeigt Zum Anzeigen der Uhrzeit drücken Sie kurz die Taste 11 Timer und die aktuelle Uhrzeit wird für ca 3 Sekunden an gezeigt Sicherungsverriegelung Kindersicherung ein und ausschalten Wenn die Sicherungsverriegelung aktiviert ist leuchtet im Display das Sperrsymbol 1 Um die Sicherungsverriegelung Kindersi cherung einzuschalten ...

Page 22: ...ch als Fettauffang 1 Setzen Sie den Drehtellerantrieb 3 in die Aussparung in der Mitte und legen Sie den Rollenring 9 in die Mulde im Gar raumboden 2 Setzen Sie den Drehteller 8 auf den Garraumboden und drehen Sie ihn bis seine Mitte auf dem Drehtellerantrieb 3 einrastet 3 Stellen Sie Kochgefäße immer auf den Drehteller So wird bei einem Überkochen das Eindringen von Flüssigkeit in das Ge rät verm...

Page 23: ...re löse mittelhaltige oder schmirgelnde Rei nigungsmittel verwenden Empfeh lenswert sind Allzweckreiniger mit einem neutralen pH Wert Pflegemittel nur für die Außenflächen verwenden Die Türdichtungen sind empfindlich gegen Öl und Fett das Gummi wird dadurch porös und spröde Nur weiche Tücher verwenden Das Gerät möglichst nach jedem Benutzen reinigen bevor eventuelle Verunreinigungen trocknen können R...

Page 24: ...as Gerät lässt sich nicht starten Die Steckdose hat keinen Strom Durch Anschluss eines anderen Geräts prüfen Die Garraumtür ist nicht rich tig geschlossen Die Garraumtür richtig schließen Der Netzstecker sitzt lose Festen Sitz des Netzsteckers kontrollieren Die Tür lässt sich nicht richtig schlie ßen Fremdkörper befindet sich an den Türdichtflächen Die Türdichtflächen gründlich reinigen Die Garrau...

Page 25: ...atzt auf Den Vorgang abbrechen und mit geringerer Leistungsstufe erneut starten Sonstige Geräu sche oder Blitze im Garraum Funkenschlag Metall im Garraum Sofort Netzstecker ziehen bzw Sicherung ausschalten und Metallteile entfernen Die Speise ist ungleichmäßig gegart Die Speise wurde nicht ausreichend gewendet oder umgerührt Die Speise umrühren oder wenden und noch eine kurze Zeit weiter erwärmen ...

Page 26: ...e Störung nicht mithilfe der Fehler suchtabelle beheben lässt Sie weiteres Zubehör bestellen möchten Bitte beachten Sie Sie sind für den einwandfreien Zustand des Geräts und die fachgerechte Benutzung im Haushalt verantwortlich Durch Nichtbeach tung dieser Anleitung verursachte Schäden können leider nicht anerkannt werden Ersatzteile Kunden in Deutschland Wenden Sie sich bitte an die Firma Hermes ...

Page 27: ...er Reparatur Annahme stellen gebracht werden müssen ist das Gerät nur in der Originalverpackung ausreichend ge schützt Wenn Sie sich von der Verpackung trennen möchten entsorgen Sie diese bitte umwelt freundlich Elektro Altgeräte umweltgerecht entsorgen Elektrogeräte enthalten Schadstoffe und wertvolle Ressourcen Jeder Verbraucher ist deshalb ge setzlich verpflichtet Elektro Altgeräte an einer zug...

Page 28: ...n mm ca 245 Gerätemaße Höhe Breite Tiefe in cm 26 2 45 2 34 6 Leergewicht in kg 11 5 Diese Mikrowelle entspricht der Geräteklasse Gruppe 2 Klasse B Gruppe 2 Erzeugt hochfrequente elektromagnetische Strahlung die für die Behandlung von Lebensmitteln geeignet ist Klasse B Darf im Wohnbereich und direkt am nor malen Stromnetz bis 230 Volt Niederspannungsnetz betrieben werden Dieses Gerät wurde gemäß ...

Page 29: ...nction appliance User manual D70D17EL XL E17 Manual version 196178_GB_20180416 Order no 22875556 Reproduction even of excerpts is not permitted Mikrowelle Timer Grill Auto Menü Start Stopp Löschen Kombi Gewicht Zeitwahl ...

Page 30: ...etting the cooking time GB 18 Cooking in grill or multi function mode GB 19 Defrosting GB 20 Using the automatic programs GB 20 Read the important safety in structions carefully and keep these for future use Before using the appliance please first read through the safety instructions and user manual carefully This is the only way you can use all the functions reliably and re liably Be absolutely s...

Page 31: ...i ance has been damaged during transit please contact our service department see Service on page GB 26 WARNING Do not operate the appliance if it has visible damage Packaging tips If you have sufficient space we rec ommend keeping the packaging at least during the warranty period If the appliance has to be sent in for repair it will only be adequately protected in the original packaging If you wou...

Page 32: ...y 11 Button to set the time 12 Button for multi function mode 13 Button to start the cooking process 14 Control knob for the cooking time and weight 15 Button to abort a process and delete a setting 16 Button for the child safety mechanism 17 Button to start the fast cooking process and to extend the cooking time 18 Button for the automatic programs 19 Button for the grill mode 20 Button for the m...

Page 33: ...by improper use Explanation of terms The following symbols can be found in this user manual WARNING This symbol indicates a hazard with a medium level of risk which if not avoid ed could result in death or serious inju ry CAUTION This symbol indicates a hazard with a low level of risk which if not avoided could result in minor or moderate injury AUTO Automatic operation Not available for this mode...

Page 34: ...talled properly The connection of a multiple socket strip or a multi socket is not permis sible and may result in a fire hazard Only connect the appliance to an eas ily accessible socket so that you can quickly disconnect it from the mains in the event of a fault Lay the mains cord so that it does not pose a tripping hazard Keep the appliance the mains plug and the mains cord away from open flames a...

Page 35: ...tenance or repair work that requires the re moval of a cover Such a cover en sures protection against exposure to radiation from microwave energy Risk of explosion Improper handling of the microwave may lead to damage or explosions Never put a mixture of water with oil or fat in the microwave Otherwise it could explode Never heat food or liquids in tightly closed containers These can burst in the ...

Page 36: ...de walls of the microwave Do not use tall slender containers with a narrow neck Stir before heating up and after half the cooking time Wait shortly after heating Carefully tap on the container and stir the food before you take the container out of the cooking compartment Improper handling of the microwave may lead to burns During use the mi crowave and its touchable parts be come very hot After gr...

Page 37: ...ok ing compartment Do not open the door Switch off the microwave pull out the mains plug or isolate the fuse in your fuse box Risk of injury The appliance is heavy and bulky Seek the help of another person dur ing transport when setting up and positioning Do not use the door handle for car rying The door must not be used as a step or for support NOTICE Risk of damage to property Improper handling ...

Page 38: ...re and the cooking grate completely into the cooking compartment Use only a special thermometer for the microwave Normal liquid ther mometers are not suitable Insufficient cleanliness of the cook ing appliance can lead to the destruc tion of the surfaces which themselves influence the appliance s useful lifespan and could possibly also lead to dangerous situations Clean the microwave regularly and r...

Page 39: ...mperature without a visible sign that it is actually boiling Even a small vibration may cause the liquid to suddenly spray out for example when re moving it from the microwave oven The cooking compartment and the air in this compartment are not heated The food container is primarily heated by the hot food Every food needs a certain amount of ener gy to cook or defrost according to the rule of thum...

Page 40: ...hen defrosting Small flat pieces defrost faster and more evenly than large thick ones Separate the already defrosted parts during the defrosting process as exposed pieces defrost faster Arrangement of food To achieve a uniform cooking result pay spe cial attention to the correct arrangement of the food Arrange food with several equally sized pieces potatoes meatballs hamburgers in a circle in the ...

Page 41: ...ooking methods To help you choose the right function for the desired food here are some examples of use Microwave The microwave without additional functions is well suited for the preparation of Stews soups sauces Meat without crusts Steamed fish Vegetables Side dishes rice boiled potatoes some pasta Hot drinks Defrosting small portions Grill The grill is located on the cooking compart ment ceilin...

Page 42: ...tion provided by the manufacturer Unsuitable cookware can causes damage to the appli ance For microwave and multi function mode Only use microwaveable cookware This in cludes Fire proof glass ceramic porcelain Fire and frost proof glass ceramic Highly heat resistant microwaveable plas tic e g roasting bag the included rotisserie racks or the rotary plate To find out if the dishes are microwave abl...

Page 43: ...t put the appliance in a closet The set up location must fulfil the following conditions Safety distances Set up height measured from the ground at least 85 cm From above 30 cm From the rear 0 cm From the left 20 cm From the right 20 cm The appliance should not be placed next to a refrigerator or freezer Heat loss increases their energy consumption unnecessarily The appliance should have a distanc...

Page 44: ...tart up and after a power failure you will have to set the time The microwave can be switched to 24 hour mode or 12 hour mode You must manually enter the time changes that occur when switching to and from day light saving hours at the end of March and back again in October 1 Press the Timer button 11 Kr12 will appear on the display 2 Press the Timer button again to set the 24 hour mode 3 To adjust...

Page 45: ...N Risk of scalding Heating the liquid can cause delayed boiling This may cause liquid to sud denly spray out for example when removing a container from the micro wave To avoid delayed boiling place a spoon in the container Make sure that the spoon always has a safe distance of at least 2 cm from the inside walls of the microwave NOTICE Risk of damage to property Improper handling of the appliance ...

Page 46: ...ch requires a long cooking time when cooking on the stove e g beef dish es this power level is recommended so that the meat remains tender 40 40 280 Watt to cook rice noodles and dumplings and to cook baked egg pud ding 20 20 140 Watt for rapid defrosting e g for puff pastry 00 0 0 Watt for air circulation Micro wave idle mode Press the Microwave button 20 to choose the power level You can set the...

Page 47: ...button 15 twice The cooking process is aborted and the display shows the time Cooking in grill or multi function mode Grill mode Flat food products e g steaks or chops should be grilled on the rotis serie rack 7 1 Press the Grill button 19 2 Turn the control knob 14 clockwise until the desired cooking time appears on the display 3 Press the START button 13 The cooking process will start The dis pl...

Page 48: ...ton 13 Defrosting starts The required defrosting time will count down in the display During the defrosting process beeps will sound to remind you to turn the food 3 To do this open the cooking compartment door and turn the food 4 Press the START button 13 to continue defrosting 4 beeps will sound once the defrosting time has expired Using the automatic programs The appliance has 9 automatic progra...

Page 49: ...ooking time is displayed while cooking To display the time briefly press the Timer button 11 and the current time will be displayed for approx 3 seconds Switching on and off the security locking mechanism child safety mechanism If the security locking mechanism is activated the locking icon lights up on the display 1 To switch on the security locking mecha nism press and hold down the button 16 fo...

Page 50: ...7 1 Place the rotary plate drive 3 in the re cess in the middle and the roller ring 9 in the recess in the cooking compartment floor 2 Place the rotary plate 8 on the floor of the cooking compartment and turn it until its centre clicks into place on the rotary plate drive 3 3 Always place the cooking containers on the rotary plate Liquid is thus prevented from entering the appliance should it boil...

Page 51: ...oor seals can get damaged by improper handling Never use harsh soda acid solvent or abrasive cleaners All purpose clean ers with a neutral pH are recommend ed Use care products only on the outer surfaces The door seals are sensitive to oil and grease making the rubber porous and brittle Only use soft cloths If possible clean the appliance after each use before any contamination can dry It is best ...

Page 52: ...em Possible cause Solutions tips The appliance cannot be started The socket has no power Check by connecting another appliance The cooking compartment door is not properly closed Properly close the cooking compartment door The mains plug is loose Check that the mains plug is fitted securely The door cannot be closed prop erly Foreign objects are located on the door sealing surfaces Clean the door ...

Page 53: ...defrosted with too much power and is bursting open Abort the process and restart the appli ance at a lower power level Other noises or flashes in the cooking compart ment Sparks are produced metal in the cooking compartment Pull out the mains plug immediately or isolate the fuse and remove the metal parts The food is cooked unevenly The food was not turned enough or stirred Stir or turn the food a...

Page 54: ...appliance a malfunction cannot be rectified using the troubleshooting table you would like to order further accessories Spare parts Customers in Germany Please contact the company Hermes Fulfilment GmbH Tel 057 32 99 66 00 Monday Thursday 8 00 15 00 Friday 8 00 14 00 Customers in Austria Please contact your mail order company s customer service centre or product advice centre Please note You are r...

Page 55: ...e appliance will only be adequately protected in the original packag ing If you would like to dispose of the packag ing please dispose of it in an environmentally friendly way Disposing of old electrical appliances in an environmentally friendly manner Electrical appliances contain harm ful substances as well as valuable resources Every consumer is therefore required by law to dispose of old elect...

Page 56: ...n mm approx 245 Appliance dimensions height width depth in cm 26 2 45 2 34 6 Empty weight in kg 11 5 This microwave corresponds to the appliance class Group 2 Class B Group 2 Generates high frequency electromagnetic radiation that is suitable for the treatment of food Class B May be operated in the living area and directly from the normal mains at a voltage of up to 230 volts low voltage network T...

Reviews: