10
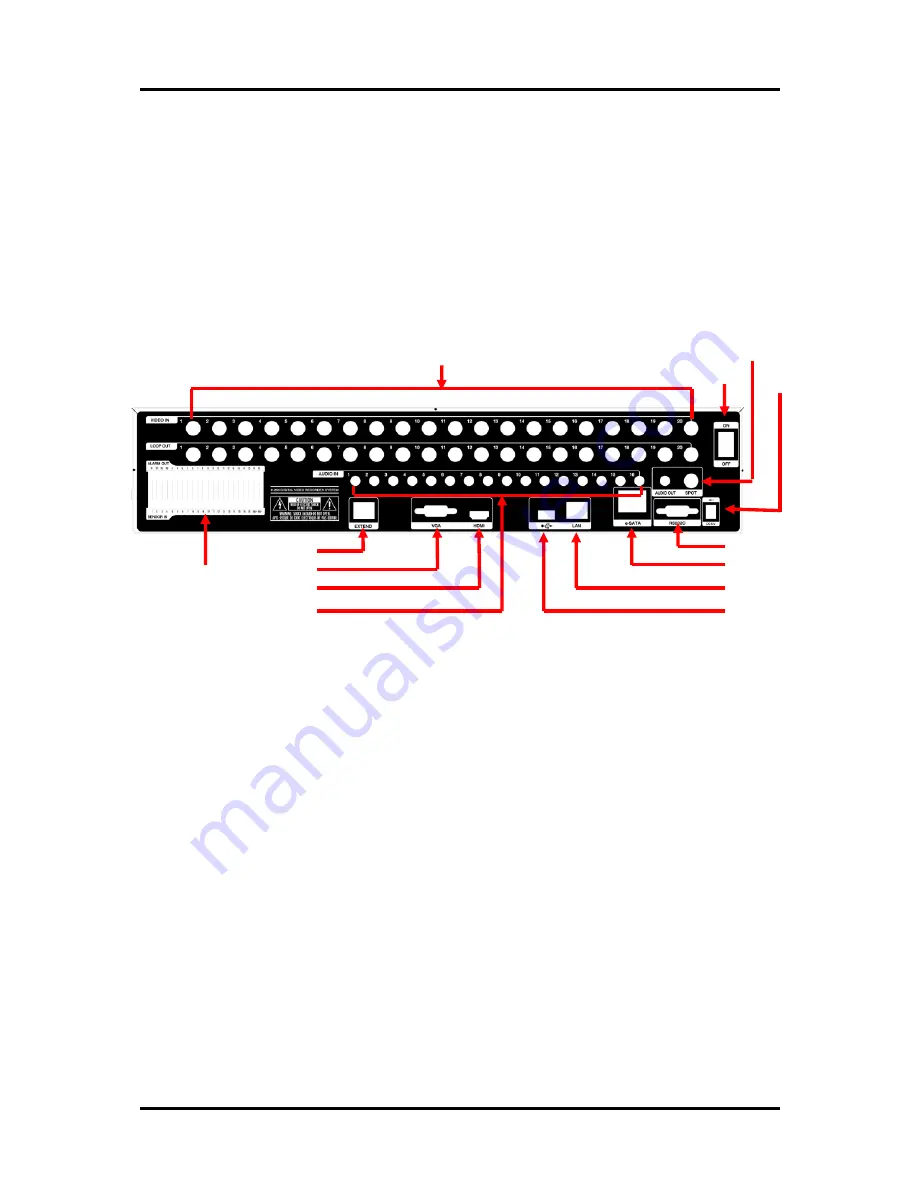
1. Video In
: This receives images from cameras and sends them to monitors.
Loop Out
: This sends the images from the cameras to the other devices(except
32ch).
2. Audio & Spot Out
:
For CRT monitor. RCA audio out terminal.
3. Power Switch
4. Adapter
: Connect DC12V only.
5. RS232C
: This is Serial communication(RS232C) cable connection terminal.
6. e-SATA
7. LAN Port
: This is LAN cable connection terminal.
8. USB ports
: This USB port is for mouse and USB devices.
9. Audio In
: RCA audio in terminals. You can record 16 channels at the same
time.
10. HD Out
: Real HD(1920X1080) output for high resolution monitor
11. VGA port
: video output for VGA display
12. Sensor, Alarm, RS485
: For external sensor and external electric devices to
these terminal block. There are 16 inputs, 2 relay output and 14 TTL output.
For control the pan and tile cameras. Make sure that the polarity.
13. Extend (ULTIMA-X Only)
: Connect EXTEND FTP cable to Receiver. Please
refer to Appendix A.
※
For more details, refer to [CH 2. Installation Method and Cautions].
CH 1 Product Introduction
[Rear Panel]
6) ZOOM : It will go to the digital zoom directly.
7) PTZ : It will change to the pan, tilt and zoom control mode from the live mode.
8) LOCK/EXIT : If you want move to the upper menu or exit without saving, press
this button. On playback, it will disappear the search list for the better
viewing. On live viewing, it performs the system lock.
9) PANIC : This button is used in emergency status. If you push this button,
the DVR starts to record with maximum speed regardless of setting value.
※
For more details, refer to [CH 3. How to Use]
12. Sensor, Alarm, RS485
1.Video In, Loop Out
7. LAN
6. e-SATA
11. VGA
10.HD Out
3. Switch
2.Audio & Spot Out
13. Extend
5. RS232C
9. Audio In
4.Adapter
8. USB
Summary of Contents for DVST ULTIMA96H-16
Page 1: ...1 Digital Video Recorder User s Manual DVST ULTIMA96H 16 20 32 ...
Page 56: ...56 Type your password to install CMS program Appendix A Configuring the installation ...
Page 57: ...57 After the installation click the close button Appendix A ...
Page 65: ...65 Click Restart to finish installing the software Appendix A ...
Page 67: ...67 The initial screen of CMS Live view The initial screen of CMS Search view Appendix A ...
Page 68: ...68 CMS Composition Widget Tab Toolbar View Screen Status bar Appendix A ...


