background image

18

SD Recording and Playback 

4.2 

SD Playback

StudioLive

 ARc Series 

Owner’s Manual

4.2 

SD Playback

Playing files from the SD card is a great way to listen to a performance right 
away, and it can be useful during a performance. SD cards can be preloaded with 
backing tracks for performance or rehearsal. Or load an SD card with your favorite 
break music and never be caught without the right adapter or cable again.
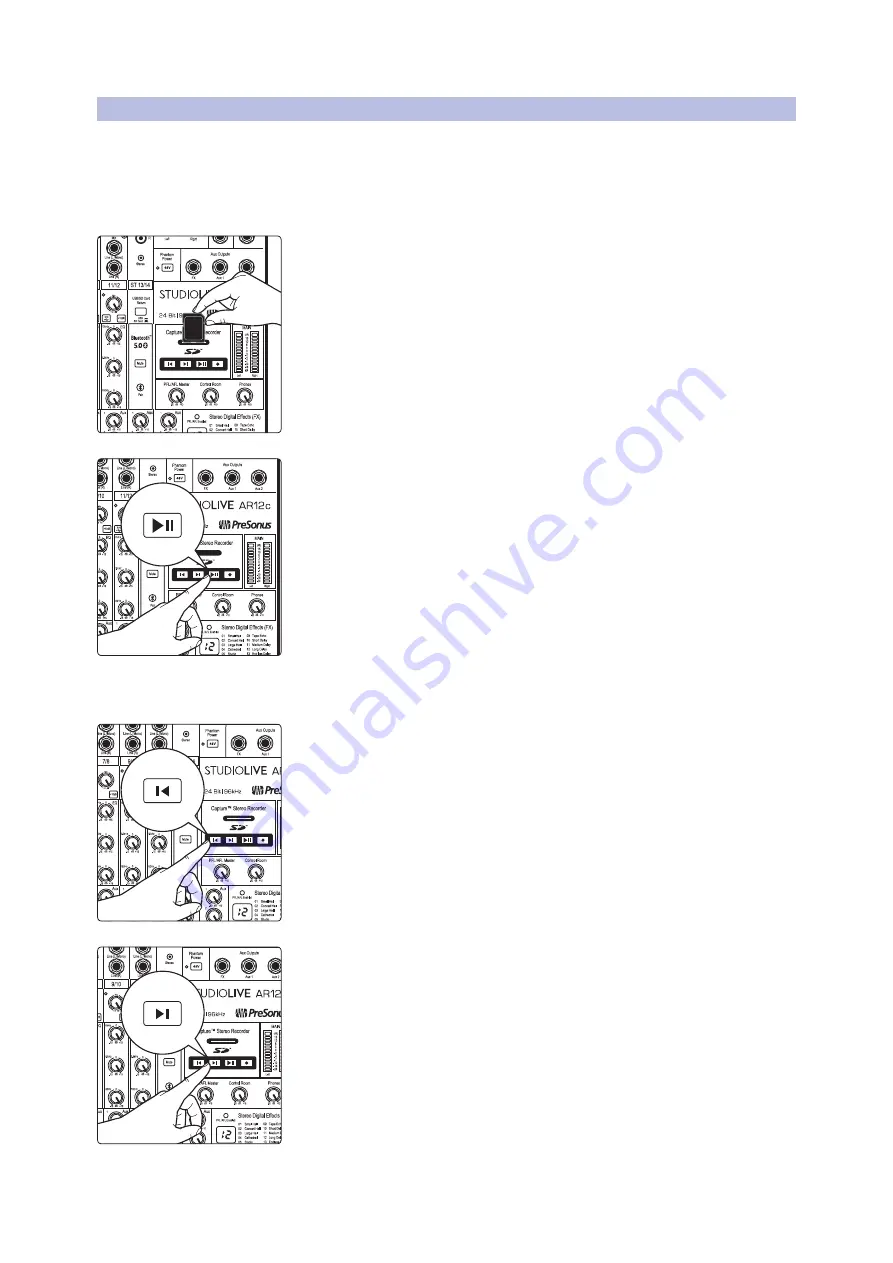
To play audio from your SD recorder:

1.  Insert into your StudioLive ARc mixer a FAT16-formatted SD card or FAT32-

formatted SDHC card that has been pre-loaded with WAV or MP3 files or 
that you have recorded to using your StudioLive ARc mixer. 


2.  Press the Play/Pause button. The current stereo audio file will begin to play 

at the last position. Playback will continue through all files, in alphanumeric 
order, until the end of the last file has been reached; then playback will stop 
automatically. 


3.  Press the Play/Pause button again to pause 

playback at the current file position.

4.  Press the Return to Zero button to restart the current audio file. Press again 

to move to the beginning of the previous file. 


5.  Press the Go to End button to advance playback to the end of the current 

audio file. Press again to move to the end of the next file.

SD Card

Summary of Contents for StudioLive AR12c

Page 1: ...StudioLive ARc Series Audio Interface Analog Mixer Stereo SD Recorder Owner s Manual www presonus com English...

Page 2: ...p Diagram 16 4 SD Recording and Playback 17 4 1 SD Recording 17 4 2 SD Playback 18 5 Connecting to a Computer 19 5 1 Installation for Windows 19 5 1 1 Universal Control Windows only 20 5 1 2 Loopback...

Page 3: ...7 1 Installation and Authorization 50 7 2 Setting Up Studio One 51 7 2 1 Configuring Audio Devices 52 7 2 2 Configuring MIDI Devices 53 7 3 Creating a New Song 56 7 3 1 ConfiguringYour I O 57 7 3 2 C...

Page 4: ...t and we value your suggestions highly We believe the best way to achieve our goal of constant product improvement is by listening to the real experts our valued customers We appreciate the support yo...

Page 5: ...s digitales anal gicas para producci n Gu a de inicio r pido StudioLive ARc Series Hybrider Digital Analog Produktionsmixer Kurzanleitung www presonus com You must register online for software downloa...

Page 6: ...the channels can result in a very loud pop that can potentially damage your sound equipment Always mute your channels before engaging Phantom power or connecting sources P A and studio equipment shoul...

Page 7: ...volume you expect during the performance 9 Turn the trim knob on Channel 1 clockwise while watching the signal indicator Adjust the Channel 1 trim knob until the signal clip indicator is red then bac...

Page 8: ...perating practices Line level Inputs Each channel of your StudioLive ARc series mixer has a inch balanced TRS connection for line level input Typical examples of line level connections are synthesizer...

Page 9: ...dioLive will follow the behavior of the type of footswitch you use A latching footswitch allows you to mute the effects return until you engage the footswitch a second time A momentary footswitch will...

Page 10: ...ton to engage the instrument preamp when connecting guitars or a passive bass Note Engaging the Instrument preamp will disable the microphone preamp on the XLR connection 4 Low Cut Filter Mono channel...

Page 11: ...vel will allow you to create more definition and space between each channel s signal 12 Mute button and indicator This button mutes its channel in all outputs The LED to the left of it will illuminate...

Page 12: ...nnel only selects line level devices the majority of which have onboard level controls you can use this channel to expand the input flexibility of your StudioLive ARc series mixer 3 3 1 Pairing a Blue...

Page 13: ...ans can t hear themselves or their bandmates their performances will suffer A monitor mix can be mono or stereo Most often an individual live monitor mix is mono and is sent to a floor wedge or sidefi...

Page 14: ...ocals a lush vibe Adds subtle ambience to a mix 6 Vibrant Room Emulates the sound of large room with hard surfaces to provide many early reflections Adds life to a flat room Helps a vocal or instrumen...

Page 15: ...usts the master level of the effects output in your main mix 3 5 3 Creating Internal Effects Mixes There are at least two main advantages to creating an effects mix rather than inserting an effect in...

Page 16: ...nitor mix adjust the FX return s monitor send control to taste 3 5 4 Using an External Effects Processor This section will detail how to use an external effects processor bypassing your StudioLive ARc...

Page 17: ...Bu For best performance the highest level of your mix should stay between the 0 and 6 indicators Because the StudioLive ARc mixer main outputs are electrical rather than digital it is more advantageou...

Page 18: ...cal Band Setup Diagram StudioLive ARc Series Owner s Manual 3 7 Typical Band Setup Diagram Front of house speakers Floor wedges Keyboard Lead vocal Drum kit Bass Electric guitar amp Music Playback Lap...

Page 19: ...al Home Studio Setup Diagram StudioLive ARc Series Owner s Manual 3 8 Typical Home Studio Setup Diagram Laptop running Studio One or 3rd party DAW Mic Guitar Micro synth Keyboard Main reference Phones...

Page 20: ...eo WAV file 1 Insert a FAT16 formatted SD card or FAT32 formatted SDHC card into your StudioLive ARc mixer An SD card will provide up to 2 GB of storage space An SDHC card will provide up to 32 GB 2 P...

Page 21: ...rmatted SDHC card that has been pre loaded with WAV or MP3 files or that you have recorded to using your StudioLive ARc mixer 2 Press the Play Pause button The current stereo audio file will begin to...

Page 22: ...www presonus com for the latest system requirements and an updated list of compatible hardware It is also recommend that you check your recording software s system requirements Power User Tip The spee...

Page 23: ...is will also increase performance demands on your computer In general you will want to set the buffer size as low as your system can safely support If you begin to hear pops clicks or distortion in yo...

Page 24: ...rce connected to analog inputs 1 and 2 on your StudioLive ARc series mixer Media Player Web Browser Etc When Loopback is enabled and Dedicated Loopback Inputs is selected the audio from another applic...

Page 25: ...stem audio to the USB return on the Super Channel of your mixer Select Set Default at the bottom of the screen and click OK Now that your StudioLive ARc series mixer is setup as the default playback d...

Page 26: ...ur StudioLive ARc series mixer as the audio interface for computer system audio for iTune playback Skype etc from the System Preferences menu 1 Open System Preferences 2 Open your System Sound Prefere...

Page 27: ...n Live 5 1 Launch Ableton Live 2 Go to Options Preferences Audio 3 Choose Driver Type ASIO Audio Device ASIO PreSonus StudioLive ARc 4 Go to Input Config Enable and select the desired Input channels 5...

Page 28: ...functions of the mixer the USB I O is designed to work as an independent bus You can route send signals from other buses to the USB bus and its output return signal is hard coded to designated mixer c...

Page 29: ...through 4 in your recording application route these playback streams to these channels on the StudioLive that is the software s Outputs 1 2 always go to StudioLive ARc Super Channel and Output 3 4 al...

Page 30: ...breaking Studio One DAW and its Session files can be opened directly in Studio One no conversion or exporting required Capture 2 was designed exclusively for StudioLive series mixers allowing instant...

Page 31: ...le 1 When you launch the Capture exe file a Welcome Screen will launch If you haven t already done so close all other open applications before clicking Next 2 Before Capture 2 can be installed on your...

Page 32: ...the Options menu see Section 6 2 5 for details By default the folder tree is Artist Performance Location This structure is useful for regularly gigging bands that want to archive performances e g Arti...

Page 33: ...have not filled in these fields a setup menu will open SessionTitle This will be the title of your Session and will be the Session filename as well as the name of the new folder that contains all data...

Page 34: ...t that the Session you open is missing audio files Capture will help you find them Use Session Locate Missing Files to search your computer for lost resources 6 2 4 Audio Device and Sample Rate Captur...

Page 35: ...und on the Start page See Section 6 2 4 for information Record Format The Record Format menu allows you to choose the bit depth of the recorded audio You can select 16 bit WAV 24 bit WAV or 32 bit flo...

Page 36: ...e Capture with an input for the source time code You can select that source from this menu File Handling Options As discussed in Section 6 2 1 Capture 2 provides an assortment of useful tools to organ...

Page 37: ...agrams show these configurations Capture 2 Recording Routing Capture 2 Playback Routing There is no need to set up audio inputs and outputs in Capture 2 as the software automatically detects which Stu...

Page 38: ...y to move to the next track s name field Arm All In the upper left hand corner you will find the Arm All button Click this button to arm enable all inputs for recording Track Controls Each track in th...

Page 39: ...he current Session Record Duration Displays how long the current Session has been recording CursorTime Displays the current timeline position of the playback cursor RemainingTime Displays the remainin...

Page 40: ...keyboard or select Session Locate Selection 6 3 6 EditingTools In the upper right corner you will see four editing tool buttons These tools will determine the function of your mouse during editing Pow...

Page 41: ...event left or right beyond the viewable arrangement hold Space Bar on the keyboard to speed up the scrolling Dragging the event up or down will move the event to another track When dragging an event f...

Page 42: ...multiple events with the Arrow tool do one of the following Click outside of the range of an event and then drag over any other events a gray box will be drawn while you drag over the target selectio...

Page 43: ...the Edit menu or by pressing Ctrl Cmd Alt X after selecting a range 6 3 6 3 SplitTool Using the Split tool single events can be split into multiple events Click on the Split Tool button or press numbe...

Page 44: ...o event The range will be indicated by a bar drawn in the timeline with flags at both ends Custom Loop Range To create a custom loop range mouse over the gray line above the timeline ruler Notice that...

Page 45: ...d Big Meter Mode The Big Meter Mode button is located in the upper right corner of the Session page above the editing tools When this button is engaged the lower three quarters of the Session page wil...

Page 46: ...by default 1 2 3 Select a marker and click on the Remove Marker button to remove the marker Naming Markers To rename a marker double click on the marker in the Marker Lane type in a new name and then...

Page 47: ...age cannot be undone in software There is a clip indicator for each input on the StudioLive ARc mixer for this purpose If an input channel is not clipping on your StudioLive ARc series mixer you can b...

Page 48: ...file and click on it to select it 3 Click on Open to import the file into your Session 4 An audio event for the imported file will be created and placed on the currently selected track in your Sessio...

Page 49: ...ame type in a new name and then press Enter to choose a name for the file Each file that is exported will begin with the filename you enter followed by the name of the track from which it was exported...

Page 50: ...ng application including PreSonus Studio One Professional to put that mix on a recordable audio CD 6 6 2 Mixing a Capture 2 Session in Studio One Many users want to use Capture 2 strictly as a track r...

Page 51: ...whatever means possible in that program Refer to the documentation of your software for more information on this process Note that in some cases you may have more than one audio event on a given trac...

Page 52: ...gle Start Stop Space Bar Start Enter Record NumPad Stop NumPad 0 Return to Zero NumPad Record Lock Cntrl Cmd L Navigation Focus Next Tab Focus Previous Shift Tab Left Left Arrow Extend Selection Left...

Page 53: ...One upgrade program for PreSonus customers please visit http studioone presonus com 7 1 Installation and Authorization Once you have installed the drivers for your audio interface and connected it to...

Page 54: ...companion content Select the content you wish to add and click Install The content will automatically begin to download and install from your My PreSonus user account Power User Tip You may be prompte...

Page 55: ...tomatically scans your system for all available drivers and selects a driver By default it will choose a PreSonus driver if one is available 2 If you do not see your device listed on the Start page wh...

Page 56: ...e device that is generally used for playing and controlling other MIDI devices virtual instruments and software parameters In Studio One Artist these devices are referred to as Keyboards and they must...

Page 57: ...uld select all MIDI channels If you are unsure of which MIDI channels to choose select all 16 5 Studio One allows you to filter out specific control functions If you would like Studio One to ignore Af...

Page 58: ...window and skip to the next section Setting up an external MIDI sound module from the Start page MIDI instrument controllers keyboards MIDI guitars etc send musical information in the form of MIDI da...

Page 59: ...ch MIDI channels to select we suggest you select all 16 4 In the Send To menu select the MIDI interface output from which Studio One Artist will send MIDI data to your sound module Click OK and close...

Page 60: ...At this point you should give your Song a name and select your preferred sample rate and bit depth for recording and playback You can also set the length of your Song and the type of time format you w...

Page 61: ...he default name Press the TAB key to edit the next name 4 Click on the Outputs tabs to enable any or all of the outputs on your StudioLive ARc Mixer In the lower right corner you will see the Audition...

Page 62: ...s track type to record and playback audio files Instrument Use this track to record and playback MIDI data to control external MIDI devices or Virtual Instrument plug ins Automation This track type le...

Page 63: ...ions please consult the Studio One Reference manual located in Help Studio One Reference Manual 7 3 4 Adding Virtual Instruments and Effects You can add plug ins and instruments to your Song by draggi...

Page 64: ...effects To add a plug in effect to a track click the Effects button in the browser and select the plug in or one of its presets in the effects browser Drag and drop the selection over the track to wh...

Page 65: ...Guitar 2 3 kHz Tinny 5 kHz and above Sparkle 200 Hz Boomy 125 Hz Full Electric Bass 1 kHz Thin 600 Hz Growl 125 Hz Boomy 80 Hz and below Bottom end String Bass 600 Hz Hollow 2 5 kHz Sharp attack 200...

Page 66: ...oustic guitar attack brighter rock guitar kick tom attack percussion attack reduce vocal dullness more finger sound on bass sharpness to synths rock guitars acoustic guitars piano bass line clarity an...

Page 67: ...1 Aux 2 PFL USB Return 1 2 SD Playback 1 2 Master Bus USB Send 1 2 1 2 USB Send Mon 1 Mon 2 Main Left Main Right AFL AFL Control Room Bus L Control Room Bus R Monitor Level 120 10 dB PFL AFL Global an...

Page 68: ...ol Room Bus L Control Room Bus R Monitor Level 120 10 dB PFL AFL Global any solo Control Room L Control Room R Control Room Out L Control Room Out R Phones Output Phones Level 120 10 dB ADC ADC DAC DA...

Page 69: ...ELNUMBER INSTRUMENT MIC CHANNELNUMBER INSTRUMENT MIC CHANNELNUMBER INSTRUMENT MIC CHANNELNUMBER INSTRUMENT MIC CHANNELNUMBER INSTRUMENT MIC CHANNELNUMBER ADDITIONALNOTES Stereo Mono Stereo Mono Stereo...

Page 70: ...sources 8 3 Recall Sheets StudioLive ARc Series Owner s Manual 8 3 2 AR8c Recall Sheet ENTER PRESETNUMBER CARDNAME NOTE NOTE NOTE NOTE NOTE INSTRUMENT MIC SOURCE INSTRUMENT MIC INSTRUMENT MIC INSTRUME...

Page 71: ...s Type TSFemale Unbalanced Hi Z MaximumInputLevel min gain 1kHz 0 5 THD N 9dBu 1 0dB GainControlRange 43dB 12to 55dB FrequencyResponsetoAnalogOutputs 20Hzto20kHz 0 5 1 5dB FrequencyResponsetoUSB Direc...

Page 72: ...z 0 5 1 5dB DynamicRange a wtd 103dB THD N Bandwidth20 20kHz 1dBFS unwtd 0 01 System Crosstalk InputtoOutput Ref 4dBu 20Hzto20kHz unwtd 90dBu AdjacentChannels Ref 4dBu 20Hzto20kHz unwtd 85dBu Signal L...

Page 73: ...ackFileFormats StereoWAV MP3 SamplingRate WAV 44 1kHz BitDepth Recording 24 bit Playback 16 and24 bit Power Connector IEC InputVoltageRange 90to240VAC Physical AR16c AR12c AR8c Length 15 6 397mm 15 6...

Page 74: ...ut source Verify that the trim control is set at an appropriate level Make sure the channel is not muted Make sure that if your device requires phantom power phantom power is engaged for the channel N...

Page 75: ...quart of chicken broth and bring to a low boil stirring constantly 6 Transfer roux mixture to a soup pot and bring to low boil Do not cover the roux will settle on the bottom of the pot and burn 7 Ad...

Page 76: ...Part 70 22000144 A 18011 Grand Bay Ct Baton Rouge Louisiana 70809 USA 1 225 216 7887 www presonus com StudioLive AR Series Audio Interface Analog Mixer Stereo SD Recorder Owner s Manual...

Reviews: