


13
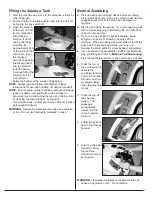
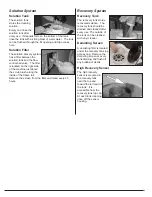
Filling the Solution Tank
1. Start the machine and move to the dispenser station or
other filling site.
2. Put the throttle in the idle position and turn the unit off
by turning the key-switch off.
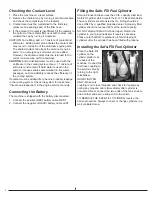
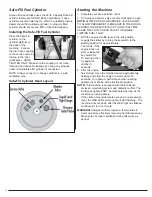
3. Open the solution
tank cover and fill
from a dispenser
with cleaning
solution. If hand-
mixing chemical
products, fill
approximately 80%
of the solution tank
with water. Pour
the required
amount of cleaning
chemical product
into the solution
tank fill opening.
Continue filling the
solution tank to 1
inch (25 mm)
below the bottom of the solution fill opening.
NOTE:
Always read and follow manufacturers label
instructions for use and handling of chemical products.
NOTE:
Floor condition, water condition, amount of soilage,
types of soilage, and pad/brush action all play an
important role in determining the type and dilution ratio
of cleaning chemical product. For specific
recommendations, contact your Amano Pioneer Eclipse
Authorized Distributor.
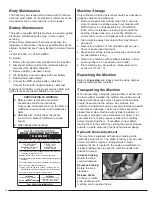
WARNING:
Flammable materials can cause an explosion
or fire. Do not use flammable materials in tanks.
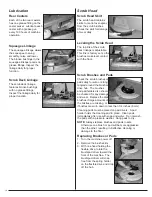
Normal Scrubbing
z
Pick up trash and oversized debris before scrubbing.
Pick up pieces of wire, string, etc., which could become
wrapped around the scrub brush and damage the
machine.
z
Plan the scrubbing in advance. Try to arrange long runs
with minimum stopping and starting. Do an entire floor
or section at one time.
z
Try to scrub as straight a path as possible. Avoid
bumping into posts or scraping the sides of the
machine. When scrubbing dead end aisles, start at the
closed end of the aisle and scrub your way out.
Overlap the scrub paths by a few inches (centimeters).
z
If you experience unacceptable scrubbing performance,
stop scrubbing and refer to
Machine Troubleshooting
.
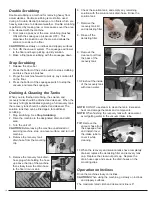
1. Start the machine and drive to the area to be scrubbed.
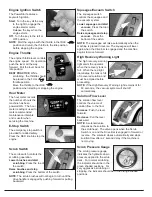
2. Press the top of
the scrub switch to
activate the
scrubbing function.
The scrub brushes
will lower and turn
on automatically
when the machine
moves.
3. Press the top of
the vacuum
switch. The
squeegee
automatically
lowers and the
vacuum system
turns on.
4. Adjust the solution
flow to the floor as
needed.
5. Push the drive bar
forward to drive
the machine
forward and scrub
as required.
WARNING:
Flammable materials or reactive metals can
cause an explosion or fire. Do not pickup.
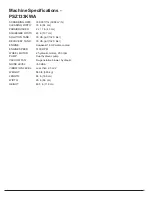
Summary of Contents for Z1 PSZ133KWA
Page 3: ......
Page 19: ...16 Machine Troubleshooting...
Page 20: ...17 Maintenance...
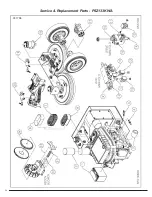
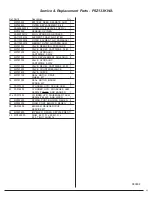
Page 27: ...Service Replacement Parts PSZ133KWA 031708 24...
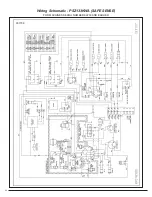
Page 29: ...26 Wiring Schematic PSZ133KWA SAFE SENSE FOR MACHINES SERIAL NUMBER 62233 AND EARLIER 031708...
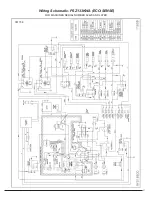
Page 30: ...27 Wiring Schematic PSZ133KWA ECO SENSE FOR MACHINES SERIAL NUMBER 62420 AND LATER 031708...
Page 32: ...29 Hydraulic Schematic PSZ133KWA 031808...
Page 33: ...30 Hydraulic Hose Connection Group PSZ133KWA 031808...
Page 35: ...32 Frame Wheel Group PSZ133KWA 031808...
Page 37: ...34 Power Group Engine PSZ133KWA 031808...
Page 39: ...36 Hydraulic Reservoir PSZ133KWA 031808...
Page 41: ...38 Airbox PSZ133KWA 031808...
Page 43: ...40 LP Regulator PSZ133KWA 031808...
Page 45: ...42 Scrub Deck Group PSZ133KWA 052308...
Page 47: ...44 Squeegee Lift Group PSZ133KWA 031808...
Page 53: ...50 Solution Tank PSZ133KWA 031808...
Page 55: ...Recovery Tank PSZ133KWA 52 030808...
Page 57: ...54 Engine Cover PSZ133KWA 031908...
Page 59: ...Squeegee 45 PSZ133KWA 56 031908...
Page 61: ...58 Control Panel Bulkhead Group PSZ133KWA 031908...
Page 63: ...60 Operational Controls PSZ133KWA 031908...
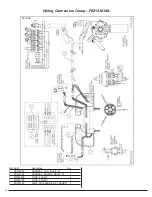
Page 67: ...64 Relay and Timer Group PSZ133KWA 031908...
Page 73: ...70...


