


21
Hydraulic System
This machine is equipped with a hydraulic drive system.
The hydraulic system holds 8 gallons (30,3 L) of
SAE 5W-20 motor oil.
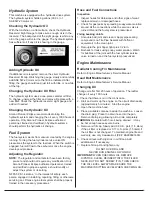
Checking the Hydraulic Oil
With the machine on a flat surface, check the Hydraulic
Reservoir Sight Gauge to make sure enough oil is in the
reservoir. The background of the sight gauge is white; any
oil in the gauge will color the gauge. The hydraulic system
has sufficient oil if any oil is showing in the gauge.
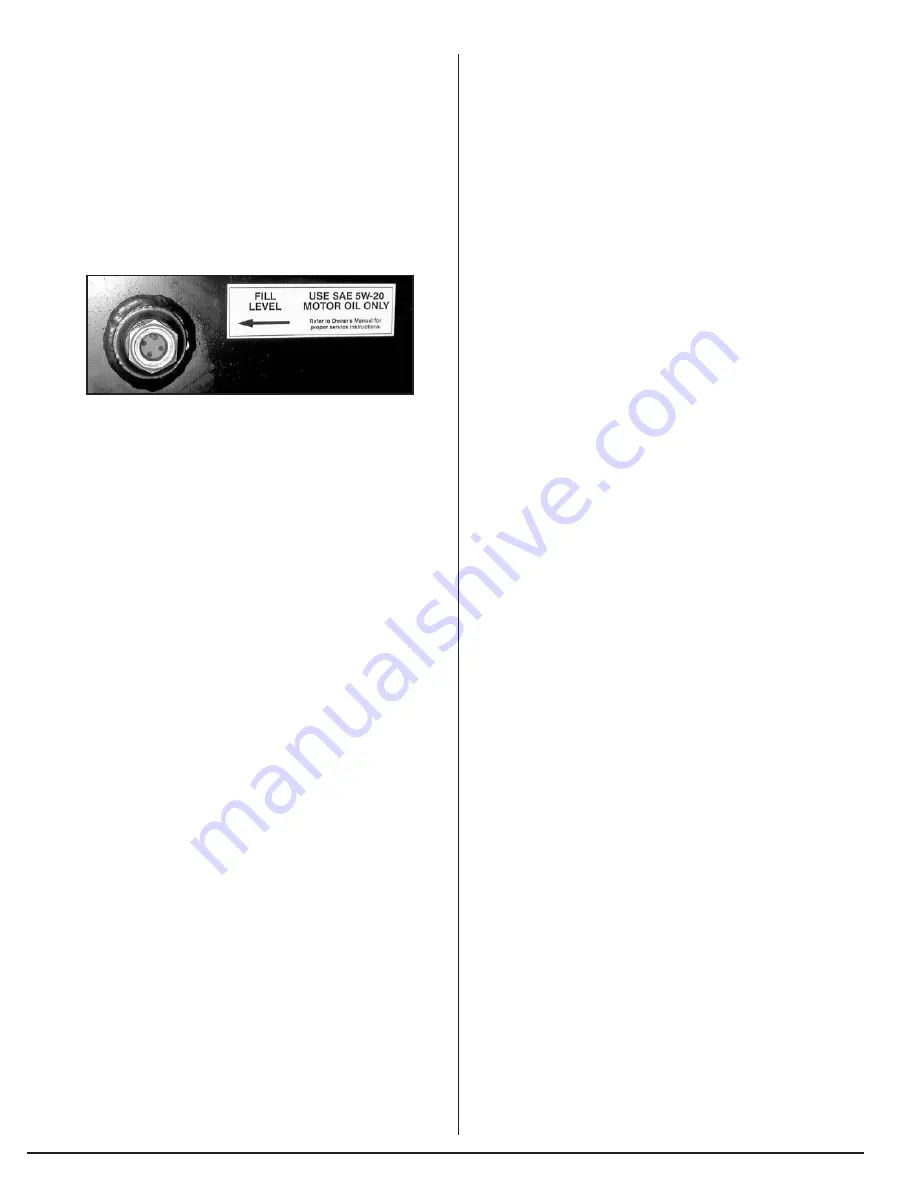
Adding Hydraulic Oil
If additional oil is required, remove the silver Hydraulic
Reservoir fill cap. Watching the gauge, slowly and carefully
add SAE 5W-20 motor oil to the fill line indicated. After
filling, the gauge should read just full, with little or no white
at the top.
Changing the Hydraulic Oil Filter
The hydraulic system uses a one-piece canister oil filter.
To change, unscrew the filter and remove. Replace with a
new filter. Check the hydraulic reservoir sight gauge and
add oil if needed.
Changing the Hydraulic Oil
Amano Pioneer Eclipse recommends draining the
hydraulic system and changing the oil every 1000 hours of
operation. Only Amano Pioneer Eclipse authorized
personnel, trained and certified in hydraulic systems,
should perform the hydraulic oil change.
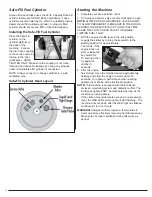
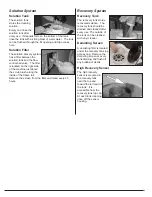
Fuel System
The fuel system works from vacuum created by the engine
running. Turning the fuel cylinder service valve ON
pressurizes the system to the fuel lock. When the switch is
engaged, fuel will flow to the carburetor once the engine
develops oil pressure.
Adjusting the Regulator
NOTE:
The regulator and carburetor have been factory
pre-set and should not require any modification. Only
Amano Pioneer Eclipse authorized personnel, trained
and certified in propane systems, should modify or
adjust the system or its setting.
NFPA 58 8-1.4 states, “In the interest of safety, each
person engaged in installing, repairing, filling, or otherwise
servicing an LP-Gas engine fuel system shall be properly
trained in the necessary procedures.”
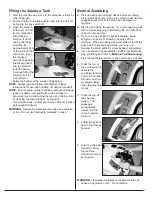
Hose and Fuel Connections
Inspection
1. Inspect hoses for abrasions and other signs of wear;
replace all worn or damaged hoses.
2. Check for gas leaks by spreading soapy water solution
around all the connections while the service valve is
turned ON and the fuel system is pressurized.
Fixing Leaking Joints
1. Uncouple bad joint and clean it. Apply pipe sealing
compound (Loc-Tite Pipe Sealant with Teflon or
equivalent) to the clean joint.
2. Recouple the joint finger tight plus 1/2 turn.
3. Recheck for leaks using soapy water solution. Watch
for bubbles at the joint with the fuel cylinder service
valve turned on and the fuel system pressurized.
Engine Maintenance
Radiator Cooling Fin Maintenance
Refer to Engine Manufacturer’s Service Manual.
Head Bolt Maintenance
Refer to Engine Manufacturer’s Service Manual.
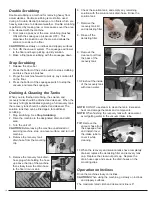
Changing Oil
Change oil after first 20 hours of operation. Thereafter
change oil every 100 hours.
1. Check that there is oil in the crank case.
2. Start and warm up the engine so the oil will drain easily
(approximately 5 minutes). Stop the engine.
3. Open the machine hood.
4. Place a suitable container beside the machine. Loosen
the drain plug. Place the drain hose into the pan.
Remove drain plug, allowing oil to drain completely.
WARNING:
Be careful with hot oil being drained. It may
be hot enough cause severe burns.
5. Remove oil fill cap. Slowly add 3.8 U.S. pints (1,8 liters)
if the oil filter is replaced or 3.17 U.S. pints (1,5 liters) if
the oil filter is not changed. To maintain engine life and
warranty, use only Kawasaki oil (PE # KA999691655).
6. Check oil level with dip stick in oil fill cap. Add
additional oil if necessary.
7. Replace fill cap. Hand tighten only.
DO NOT OVERFILL AND
NEVER RUN ENGINE LOW ON OIL!
IMPORTANT:
WHEN CHECKING OIL, REMOVE
DIPSTICK, CLEAN, REINSERT INTO THE FILLER
NECK, BUT DO NOT SCREW IT IN, THEN CHECK
THE OIL LEVEL. ALWAYS MAKE SURE THE
MACHINE IS SITTING LEVEL WHEN CHECKING OIL.
Summary of Contents for Z1 PSZ133KWA
Page 3: ......
Page 19: ...16 Machine Troubleshooting...
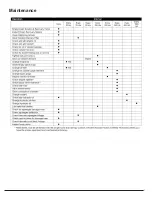
Page 20: ...17 Maintenance...
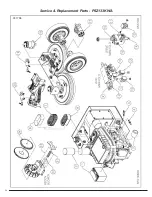
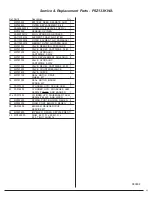
Page 27: ...Service Replacement Parts PSZ133KWA 031708 24...
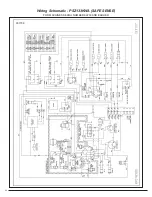
Page 29: ...26 Wiring Schematic PSZ133KWA SAFE SENSE FOR MACHINES SERIAL NUMBER 62233 AND EARLIER 031708...
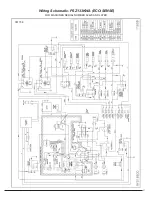
Page 30: ...27 Wiring Schematic PSZ133KWA ECO SENSE FOR MACHINES SERIAL NUMBER 62420 AND LATER 031708...
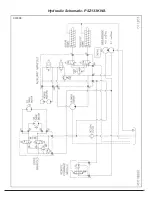
Page 32: ...29 Hydraulic Schematic PSZ133KWA 031808...
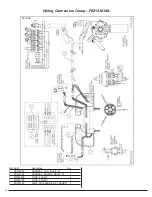
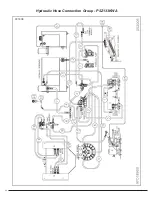
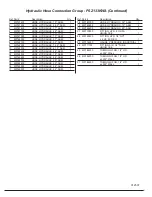
Page 33: ...30 Hydraulic Hose Connection Group PSZ133KWA 031808...
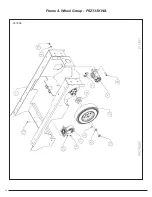
Page 35: ...32 Frame Wheel Group PSZ133KWA 031808...
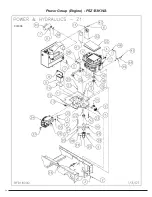
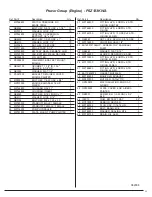
Page 37: ...34 Power Group Engine PSZ133KWA 031808...
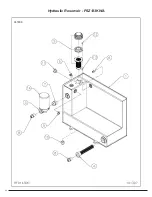
Page 39: ...36 Hydraulic Reservoir PSZ133KWA 031808...
Page 41: ...38 Airbox PSZ133KWA 031808...
Page 43: ...40 LP Regulator PSZ133KWA 031808...
Page 45: ...42 Scrub Deck Group PSZ133KWA 052308...
Page 47: ...44 Squeegee Lift Group PSZ133KWA 031808...
Page 53: ...50 Solution Tank PSZ133KWA 031808...
Page 55: ...Recovery Tank PSZ133KWA 52 030808...
Page 57: ...54 Engine Cover PSZ133KWA 031908...
Page 59: ...Squeegee 45 PSZ133KWA 56 031908...
Page 61: ...58 Control Panel Bulkhead Group PSZ133KWA 031908...
Page 63: ...60 Operational Controls PSZ133KWA 031908...
Page 67: ...64 Relay and Timer Group PSZ133KWA 031908...
Page 73: ...70...


