


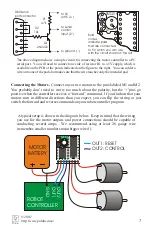


How the Motor Controller Works
The motor controller uses
H-bridges
to turn motors forward and backward (see the
dotted ‘H’ in the left figure). H-bridges have four switches, which are turned on in pairs
to allow current to flow into the motors in both directions, as shown below. In the left
figure, all four switches are open, and the motor is turned off. When switches 1 and 4
close, the motor turns in one direction; when switches 2 and 3 close, the motor turns the
other way. Integrated circuit U2 contains two H-bridges, allowing bidirectional
control of two motors.
A technique called
pulse width modulation
(PWM) is used to control the speed of the
motors. The microcontroller (U1) is a little computer that controls the H-bridge
switches. It turns the switches on and off very rapidly (600 times per second) and
varies the percentage of the time that the switches are on to achieve the speed set by the
serial interface. For a higher speed, the switches are on a larger fraction of the time than
for a slower speed. At the maximum speed of 127, the switches are left on. The
momentum of the motor shaft keeps the shaft spinning at a constant speed that can be
varied smoothly over all 127 different speeds.
U3 and the capacitors provide a steady 5V power supply for the microcontroller, which
cannot run at the full motor voltage provided to the board at the ‘+’ and ‘
-
’ pins.
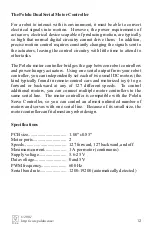
The complete schematic diagram of the motor controller is shown below:
11
Pololu
VIN
VOUT
GND
LM2931
U3
SN754410
1,2EN
1Y
1A
GND
GND
2A
2Y
VMOT
VCC
3Y
4A
GND
GND
3A
4Y
3,4EN
4
5
12
13
2
7
10
15
1
8
9
16
3
6
11
14
U2
PIC12C508A
GP2
VSS
VCC
GP0
GP1
GP4
MCLR
GP5
4
3
8
1
5
7
2
6
U1
C1
100
C2
22
+
2
-
1
+
-
+
-
M1
M2
M
V+
V-
M
V+
V-
M
V+
V-
1
2
4
3
1
2
4
3
1
2
4
3
© 2001
http://www.pololu.com/


