Pololu SMC01A User Manual Download Page 10

Example BASIC Stamp II Program

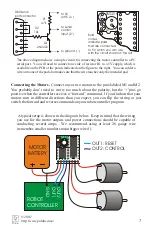
This program, which can run on a BASIC Stamp II controller, makes motor 1 gradually 
speed up, then slow down, then speed up in the other direction, and then slow down 
again.  For the code to work, pin 15 must be connected to the reset input (‘1’), and pin 
14 must be connected to the serial input (‘2’).  The interface code should look similar in 
other programming languages; the description below should help you in understanding 
the code and, if necessary, in translating it to other languages.

On line 1, the 8-bit variable 

speed

 is declared for later use.  The motor controller is 

then reset by a low-going pulse on pin 15 (lines 2 and 3).  

The first 

for loop

 on lines 4-7 causes motor 1 to gradually speed up.  The serial output is 

created by the 

serout

 statement on line 5.  The first parameter, 14, specifies the pin 

number through which to send the serial signal.  The next parameter, 

32

, sets up the 

serial characteristics to be 8 bits with no parity, non-inverted, at a baud rate of 19200.  
The four numbers in square brackets are the data to be sent, and they correspond to the 
four control bytes for the motor controller.  The first two bytes should always be 

$80


and 

0

.  The second 

0

 makes motor 1 go backward.  The speed variable, which increases 

every time through the loop, is the only part of the command that changes, and that is 
what makes the motor gradually speed up.   The 

pause

 statement on line 6 causes the 

program to wait for 20 ms (0.02 seconds) before sending the next command.

When the first loop ends, the motor is set to its full speed of 127.  The second loop on 
lines 8-11 slows the motor back down by sending speeds from 127 down to 0.  The next 
two loops on lines12-19 then repeat the process, except for the parameter value of 

1

 in 

byte three, which causes motor 1 to spin forward.

1

speed

var

byte 

2

low 15

'reset motor controller

3

high 15

4

for speed = 0 to 127 

5

serout 14,32,[$80, 0, 0,speed]

6

pause 20

7

next

8

for speed = 127 to 0 

9

serout 14,32,[$80, 0, 0,speed]

10

pause 20

11

next

12

for speed = 0 to 127 

13

serout 14,32,[$80, 0, 1,speed]

14

pause 20

15

next

16

for speed = 127 to 0 

17

serout 14,32,[$80, 0, 1,speed]

18

pause 20

19

next

10

Pololu

© 2001
http://www.pololu.com/

Summary of Contents for SMC01A

Page 1: ...tents Safety Warning Parts List Contacting Pololu How to Solder Assembly Instructions Connecting the Motor Controller Using the Motor Controller How the Motor Controller Works Description and Specific...

Page 2: ...se or to the performance of this product This product is not designed for and should not be used in applications where the malfunction of the product could cause injury or damage Parts List The follow...

Page 3: ...er soldering trim excessleadswithdiagonalcutters To solder heat a component lead and the PCB pad and then apply solder until the solder flows onto both the lead and the pad If the solder beads up on t...

Page 4: ...ptions concern the size of the assembled motor controller You can insert the various components into the PCB without soldering to helpdeterminewhichoptionsarebestforyou Should I use IC sockets for U1...

Page 5: ...5 Pololu SMC01A C2 C1 U3 U2 U1 M2 1 2 M1 Next add the tantalum capacitor C2 You may need to bend the leads to make them straight so that they will fit The capacitor is polarized which means it must on...

Page 6: ...o use it to ensure that spurious signals sent when your robot controller turns on do not cause the motor controller to detect the baud rate incorrectly onnect this pin to a 0 5V digital output on your...

Page 7: ...port connector R2 10k R1 4 7k Q1 2N2222 Bold circles indicate pads that are connected to 5V which you can use with the circuit shown on the left SMC01A C2 C1 U3 The above diagram shows a simple circui...

Page 8: ...s byte should always be 0x80 128 in decimal to signify the beginning of a command The start byte is the only byte with the highest bit bit 7 set and it alerts all devices on the serial line that a new...

Page 9: ...or controller to use it successfully However you may need to reset the motor controller to ensure that spurious signals sent when your robot controller turns on do notcausethemotorcontrollertodetectth...

Page 10: ...of 19200 The four numbers in square brackets are the data to be sent and they correspond to the four control bytes for the motor controller The first two bytes should always be 80 and 0 The second 0 m...

Page 11: ...on and off very rapidly 600 times per second and varies the percentage of the time that the switches are on to achieve the speed set by the serial interface For a higher speed the switches are on a l...

Page 12: ...bot controller you can independently set each of two small DC motors the kind typically found in remote control cars and motorized toys to go forward or backward at any of 127 different speeds To cont...

Reviews: