


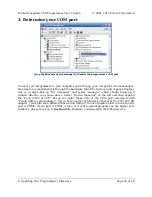


AVR Studio’s programmer-selection dialog
6. If you have not done so already, connect your programmer to your Orangutan or 3pi
using the 6-pin ISP cable. Make sure the cable is oriented so that pin 1 on the connector
lines up with pin 1 on your target device! You can test your connection by going to the
Main
tab and clicking the
Read Signature
button. This sends a command to the target
microcontroller asking for its device signature. If everything works correctly, you should
see
“Signature matches selected device”
. If the signature does not match the selected
device, you probably have the wrong device selected (or possibly your target device is
turned off). If reading the signature fails entirely, please refer to our troubleshooting
advice (
) for help getting your connection working.
Reading the device signature in AVR Studio’s Main ISP tab
7. Now it is time to program your target device. Select the
Main
tab. Your
Device
should match the one you selected when you created the project: ATmega328P,
ATmega168, or ATmega48. Select the
Program
tab. Your
Input HEX File
in the
Flash
section needs to be the hex file that was generated when you built your program. You
can browse for this using the
"..."
button to the right of the input file text box. If you
navigate to your project’s folder, you should find it as
“default\<project name>.hex”
.
Click the
Program
button (make sure you click the one in the
Flash
section, not one in
the “EEPROM” or “ELF Production File Format” sections!).
Pololu Orangutan USB Programmer User's Guide
© 2001–2010 Pololu Corporation
5. Getting Started Using Windows
Page 11 of 29


