Pololu Orangutan User Manual Download Page 19

7. Troubleshooting

If Your Computer Fails to Connect to the Programmer

• Make sure your programmer is connected to your computer via a USB A to mini-
B cable. If it was previously working and has since stopped, try cycling the power by
unplugging it from your computer and then reconnecting it.
• Make sure you have installed the drivers the Orangutan USB programmer needs to
operate.
• Is the programmer’s green USB status LED on? This is the single LED on the same
side of the board as the mini-B connector. If this LED is not on, you do not have a valid
USB-to-serial connection between your programmer and your computer.
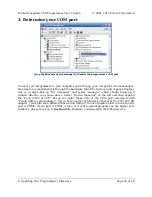
• If you are running Windows, can you see your programmer listed among your Device
Manager’s COM ports? If you expand your Device Manager’s “Ports (COM & LPT)” list,
you should see your programmer appear as “Pololu USB-to-serial adapter”.
• If you are running linux, examine the system messages generated when the
programmer is connected, using the command “dmesg”.
• Your computer will only let one program have a given COM port open at a time. If you
are connected to your Orangutan USB programmer’s COM port using another program,
such as Hyper Terminal or a second instance of AVR Studio, you will not be able to
connect to it with your programming software. Please make sure you don’t have any
terminal programs connected to your programmer, and if you have multiple versions of
AVR Studio running, make sure that you have closed the “AVRISP” programming dialogs
in all of them. When the AVRISP dialog is open, that instance of AVR Studio has an open
serial connection to your programmer.
• If you are using AVR Studio, try connecting to your programmer’s specific COM port
instead of selecting the “Auto” option, which attempts to locate the port automatically.
• Is your programmer’s blue mode jumper selecting for programming mode? If the
mode jumper is missing or is selecting USB-to-serial adapter mode, your computer will
not detect it as a programmer.
• If none of the above work, try connecting to your programmer using a terminal
program to verify that it’s alive. Please see the Configuring Your Programmer for AVR
Studio section for instructions on how you can interact with your Orangutan USB
programmer using a terminal program.

If Your Programmer Has Problems Connecting to Your Target Device

• The most common cause for this problem is an incorrect connection between your
programmer and your target device. If the ISP pins are misaligned between your
programmer and your target device, the two will not be able to communicate. Please
make sure that the ISP pins as numbered in the Module Pinout & Components section
are correctly connected between your Orangutan and your programmer (i.e. 1 goes to 1,
2 goes to 2, etc.).
• Your target must be powered for programming to work. Please make sure that your
Orangutan has power and is turned on.

Pololu Orangutan USB Programmer User's Guide

© 2001–2010 Pololu Corporation

7. Troubleshooting

Page 19 of 29

Summary of Contents for Orangutan

Page 1: ...5 a Using AVR Studio 8 5 b AVR Studio in More Detail 12 5 c Configuring Your Programmer for AVR Studio 14 5 d Using AVRDUDE 16 6 Getting Started Using Linux 17 7 Troubleshooting 19 8 Updating Your Pr...

Page 2: ...t receives its power via the USB A to mini B cable http www pololu com catalog product 130 that connects it to a personal computer This cable is not included with your programmer if you do not already...

Page 3: ...cts and about your experience with the Orangutan USB programmer You can contact us http www pololu com contact directly or post on our forum http forum pololu com Tell us what we did well what we coul...

Page 4: ...grammer PGM02A and PGM02B The programmer s revision number is written along the right side of the bottom of the PC board The newer PGM02B revision has two key improvements over the original PGM02A 1 i...

Page 5: ...P port located just behind the right wheel as shown above Connecting to Your Orangutan Baby Orangutan ISP pins Orangutan SV 168 SV 328 and LV 168 ISP pins Orangutan ISP pins The Orangutan USB programm...

Page 6: ...which can in turn permanently disable your Orangutan see Fuses in Section 5 b If your programmer version is PGM02B the programmer will not let you program an unpowered device you will see the red sta...

Page 7: ...om docs 0J7 for the programmer s CP2102 USB to UART bridge Once you have successfully installed your this driver you should see the green USB status LED near the mini B connector lit whenever it is co...

Page 8: ...w you step by step how to use AVR Studio to make the red user LED blink on your Orangutan Orangutan SV 168 Orangutan SV 328 Orangutan LV 168 Baby Orangutan or 3pi robot Please note that this program w...

Page 9: ...ich chip your Orangutan or 3pi has Click Finish Creating a new AVR Studio project step 2 3 Write your program in BlinkLED c as seen in the screen shot below and click the Build button on the toolbar o...

Page 10: ...g to the Tools menu and selecting Program AVR Connect Connecting to the programmer with AVR Studio 5 This will bring up a programmer selection dialog The platform should be AVRISP The Orangutan USB pr...

Page 11: ...y please refer to our troubleshooting advice Section 7 for help getting your connection working Reading the device signature in AVR Studio s Main ISP tab 7 Now it is time to program your target device...

Page 12: ...if you are trying this on a 3pi robot and you haven t yet soldered in the optional through hole LEDs you will need to turn your 3pi robot over to see the flashing LED as the surface mounted LEDs are l...

Page 13: ...2 5 kHz This ISP frequency is so low that AVR Studio times out when it tries to program flash or EEPROM but it can be used to program fuses and lock bits You should be able to program any device runn...

Page 14: ...enting further flash writing or reading The lock bits can be reset to a fully unlocked state by performing a chip erase i e by clicking the Erase Device button in the Program tab Lock bits are usually...

Page 15: ...15 200 baud with 8 bit characters no parity and one stop bit This is occasionally represented as 115200 8 N 1 In the screen shots below we use Hyper Terminal for this Once the connection is made type...

Page 16: ...nto a command console cd C BlinkLED default avrdude p m168 P COM2 c avrispv2 e U flash w BlinkLED hex The argument following the p is the part number and should be m328p m168 or m48 The argument follo...

Page 17: ...linkLED_m48 zip file_id 0J188 9k zip mega168 BlinkLED zip http www pololu com file download BlinkLED_m168 zip file_id 0J189 9k zip mega328 BlinkLED zip http www pololu com file download BlinkLED_m328...

Page 18: ...es of flash written avrdude verifying flash memory against BlinkLED hex avrdude load data flash data from input file BlinkLED hex avrdude input file BlinkLED hex auto detected as Intel Hex avrdude inp...

Page 19: ...ersions of AVR Studio running make sure that you have closed the AVRISP programming dialogs in all of them When the AVRISP dialog is open that instance of AVR Studio has an open serial connection to y...

Page 20: ...short or cut trace somewhere on your target device The ideal way to test for this would be to try programming a different device with your Orangutan USB programmer or conversely try using a different...

Page 21: ...g product 975 which all have motor driver control lines that double as programming lines Version 1 2 could cause motors connected to these devices to briefly kick during programming Version 1 3 will n...

Page 22: ...mend Tera Term Pro v2 3 available for free at http hp vector co jp authors VA002416 teraterm html http hp vector co jp authors VA002416 teraterm html Installation instructions are included in the down...

Page 23: ...erfere with the upgrading process For example if you have AVR Studio open make sure the AVRISP programming window is closed as this window ties up the COM port your programmer is using Pololu Oranguta...

Page 24: ...vice Manager on the left and then expand the Ports COM LPT list on the right Make note of the COM port associated with Pololu USB to serial adapter If you have another Pololu device that uses the CP21...

Page 25: ...tton At the bottom of the next dialog box is a drop down list labeled COM Port Number When you select this list you can see all the ports available to you You need to select a port from COM1 to COM4 t...

Page 26: ...in the future if you ever simultaneously connect your programmer and the other device that is configured to use that port Once you have chosen your new port click OK on both the Advanced and Propertie...

Page 27: ...ing your own COM port The baud rate should be 115200 with 8 bit data no parity one stop bit and no flow control You do not need any transmit delays The only settings you should have to change from the...

Page 28: ...ond period expires and the two status LEDs turn off As you type the string you will see the uppercase version of the letters you type echoed back so as you type fwbootload you will see FWBOOTLOAD If y...

Page 29: ...LED below the reset button flickering as the firmware update progresses When the upload is complete the programmer will transmit SUCCESS to indicate success If there is a problem the programmer will...

Reviews: