


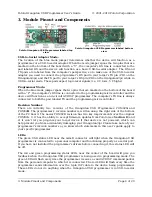


Building a project with AVR Studio
Note:
You will probably want to customize this program slightly if you are
working with an original Orangutan rather than a Baby Orangutan, Orangutan
SV-168, Orangutan SV-328, Orangutan LV-168, or 3pi robot.
F_CPU
should be
defined as the clock frequency of your target device in Hz. For the Orangutan
this should be
8000000UL
(8 MHz), while for the Orangutan SV-xx8, Orangutan
LV-168, Baby Orangutan, and 3pi robot this should be
20000000UL
(20 MHz).
You can achieve this by commenting out line 3 and uncommenting line 2. If you
don’t make this change, the timing of delayms() will be off.
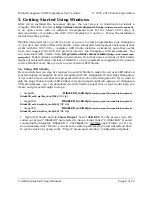
4. Make sure your Orangutan USB programmer is connected to your computer via its
USB A to mini-B cable and then click the
Display the ‘Connect’ Dialog
button on
the toolbar . You can also accomplish this by going to the “Tools” menu and selecting
Program AVR → Connect…
.
Connecting to the programmer with AVR Studio
5. This will bring up a programmer selection dialog. The platform should be
AVRISP
.
The Orangutan USB programmer uses AVR ISP version 2 (written as AVRISPv2), but this
is not the same as AVR ISP mkII. Select the serial port of your programmer if you know
what it is, or select
Auto
and it will try all the ports until it detects the programmer. You
can determine your programmer’s serial port by looking in the “Ports (COM & LPT)” list
of your Device Manager for “Pololu USB-to-serial adapter”. Click “Connect…” to bring
up the AVRISP dialog. You should see the green programming status LED flash very
briefly as the dialog appears. If an error dialog appears instead of the AVRISP dialog,
your computer cannot detect the programmer; please go to Troubleshooting (
)
for help identifying and fixing the problem.
Pololu Orangutan USB Programmer User's Guide
© 2001–2010 Pololu Corporation
5. Getting Started Using Windows
Page 10 of 29


