


If you do not want to use the inertial sensors on the Zumo 32U4’s I²C bus, you can cut the surface-mount jumpers
labeled “2 = SDA” and “3 = SCL”. This frees up pin 2 (PD1) and pin 3 (PD0). These pins can be used as digital
inputs and outputs.
Power
All of the Zumo’s power nodes are accessible from the left expansion area. If you power additional devices from
VBAT, then they will be powered whenever the Zumo’s power switch is in the ON position, and they will receive
whatever voltage the batteries are outputting. If you power them from VREG, they will get 5 V power whenever
the batteries are installed and the power switch is on (but they cannot be powered from USB). If you power them
from the 5V pin, then they will receive 5V power whenever the Zumo 32U4 logic components are powered.
If you power them from 3V3, they will receive 3.3V power whenever the Zumo 32U4 logic components are
powered. For more information about these power nodes and how much current they can provide, see
Section
3.8
.
It is also possible to add your own power switch to control power to the Zumo, as described in
Section 3.8
.
Ground
You should make sure that all the grounds in your system are connected. The Zumo 32U4’s ground node is
labeled “GND” and can be accessed from any of the expansion areas. It should be connected to the ground node
of every other circuit board or device you add to the robot.
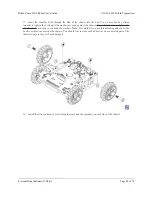
Making the physical connections
You should refer to
Section 3.9
to locate the access points in the Zumo 32U4 expansion areas for the pins
you have chosen. One option to make the connections to those pins is two get two
2×13-pin female headers
[https://www.pololu.com/product/2745]
and solder them in to the left and right expansion areas. Another option would
be to break off pieces of a
2×40-pin male header
[https://www.pololu.com/product/966]
and solder them in. Our
premium jumper wires
[https://www.pololu.com/category/65/premium-jumper-wires]
can then be plugged into the male
or female headers.
3.12. AVR Timers
The ATmega32U4 has 4 timers: Timer0, Timer1, Timer3, and Timer4. Each timer has a different set of features,
as documented in the datasheet.
• Timer0 is used by the Arduino environment for timing-related functions like
millis()
.
• Timer1 is used by the Zumo 32U4 Arduino library for driving motors.
• Timer3 is used by the Zumo 32U4 Arduino library for emitting 38 kHz IR pulses for the proximity
sensors, but it can be used for other purposes between readings of the sensors.
• Timer4 is used by the Zumo 32U4 Arduino library for controlling the buzzer. The buzzer pin (digital pin
6, or PD7; Timer4 output OC4D) can be freed for other uses by cutting the surface-mount jumper labeled
“6 = Buzzer”.
3.13. Schematics and dimensions
Schematics
The schematic diagram for the Zumo 32U4 robot is available as a PDF:
Zumo 32U4 schematic diagram
[https://www.pololu.com/file/download/zumo-32u4-schematic-diagram.pdf?file_id=0J862]
(1MB pdf).
Pololu Zumo 32U4 Robot User’s Guide
© 2001–2015 Pololu Corporation
3. The Zumo 32U4 in detail
Page 30 of 76