background image

No

t

es:


If   

is   highlighted   whilst   a   song   is   playing,   this   song   will   be   added   to   a   ’songs   you   

23   

love’   list   located   in   the   USB   contents   menu.   

Normal:   

Will   play   all   the   songs   in   order   and   stop   once   finished.   


Repeat   Song:   

Will   repeat   the   current   song.   


Repeat   all

:   Will   play   the   songs   in   order   and   start   from   the   beginning   once   finished.   


Shuffle

:   Will   shuffle   all   the   songs   on   the   USB.   

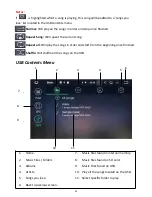
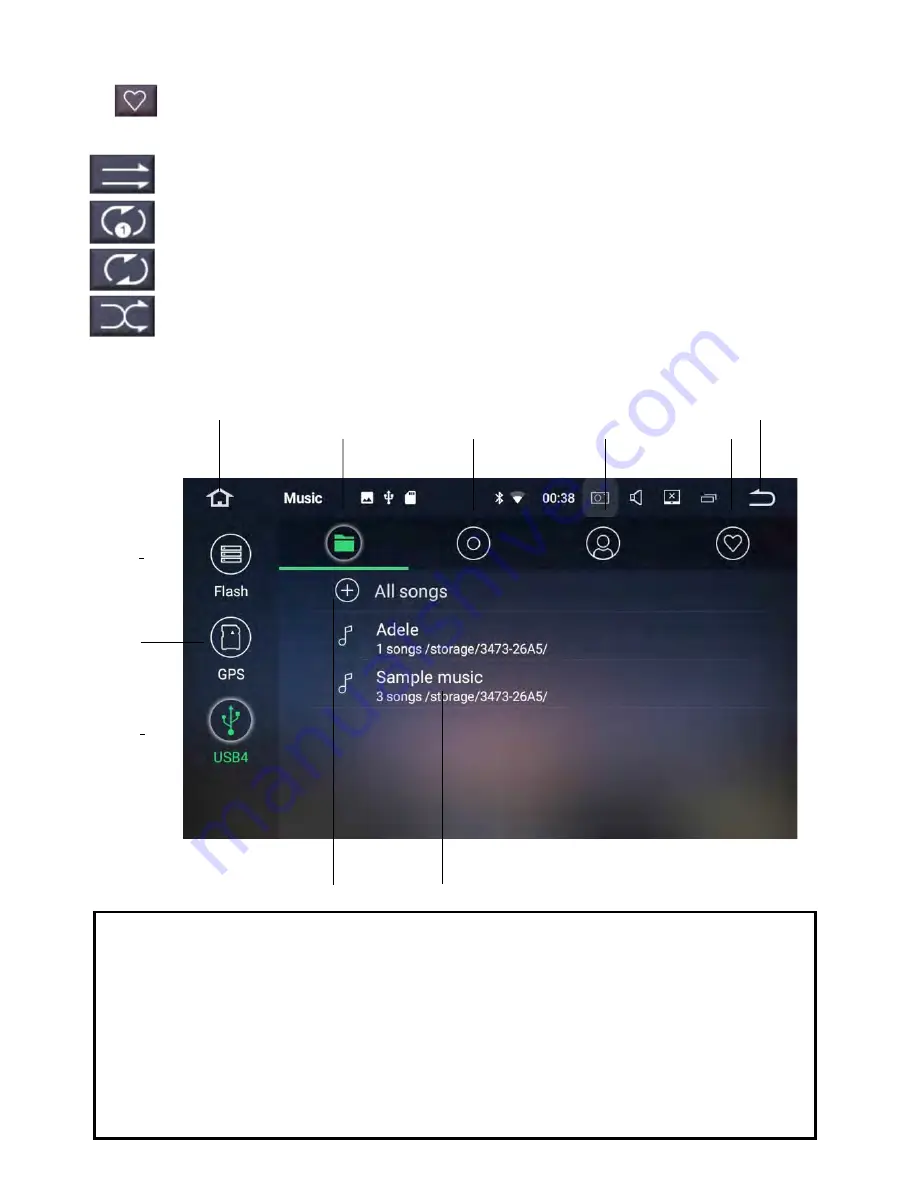
USB   Contents   Menu


1   

2   

3   

4   

5    6   

7          

8   


9          

10   

11   

1.    Home.   

7.    Music   files   found   in   internal   memory.   

2.    Music   Files   /   Folders   .   

8.    Music   files   found   on   SD   card.   

3.    Albums.   

9.    Music   Files   found   on   USB.   

4.    Ar=sts.   

10.    Play   all   the   songs   located   on   the   USB.   

5.    Songs   you   love.   

11.    Select   specific   folder   to   play.   

6.    Back   to   previous   screen.   

Summary of Contents for Universal Maxx

Page 1: ...User manual Owners Manual please read before using this product ...

Page 2: ...amaged or tampered with in any way this includes installing foreign mapping or soIware onto the SD card The installa on of 3rd party apps that may cause harm to the unit Warranty Terms The Universal Maxx is covered for 3 years and includes Defec ve Equipment Defec ve Cables Not Covered under warranty Abuse Improper installation Altera on to Cables includes cuQng of any cables Accidents Water damag...

Page 3: ...features 29 30 Se6ngs 31 34 Multitasking split screen 35 36 AV in Op onal 37 Front Camera Op onal 38 Car play Android Auto Op onal 39 Touch buYon panel 40 Shortcuts 40 Knobs and controls 41 Specifica ons 42 43 What s in the box 44 Wiring Diagram 44 45 Installa on notes 46 Reverse Camera wiring diagram 47 2 Cam opera on wiring diagram 47 Forward Camera wiring diagram 48 Moun ng the unit 48 AYaching ...

Page 4: ...e ini al start up after this the unit will load instantaneously unless reset Once the unit has loaded it will appear with the main menu interface Swipe leF to access more features 4 Please note that some apps have been installed by Polaris via Google Play store ...

Page 5: ...own the Wi Fi symbol un l the Wi Fi seQngs appear Touch the Wi Fi that you wish to connect to and follow the prompts 2 The other way in which you can connect to Wi Fi is to select the seQngs icon select Wi Fi Touch the Wi Fi that you wish to connect to and follow the prompts Please Note If you are connecting to Wi Fi via your personal hotspot you will be using your phones data Connec ng Bluetooth ...

Page 6: ...the device has paired successfully it will move over to the paired devices column You can also connect your bluetooth device by following the normal procedure through your device This usually involves going into your devices bluetooth seQngs and scanning for other bluetooth devices The Universal Maxx s bluetooth ID is Polaris Select Polaris on your device when your device asks you for a passcode p...

Page 7: ...ma cally scan select the magnifying glass icon Automa c scan The unit will run through a complete scan and will automa cally set your pre set sta ons to the radio frequencies with the strongest signal within your area Select a pre set down the bottom of the screen and hold down un l it changes to your desired sta on 7 ...

Page 8: ...Once you have reached your desired station select a pre set down the bottom of the screen and hold down long press un l it changes to your desired sta on For a more in depth view at the radio features please see page 20 21 Date Time Select seQngs from the main menu Scroll down un l you find date time located under system seQngs If you are planning on always being connected to Wi Fi via your mobile ...

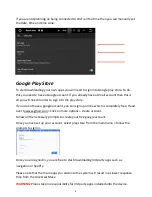
Page 9: ... account you can sign up online which is completely free Head over to www gmail com click on more op ons create account Follow all the necessary prompts to create your free google account Once you have set up your account select play store from the main menu follow the prompts to sign in 9 Once you are signed in you are free to start downloading 3rd party apps such as naviga on or Spotify Please n...

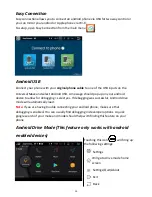
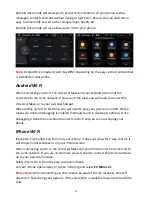
Page 10: ...our android device to allow for debugging select yes If debugging was successful Android drive mode will automa cally load Note If you are having trouble connecting your android phone make sure that debugging is enabled You can usually find debugging in developer op ons A quick google search of your make and model should help with finding this feature on your phone Android Drive Mode This feature on...

Page 11: ...l need to plug your phone in via USB Please make sure Android debugging is enabled normally found in developer op ons Once debugging is done the unit should connect via Wi Fi and you can now unplug your phone iPhone Wi Fi iPhone Wi Fi will allow you to mirror your iPhone It does not allow for 2 way control it will simply mirror whatever is on your iPhone screen When connec ng via Wi Fi the Univers...

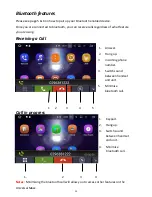
Page 12: ...eature you are using Receiving a Call 1 Answer 2 Hang up 3 Incoming phone number 4 Switch sound between handset and unit 5 Minimise bluetooth call 1 2 3 1 4 2 3 Call in progress 1 Keypad 2 Hang up 3 Switch sound between handset and unit 4 Minimise bluetooth call Notes Minimising the bluetooth call will allow you to access other features on the Universal Maxx 4 12 5 ...

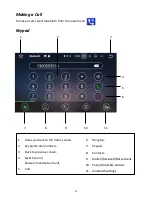
Page 13: ...pad to dial numbers 3 Back to previous screen 4 Switch sound between handset and unit 5 Call 6 Hang Up 7 Keypad 8 Contacts 9 Dialled Received Missed calls 10 Paired Available devices 11 bluetooth seQngs Making a Call To make a call select bluetooth from the main menu 3 13 ...

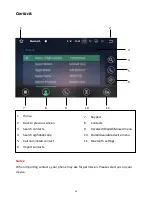
Page 14: ...phabetically 5 Call nominated contact 6 Import contacts 10 11 7 Keypad 8 Contacts 9 Received Dialled Missed menu 10 Paired Available device menu 11 Bluetooth seQngs 3 4 5 6 9 1 Notes When impor ng contacts your phone may ask for permission Please select yes on your device 2 14 ...

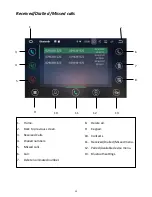
Page 15: ...ls 4 Dialled numbers 5 Missed calls 6 Call 7 Delete nominated number 8 Delete all 9 Keypad 10 Contacts 11 Received Dialled Missed menu 12 Paired Available device menu 13 Bluetooth seQngs 3 4 5 9 10 11 12 13 6 7 8 1 Received Dialled Missed calls 2 15 ...

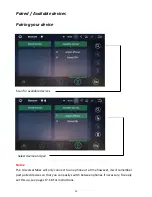
Page 16: ...e Universal Maxx will only connect to one phone at a me however it will remember past paired devices so that you can easily switch between phones if necessary To easily set this up see pages 17 18 For instruc ons 16 Paired Available devices Pairing your device ...

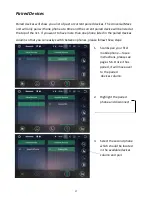
Page 17: ...you want to have more than one phone listed in the paired devices column so that you can easily switch between phones please follow these steps 1 Scan pair your first mobile phone to see instruc ons please see pages 5 6 Once it has paired it will move over to the paired devices column 2 Highlight the paired phone and disconnect 3 Select the second phone which should be located in the available devi...

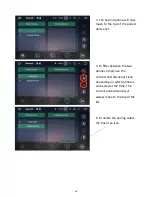
Page 18: ...d device list 5 To filter between the two phones simply use the connect and disconnect icon depending on which phone is connected at the me The current paired device will always move to the top of the list 6 To delete the pairing select the trash can icon 18 ...

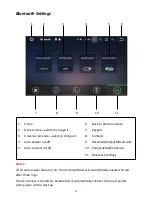
Page 19: ...on off 6 Back to previous screen 7 Keypad 8 Contacts 9 Received Dialled Missed calls 10 Paired Available devices 11 Bluetooth seQngs Notes If the auto answer feature is on The Universal Maxx will automa cally answer the call after three rings If Auto Connect is turned on bluetooth will automa cally connect to the last paired phone upon vehicle start up 6 19 ...

Page 20: ...udio file you were previously listening to on your bluetooth enabled device If you were listening to a playlist you can skip forward and back pause and play through A2DP Notes A2DP is limited in features we recommend that if you use streaming services such as Spo fy or Apple music to download the app directly onto the Universal Maxx Radio The Universal Maxx has AM and FM built into it You can set u...

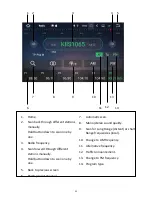
Page 21: ...rward through different stations manually Hold button down to scan one by one 5 Back to previous screen 6 Radio pre set channel 7 Automa c scan 8 Mono stereo sound quality 9 Scan for Long Range distant or short Range frequencies local 10 Change to AM frequency 11 Alterna ve frequency 12 Traffic Announcement 13 Change to FM frequency 14 Program type 21 ...

Page 22: ...y run into the glove box The third USB port is located in the head unit 1 22 2 3 4 5 6 1 Home 2 Back to previous screen 3 Skip back 4 USB contents menu 5 Pause play 6 Skip forward 7 8 9 10 11 7 Song Ar st Album Info 8 Songs you love see notes 9 Shuffle Repeat Repeat All see notes 10 Sound spectrum on off 11 Equaliser presets ...

Page 23: ...t song Repeat all Will play the songs in order and start from the beginning once finished Shuffle Will shuffle all the songs on the USB USB Contents Menu 1 2 3 4 5 6 7 8 9 10 11 1 Home 7 Music files found in internal memory 2 Music Files Folders 8 Music files found on SD card 3 Albums 9 Music Files found on USB 4 Ar sts 10 Play all the songs located on the USB 5 Songs you love 11 Select specific folder t...

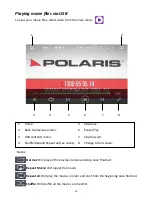
Page 24: ...n 6 Pause Play 3 USB contents menu 7 Skip forward 4 Shuffle Repeat Repeat all see notes 8 Change to full screen Notes Normal Will play all the movies in order and stop once finished Repeat Movie Will repeat the movie Repeat all Will play the movies in order and start from the beginning once finished Shuffle Will shuffle all the movies on the USB 24 ...

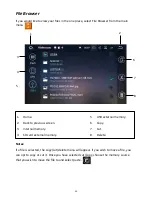
Page 25: ...to previous screen 3 Internal memory 4 SD card external memory 5 USB external memory 6 Copy 7 Cut 8 Delete Notes If a file is selected the copy cut delete menu will appear If you wish to move a file you can opt to copy or cut it Once you have selected cut copy choose the memory source that you wish to move the file to and select paste 25 ...

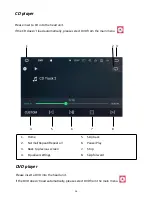
Page 26: ...ect DVD from the main menu 1 2 3 DVD player Please insert a DVD into the head unit If the DVD doesn t load automa cally please select DVD from the main menu 26 4 5 6 7 8 1 Home 5 Skip back 2 Normal Repeat Repeat all 6 Pause Play 3 Back to previous screen 7 Stop 4 Equaliser seQngs 8 Skip forward ...

Page 27: ...reen 3 More op ons 4 Skip back 5 Rewind 6 Pause Play 7 Stop 8 Fast forward 27 9 Skip forward 10 Previous op ons 11 Equaliser seQngs 12 Sub tles on off 13 Change language if applicable 14 Back to main menu 15 Normal Repeat Repeat all 16 Filters through different scenes ...

Page 28: ...rd at the me of purchase Please be aware that the mapping data is provided by HEMA but the soIware is run by OziExplorer To enter into your off road naviga on please enter the OziExplorer app from the main menu For help on how to use the OziExplorer android software please visit www oziexplorer com OziExplorer Android The HEMA maps and Tom Tom maps only require a GPS signal to work No internet conn...

Page 29: ...ck Timer Stopwatch func on GPS Info Displays satellite strength informa on Adobe Reader allows you to view PDF documents Google Chrome Use Google Chrome to browse the internet when connected to Wi Fi Downloads View Manage downloads Gmail View Manage your Gmail account Google Open Google search bar Gallery View Manage photos that are stored in the internal memory 29 ...

Page 30: ...s Google maps for naviga on Google play store Open Google play store for downloading apps onto the unit Voice search Allows you to u lise OK Google with the Universal Maxx Steering wheel study Allows you to reprogram your steering wheel controls if necessary 30 ...

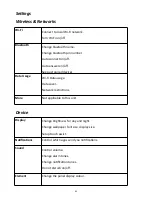
Page 31: ...e past paired devices Data Usage Wi Fi Data usage Data saver Network restric ons More Not applicable to this unit Display Change brightness for day and night Change wallpaper font size display size Setup touch assist NoZfications Control which apps send you no fica ons Sound Control volume Change alarm tones Change no fica on tones Do not disturb on off Element Change the panel display colour ...

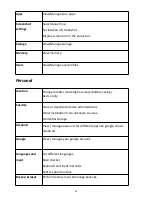
Page 32: ... loca on mode high accuracy battery saving device only Security View or deac vate device administrators Allow installa on from unknown sources Creden al storage Accounts View manage accounts for different apps like google Gmail adobe etc Google View manage your google account Languages and input Set different languages Spell checker Keyboard and input methods Text to speech output Backup reset Per...

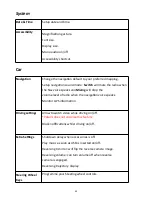
Page 33: ...olume level of radio when the naviga on voice speaks Monitor GPS informa on Driving se ings Allow to watch video while driving on off Polaris does not endorse this feature Block no fica ons whilst driving on off Extra Se ngs Shutdown delay when accessories is off Play music as soon as USB is inserted on off Reversing X mirror will flip the reverse camera image Reversing volume can turn volume off whe...

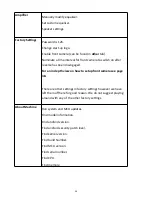
Page 34: ... disengaged For an in depth view on how to setup front camera see page 38 There are other sesings in factory seQngs however we have leI them off here for good reason We do not suggest playing around with any of the other factory seQngs About Machine Run system and MCU updates Find model information Find android version Find android security patch level Find kernel version Find build Number Find MCU...

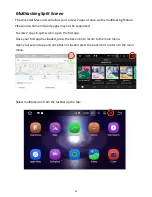
Page 35: ...ase note Some 3rd party apps may not be supported To view 2 apps in split screen open the first app Once your first app has loaded press the back icon to return to the main menu Open your second app and once this has loaded press the back icon to return to the main menu Select mul task icon from the taskbar up the top 35 ...

Page 36: ...nd it should adjust size and appear on the right hand side To exit mul task split screen select the mul tasking icon and the right hand side app will appear with a cross underneath Touch the cross to close the app Simply drag the app that appears on the leI hand side to open in full screen 36 ...

Page 37: ... a toggle switch as it will allow you to override the reverse camera func on If you do not use the control box or some kind of override switch you will not be able to view the trailer camera in reverse as the reverse camera will always override when the vehicle is in reverse If you are seQng up the second camera through our control box please be aware that both cameras will be running through the ...

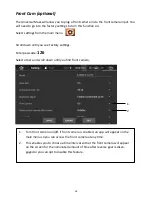
Page 38: ... Factory seQngs Enter passcode 126 Select other and scroll down un l you find front camera 1 2 38 1 Turn front camera on off If front camera is enabled an app will appear on the main menu so you can access the front camera at any me 2 This enables you to choose a me interval so that the front camera will appear on the screen for the nominated amount of time after reverse gear is disen gaged or you ...

Page 39: ...ur phone in with your genuine cable into the dongle Step 3 Select AutoPlay from the main menu Step 4 Apple Car play or Android Auto should appear on screen depending on which phone you have Please note For Android phones you must have the Android Auto app installed on your phone as well TroubleshooZng If you are having trouble with this device unplug your phone and select sesings in the top leI co...

Page 40: ...such as Wi Fi Bluetooth Volume brightness Amplifier speed management seQngs and general seQngs You can also access widgets wallpaper and general seQngs by holding your finger down anywhere on the screen in the main menu interface 1 2 3 4 5 40 1 Standby 2 Volume up 3 Volume down 4 Home 5 Back to previous screen ...

Page 41: ...ernal bluetooth mic 3 CD DVD player slot 4 Micro SD card slot for GPS 5 AUX Not available in AUS Version 6 Screen plug 7 USB input 8 Reset hole 9 Micro SD card slot 10 Slide across to detach screen from double din chassis 11 Eject disc 12 Radio tuner 11 41 12 ...

Page 42: ...DA 7851 Video Decoder 1080P HW DVR USB Camera Screen Hanstar screen GPS frequency 1 6GHz GPS Naviga on Google Maps APP comes pre installed on device Will need to use data from personal hotspot on the road Street Naviga on Australia Wide TomTom Naviga on with iGo Nextgen Software plauorm loaded onto an SD card Off Road Navigation HEMA maps with OziExplorer plauorm loaded onto an SD card GPS Dual Zon...

Page 43: ...onal Extra Car Play Android Auto USB Dongle Car play Android Auto USB dongle available NOTES Optional Extra Bluetooth Function Hands free Yes compa ble with BT 2 0 for most brand phones Import Phonebook Yes with alphabe c search function Stream audio via Bluetooth Yes Supports external microphone Yes included in the unit CD DVD Video Output Range 1 0V 1 2V 75Ω Compa ble Disc DVD DIVX MP4 MP3 MP2 V...

Page 44: ...l vehicles so that the unit becomes plug and play We can try and source it for you or you can source it yourself If you cannot find a secondary harness to fit you can simply cut the ISO plug off and hardwire it into your vehicle Please refer the wiring diagram on page 45 Universal ISO plug 44 No Colour FuncZon 1 Green Speaker LeI Rear 2 Green with black stripe Speaker leI rear 3 White Speaker leI fr...

Page 45: ...Wiring Diagram Please see installation notes on page 46 45 ...

Page 46: ... battery wire directly to the vehicle battery Always secure all wirings with cable clamps or adhesive tape to prevent short circuit Please make sure all wiring connec ons and speaker wires are well insulated When pulling the dash apart please use quality trim tools to avoid damaging your dash Please do NOT cut any plugs off of any Polaris cameras Doing so will void your warranty If you need to blen...

Page 47: ...van setup Yellow Acc Green Reverse Light Blue Reverse in from Maxx see fig 2 Black Ground Camera 1 Camera 2 Not used Control box Video 2 out must be plugged into V2 out to view 2 cameras Micro switch dash mounted Figure 1 Figure 2 Connect to CAM IN on the back of Universal Maxx 47 om Control box Universal Maxx Loom Reversing wire or black stripe need Reverse Light posi Universal Maxx Reverse in Blu...

Page 48: ...he camera directly to another 12 volt power source in the vehicle Moun ng the unit The screen is detachable so it is best to mount the double DIN chassis in the vehicle before attaching the screen The double DIN chassis will attach to most vehicle s OEM brackets Before puQng your dash back together it is best to attach the screen and test all func ons Some vehicles will require a fascia to fill the...

Page 49: ...y detaching and attaching may reduce the life of the Universal Maxx TOUCH SCREEN NOT RESPONSIVE Once you have attached the screen and powered the unit up if you find that the touch screen is non responsive this means that the screen has not been attached properly To rec fy this issue you need to remove constant power before reattaching the screen again The easiest way to do this is to remove posi v...

Page 50: ...in you will s ll have to programme them in please see below Programming in your steering wheel controls Select Wheel Key study from the main menu Select and press one of your steering wheel controls Once you have selected one of your steering wheel controls the following screen will appear You can select a different func on for short press and long press For example if I have selected my mode butt...

Page 51: ...s again Steering Wheel Control func ons 51 Power standby Answer call SeQngs Home main menu Hang up call AV in Back to previous screen Brightness control Equaliser Widgets Ok Google Radio Scans through pre sets Volume Up Stop music movies files Radio Scans Volume Down Skip previous Play Pause music movie files Mode Skip forward Radio Change bands Naviga on Rewind Radio Seek up Radio Fast Forward Radi...

Page 52: ...Dimensions 260mm 155mm 10mm 155mm 100m 177mm 52 ...

Page 53: ...rty app we will do our best to try and help you but unfortunately it is out of our control if a third party app is causing issues with the unit or the app itself is malfunc oning Not all third party apps are going to be compa ble with this device Not all third party apps will work in split screen func on Please ensure that you download third party apps from a reputable source as it possible to cor...

Page 54: ... exhausted all op ons and determines that the unit needs to be sent back for assessment please visit www polarisgps com au warranty returns returns form Please print and fill out the return form and include a copy with the goods For a speedy return process please try and be as detailed as possible when describing the fault 3 Package the item up and send back to TO Polaris ATTN Returns PO Box 7236 S...

Reviews: