


Automist Smartscan
®
Handbook v1.2.3
Plumis Ltd Copyright © 2017. All Rights Reserved.
Page 46 of 64
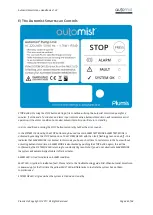
S MA RT SC AN
®
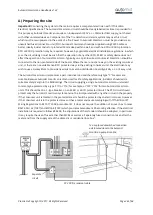
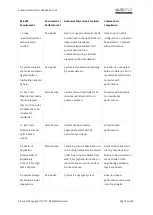
7.
The spray head will now deploy to around 90° position, pointing straight out from the
faceplate.
8.
Connect the commission kit to the spray head
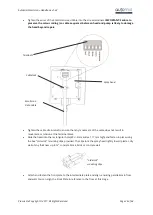
9.
The next step of commission is testing the alarm: within 5 minutes, test the heat alarm or fire
panel output as recommended in its user manual (e.g. press the test button). The alarm will
need to be kept sounding for at more than 12 seconds.
10.
The system will indicate the alarm input by flashing a distinctive LED flash pattern on the head
and the pump will sound an alarm for 20 seconds; but will not run.
11.
After the 20 seconds warning, the pump will run for 60 seconds.
12.
Check the gauge and ensure that the output pressure reaches a stable 75 to 100 bar.
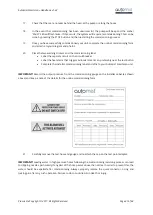
IMPORTANT!
The pump features a cut-out which will disable it if the pressure becomes
excessive, so it is critically important not to leave an installed system with a high out-of-spec
pressure. By leaving an installed system with pressures outside the specified range, you might
become liable for deaths or injuries. If the achieved output pressure is outside the specified
range, refer to the commissioning troubleshooting guide (see page 54) and contact Plumis on
020 7871 3899 if the situation cannot be resolved.
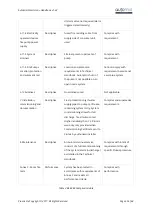
13.
Following a successful pressure test, the high pressure hose must be cleared of water by
connecting a suitable pump to the Plumis supplied attachment, that is connected to the test
point tee.
14.
the commissioning tool and other aids obstructing the spray head should be promptly
removed.
15.
Wipe the head IR sensor (below the nozzle) dry with a dry cloth, to ensure that there is no
water left on the IR sensor.
16.
Press the STOP button again to complete the COMMISSIONING MODE and bring the system to
STANDBY MODE.
The green ‘SYSTEM OK’ LED will now be on constantly.
100
75


